
Yamaha RX-V371 Support Question
Yamaha RX-V371 Support Question
Find answers below for this question about Yamaha RX-V371.Need a Yamaha RX-V371 manual? We have 2 online manuals for this item!
Question posted by dtklap on December 1st, 2012
Unit Shuts Down
while watching a movie the unit powers down when the volume is above -40 when the unit is powered back on it reads check sp wires
Current Answers
Related Yamaha RX-V371 Manual Pages
Owners Manual - Page 2
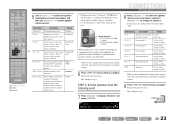
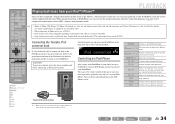
... Playback a test tone 24 STEP 5: Adjust the volume 24
PLAYBACK
Basic playback procedure 25 Adjusting high/low-...audio output function of this unit 45 Setting HDMI functions 46 Making the receiver easier to use 48 Setting sound field program parameters 49 Prohibiting setting changes 49
Setting sound field program parameters 50 Setting sound field parameters 50
Controlling other components...
Owners Manual - Page 3
Speaker cable connection...10 - Volume control for each speaker...43 - Subwoofer cable connection ...12
■ Acoustic ...Speaker impedance configuration...10 - Setting for 2- INTRODUCTION
Features and capabilities
■ Built-in high-quality, high-power 5-channel amplifier
■ 1-button input/sound field program switching (SCENE function 26
■ Speaker connections for speaker ...
Owners Manual - Page 6
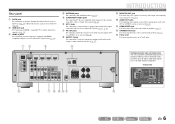
... analog inputs (AV35 or AUDIO1-2) are selected (☞p. 20). k SUBWOOFER jack
For connecting a subwoofer with HDMIcompatible outputs to a TV or other external component. m Power cord
For connecting this unit can receive audio/video signals (☞p. 17, p. 18).
INTRODUCTION
Part names and functions
i MONITOR OUT jack
For connecting a TV capable of receiving video input, and...
Owners Manual - Page 8
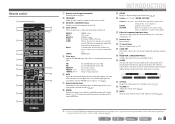
...component operation keys
Operate recording, playback, and menu displays etc. o RECEIVER A (RECEIVER Power)
Switches this unit... for this unit from the ...unit...VOLUME +/-
Adjusts the volume level (☞p. 25). m TV control keys
Operate a monitor such as a TV. Remote control
a b c
d
e f g h i j
k
l
m
SOURCE
1 1 5
TRANSMIT
CODE SET
SLEEP
RECEIVER
HDMI
2
3
4
AV
2
3
4
AUDIO...
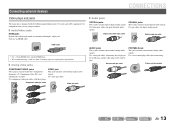
Owners Manual - Page 11

If the speaker cables short circuit, "CHECK SP WIRES!" Connect your speakers to indicate different polarity.
One of two parallel insulated cables. will appear on the front panel display when this unit from the power outlet before connecting the speakers. • Generally speaker cables consist of these cables is switched on the rear panel. CONNECTIONS
Connecting...
Owners Manual - Page 13
... a stereo mini-plug cable when connecting. Use pin cables for components that you are going to the white L jack. Use fiber-optic cables for optical digital audio signals. Connecting external devices
CONNECTIONS
Cable plugs and jacks
The main unit is separated into three components: luminance (Y), chrominance blue (PB), and chrominance red (PR). Only use...
Owners Manual - Page 14
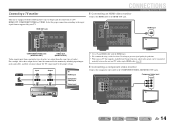
... Channel function, audio/video signals can be connected to the monitor by your TV. Connecting a TV monitor
This unit is equipped with the following three types of jack(s).
For example, these three output devices must be transmitted
mutually between the unit and TV with a single HDMI cable (☞p. 59).
■ Connecting a component video monitor...
Owners Manual - Page 15

.../DVD) HDMI 1
HDMI 2
PB
PB
Y MONITOR OUT
Y COMPONENT
VIDEO
VIDEO
HDMI 3
HDMI 4
MONITOR OUT
V
OPTICAL AV 1
COAXIAL AV 2
COAXIAL
(CD) AV 3
OPTICAL
( TV ) AV 4
AV 5
AV OUT
AUDIO 1
AUDIO 2
AUDIO OUT
Video input
VIDEO V
TV
■ Listening to TV audio
To transmit sound from the TV to the unit are enabled on TV, connect the TV...
Owners Manual - Page 16
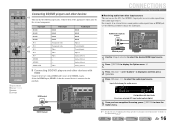
...This unit has the following method to select the audio input source. d Input selector j Cursor C / D / E j ENTER q OPTION
HDMI output
HDMI
HDMI
DOCK COMPONENT
VIDEO...AV
2
3
4
AUDIO
1
2
V-AUX
[ A ]
[ B ] DOCK
TUNER
FM
AM
PRESET TUNING
INFO
MEMORY
MOVIE
ENHANCER SUR.
DECODE MUSIC STEREO
STRAIGHT
BD DVD
SETUP
SCENE
TV
CD
RADIO
OPTION
ENTER
VOLUME
RETURN
DISPLAY
TOP ...
Owners Manual - Page 19
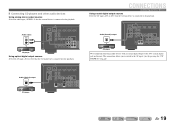
... (☞p. 26). This connection allows you to switch to the AV3 coaxial digital jack on this unit. Audio output
AUDIO L R
DOCK COMPONENT
VIDEO
PR
ARC HDMI OUT
PR
(BD/DVD) HDMI 1
HDMI 2
HDMI 3
HDMI 4
PB
PB
Y MONITOR OUT
Y COMPONENT
VIDEO
VIDEO
MONITOR OUT
L
OPTICAL AV 1
COAXIAL AV 2
COAXIAL
(CD) AV 3
OPTICAL
( TV ) AV 4
R
AV 5
AV...
Owners Manual - Page 20

...) AV 3
OPTICAL
( TV ) AV 4
AV 5
AV OUT
AUDIO 1
AUDIO 2
AUDIO OUT
VCR Audio input
AUDIO L R
Audio recorder
Using the AV OUT jacks Connect this jack to external devices through the AV OUT and AUDIO OUT jacks. Using the AUDIO OUT jacks Connect this jacks to turn down the volume when connecting this unit and the other TVs or external devices...
Owners Manual - Page 23
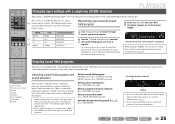
... menu. If necessary, you have completed the settings for one speaker, repeat the same procedure for all speakers to "Small," low-frequency components of the subwoofer. SOURCE
1 1 5
TRANSMIT
CODE SET
SLEEP
RECEIVER
HDMI
2
3
4
AV
2
3
4
AUDIO
1
2
V-AUX
[ A ]
[ B ] DOCK
TUNER
FM
AM
PRESET TUNING
INFO
MEMORY
MOVIE
ENHANCER SUR.
Return to 24.0 m)
Sur.
Owners Manual - Page 25
... to adjust the volume. Set the headphone tone control with the
r
external component for a few ...
SR
2 Press PROGRAM l / h to this unit and select the input source using dInput selector. Adjusting...AUDIO
1
2
V-AUX
[ A ]
[ B ] DOCK
TUNER
FM
AM
PRESET TUNING
INFO
MEMORY
MOVIE
ENHANCER SUR. En 25 DECODE MUSIC STEREO
STRAIGHT
BD DVD
SETUP
SCENE
TV
CD
RADIO
OPTION
ENTER
VOLUME...
Owners Manual - Page 26
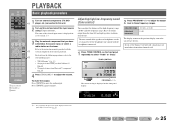
... between the external components that sounds best with one key repeatedly to check what speakers are provided as d playing movies or music. PLAYBACK
SOURCE
1 1 5
TRANSMIT
CODE SET
SLEEP
RECEIVER
HDMI
2
3
4
AV
2
3
4
AUDIO
1
2
V-AUX... unit offers sound field settings (sound field programs) in the same category. Four scenes are stored for that allows you to turn the power ...
Owners Manual - Page 33
... finish this unit. DECODE MUSIC STEREO
STRAIGHT
BD DVD
SETUP
SCENE
TV
CD
RADIO
OPTION
ENTER
VOLUME
RETURN
DISPLAY
...MOVIE
ENHANCER SUR.
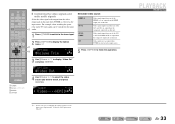
Video signals input from one of the AV3 to display the Option menu. For example, when watching the sports relay on the TV, only audio can be output from either one of the AV1 and AV2 are output from the component output jack on this unit...
Owners Manual - Page 34
...SCENE
TV
CD
RADIO
OPTION
ENTER
VOLUME
RETURN
DISPLAY
TOP MENU
REC
POP... your iPod.
You can check song information on the YDS...COMPONENT VIDEO PR
ARC HDMI OUT
PR
PB
PB
Y MONITOR OUT
Y COMPON
VIDEO
Switch the power...
4
AUDIO
1
2
V-AUX
[ A ]
[ B ] DOCK
TUNER
FM
AM
PRESET TUNING
INFO
MEMORY
MOVIE
ENHANCER SUR. VOL.
k CAUTION To prevent accidents, place this unit. k...
Owners Manual - Page 57
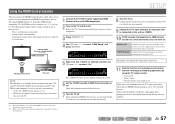
... that "Control" is being properly received by using the TV remote control. • Power On/Off • Volume Control • Switching between audio output devices
If this unit, a TV, and a DVD recorder.
Set the TV's HDMI Control function to operate external components.
3 Press iSETUP. HDMI
VOL. If it is still off, turn it manually. If...
Owners Manual - Page 60
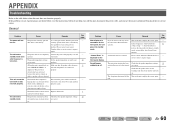
... outlet.
The protection circuitry has been activated because of a countdown on and "CHECK SP WIRES!" "Internal Error" is disabled.
The protection circuitry has been Check that the speaker wires are correct.
The power cable is displayed.) The protection circuitry has been activated because this unit is hung-up due to an external electric shock (such as lightning...
Owners Manual - Page 75

...power cord of this unit from the ends of the speaker cables, and twist the bare wires of the cables together firmly so that the core of the speaker cable does not touch anything or come into contact with an audio pin cable.
2 Set the subwoofer volume...information on this unit with the metal areas of this unit or the speakers. If the speaker cables short circuit, "CHECK SP WIRES!" MIN
MAX
...
Quick Reference Guide - Page 3

...CHECK SP WIRES!" Connecting the banana plug (Except U.K., Europe, Asia and Korea models)
Tighten the knob, and then insert the banana plug into the terminal.
3 Lift the tab to approximately half volume (or slightly less than half).
Volume...:
• Remove the AC power cord of this unit from the ends of the speaker cables, and twist the bare wires of the cables together firmly so...
Similar Questions

Rx-v2095 No Signal Out Of Subwoofer Jack, Sob And Cable Checked Out Good
Plugged sw cable into coaxial did/ld jack by mistake while unit was on
Plugged sw cable into coaxial did/ld jack by mistake while unit was on
(Posted by erffuller 4 years ago)


Configuration Setting Not Saved
When i make some settings on the rx-v1000 and when i power off the unit ans switch it on again, it s...
When i make some settings on the rx-v1000 and when i power off the unit ans switch it on again, it s...
(Posted by shahidayub 12 years ago)