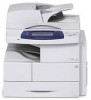
Xerox 4250 Support Question
Xerox 4250 Support Question
Find answers below for this question about Xerox 4250 - WorkCentre - Copier.Need a Xerox 4250 manual? We have 4 online manuals for this item!
Question posted by and6agh on May 10th, 2014
How To Add 9 Prefix Xerox Workcentre 4250
The person who posted this question about this Xerox product did not include a detailed explanation. Please use the "Request More Information" button to the right if more details would help you to answer this question.
Current Answers
Related Xerox 4250 Manual Pages
Quick Use Guide - Page 24
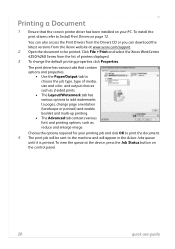
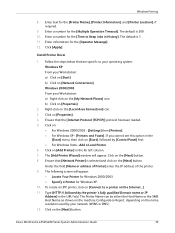
... enlarge image. To view the queue at www.xerox.com/support. 2 Open the document to be sent...Xerox WorkCentre 4250/4260 Series from the Xerox website at the device, press the Job Status button on page 12. The print driver has various tabs that the correct printer... the Paper/Output tab to choose the job type, type of printers displayed. 3 To change page orientation (landscape or portrait) and ...
System Administration Guide - Page 6

... Verify the LDAP Settings 83
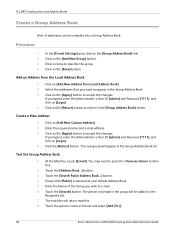
Create a Local Address Book 84 Overview 84 Procedure 84
Add a New Address 85 Export Local Address Book to File 85 Test the Local Address Book 85
...Procedure 86
Add an Address from the Local Address Book 86 Create a New Address 86 Test the Group Address Book 86
9 Server Fax...89
Overview 89 Server Fax and Embedded Fax 89
vi
Xerox WorkCentre 4250/4260 ...
System Administration Guide - Page 7
...
Information Checklist 97 Enable Embedded Fax from Phonebook 103 Setting up a Cover Sheet 104 Setup Fax Options 104 Setup Phonebook Preferences 105 User Preferences 105
Xerox WorkCentre 4250/4260 Series System Administration Guide
vii Automatically 102 Configure the Printer Driver -
System Administration Guide - Page 8
...117 Setting Usage Limits 117 Exceeding Usage Limits 118 Use the Xerox Standard Accounting 119 Optional Step: Create a General Account 119 Overview 119 Account Example 120 Procedure 120
Add Users to the General Account 120
Optional Step: Reset User ...122
14 SMart eSolutions ...125
Overview 125 Information Checklist 125
viii
Xerox WorkCentre 4250/4260 Series System Administration Guide
System Administration Guide - Page 30
..., automatic configuration or a combination of automatic and manual configuration. 10.
Click the [Enabled] checkbox for neighbour discovery and address resolution on the [Protocols] link. 6. Click [Add] to the Router prefix.
18
Xerox WorkCentre 4250/4260 Series System Administration Guide Enter the manual IPv6 address (interfaceID) to append to populate the...
System Administration Guide - Page 35

...detailed below:
GUI Method 1.
Open a [Command] window from the HP-UX workstation. 3. Click on [lp] spooler. 6. Ensure that the following information into the [Add Remote Printer/Plotter] form:
Xerox WorkCentre 4250/4260 Series System Administration Guide
23 Enter sam to access Super User mode. 3. Information Checklist
Before starting the installation procedure, please ensure that you...
System Administration Guide - Page 36
...by entering the command: lp -d queuename /etc/hosts. 11.
Create the print queue by the [Add Remote Printer/Plotter] form. 10. Enter accept queuename to exit Super User mode. 13.
c) Click on ...items are available and/or the tasks have been performed:
24
Xerox WorkCentre 4250/4260 Series System Administration Guide Solaris 2.x
Information Checklist
Before starting the installation procedure, please ...
System Administration Guide - Page 37
... on [Edit:Add:Access to this page. Configure the Client
1. Enter the following information into the [Access to the etc/hosts file. 2.
c) Click on [Browse:Printers]. 5. Enter su to modify the remote
queuename. 9. Enter admintool to complete the form. 7. Click on [OK] to run the Bourne shell. 8. b) Print Server: hostname. Xerox WorkCentre 4250/4260 Series...
System Administration Guide - Page 38
... steps to exit Super User mode. 7. Add the machine printer hostname to the etc/hosts file on page 14 until step 38, then return to the network. 3.
Follow the steps in Chapter 3, Configure Static IPv4 Addressing using either the GUI or the TTY method.
26
Xerox WorkCentre 4250/4260 Series System Administration Guide Define the...
System Administration Guide - Page 39

... access Super User mode. 2. Xerox WorkCentre 4250/4260 Series System Administration Guide
27 Click on [File: Close this directory]. 8. Enter the following information:
a) Printer Name: queuename b) Remote Printer: r c) Hostname: hostname d) If the information has been entered correctly, enter y 4. c) Click on [Save] in as root. 2. Click on [Printer: Add Remote: UNIX...]. 4. Click on...
System Administration Guide - Page 40
....
2. Procedure
1.
Enter ipp://hostname/ipp/printername. Create the Print Queue
1. Enter http://127.0.0.1:631/printers in the [Driver] menu.
28
Xerox WorkCentre 4250/4260 Series System Administration Guide Press [Enter]. 5. In the [Add New Printer] screen enter a name for the printer (optional). 10. Click on [Continue]. 17. Select the correct driver in the Address bar...
System Administration Guide - Page 41
... performed: 1. Click on [Continue]. 19. Xerox WorkCentre 4250/4260 Series System Administration Guide
29 Click on the [Add]. 6. Dynamic Addressing
Information Checklist See Chapter 3,...
Information Checklist Before starting the Installation procedure, please ensure that supports PrintTool.
The [Add a Printer Entry] window will appear. Procedure 1.
Enter printtool. 4. Procedure 1. Log in,...
System Administration Guide - Page 42
...the Print Queue Name from step 10. 15. The printer should now be listed in the [Names] area. 11. To allow access to the printer, edit the [/etc/hosts] table to list the... Add the name of the subdirectory path. 12. Dynamic Addressing
Information Checklist See Chapter 3, Configure Dynamic IPv4 Addressing using the Machine User Interface, Procedure on page 29.
30
Xerox WorkCentre 4250/4260...
System Administration Guide - Page 43
... 3, Configure Dynamic IPv4 Addressing using the Machine User Interface, Information Checklist on page 15.
Xerox WorkCentre 4250/4260 Series System Administration Guide
31 In the [Names] area, enter a name for your print queue. 4. In the [Hostname/IP of Printer] area, enter the hostname or IP Address of Linux support PrintTool. Linux operating system that...
System Administration Guide - Page 47

...
Follow the relevant steps below that Print Services for Unix is loaded 3. If the CD autoruns, click on [Add/Remove Windows Components] in the left hand column. Click on [Add or Remove Programs]. 6.
Xerox WorkCentre 4250/4260 Series System Administration Guide
35 4 Print Drivers
This chapter explains how to your operating system:
Windows XP 1. Double...
System Administration Guide - Page 48

...on [Properties]. 3. Close the [Add/Remove Programs] window.
When you are finished, return to enable the service.
36
Xerox WorkCentre 4250/4260 Series System Administration Guide From ... Click on [Other Network File and Print Services]. d) Click on [Add/Remove Win Components] in Chapter 4, LPR Printing, Install Printer Driver on the [Finish] button. 13. Click on the [Next...
System Administration Guide - Page 49

... on [Automatically detect and install my Plug and Play printer] to deselect it.
• For Windows Vista - [A printer attached to this option in the far left column. NOTE: If already selected, click on [Add Printer].
3. Click on the [Next] button. 8. Click on the [Next] button. 5. Xerox WorkCentre 4250/4260 Series System Administration Guide
37 From the [Start...
System Administration Guide - Page 51
... Panel] first. • For Windows Vista - Xerox WorkCentre 4250/4260 Series System Administration Guide
39 Follow the steps below that the [Internet Protocol (TCP/IP)] protocol has been loaded. 5. b) Click on the Internet...]. 11. Click on the [Next] button. The [Add Printer Wizard] window will appear: • Locate Your Printer for Windows 2000/2003. • Specify...
System Administration Guide - Page 98
...name and e-mail address. 3. If prompted, enter the Administrator's User ID [admin] and Password [1111], and click on [Add New Address from the Local Address Book
1. The new group will return matches. 8. Touch the [Search Public Address Book...] ... the changes. The machine will appear in the list and select [Add (To:)].
86
Xerox WorkCentre 4250/4260 Series System Administration Guide
System Administration Guide - Page 117
...Resolution] drop-down menu. 34.
Xerox WorkCentre 4250/4260 Series System Administration Guide
105
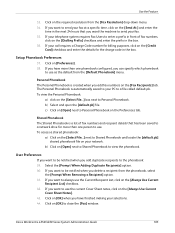
Click on the [Fax Recipients] tab. If you add duplicate recipients to send your network.
.... Click on [OK] to view the phonebook. b) Click on the [Dialling Prefix] checkbox and enter the prefix in the box. 36. Select the [Prompt When Adding Duplicate Recipients] option. ...
Similar Questions

How To Check Workcentre 4250 Firmware Update
(Posted by baninja 9 years ago)

How Do I Add A Email For Scanning On A Xerox Workcentre 4250
(Posted by nomhen 10 years ago)

Xerox Workcentre 4250 Can You Add Fax
(Posted by dewdrapu2 10 years ago)

How To Print Delete Jobs On Xerox Workcentre 4250
(Posted by vicmadhuber 10 years ago)

Workcentre 4250 Xerox Copier Jam Why
(Posted by mwoojedda 10 years ago)