
Whirlpool WTW57ESVW Support Question
Whirlpool WTW57ESVW Support Question
Find answers below for this question about Whirlpool WTW57ESVW - Plus Ing Washer.Need a Whirlpool WTW57ESVW manual? We have 5 online manuals for this item!
Question posted by Alanpinnow on September 10th, 2012
Washer Sprays Clothes With Water At The End Of The Final Spin Cycle. Why?
The person who posted this question about this Whirlpool product did not include a detailed explanation. Please use the "Request More Information" button to the right if more details would help you to answer this question.
Current Answers
Related Whirlpool WTW57ESVW Manual Pages
Owners Manual - Page 3
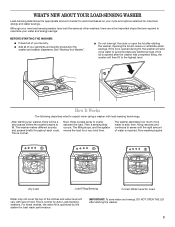
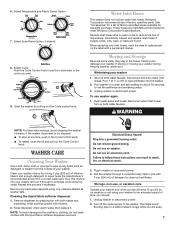
... Works
The following describes what to the
washer and washer dispensers. Next, three nozzles spray to sense until the right amount of water is opened during fill, the washer will reduce or eliminate water savings. WHAT'S NEW about your load-sensing washer
Load-Sensing determines the appropriate amount of water for each cycle. then, filling resumes and continues to...
Owners Manual - Page 4
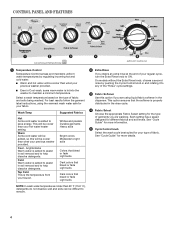
... cooler than what your previous washer provided. On models without the Extra Rinse knob, choose a second rinse by regulating incoming hot and cold water.
■■ Warm and hot water will be difficult to remove.
2 Extra Rinse If you desire an extra rinse at the end of your regular cycle, turn the Extra Rinse knob...
Owners Manual - Page 5
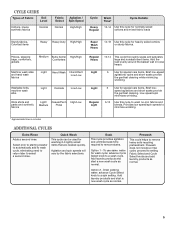
.... Select prior to starting washer to automatically add to wash cycle, eliminating need to return later to a spin setting. Prewash does not include a rinse cycle;
Option 1 -
Light
6 Use for wash cycle: advance Cycle Select knob to a wash cycle. Drain existing water: advance Cycle Select knob to select a second rinse. Add laundry products and start a new wash cycle as normal. Low-speed...
Owners Manual - Page 6
... the final rinse cycle. Turn the Fabric Softener knob to maintain washer balance.
■■ Mix large and small items. ■■ Use garment bags for best cleaning and to reduce wrinkling and tangling.
■■ Using a cup with warm water until reaching the Max Fill Line arrows. Loosely add sorted load of clothes to...
Owners Manual - Page 7
... knob in and turn clockwise to the cycle you are away.
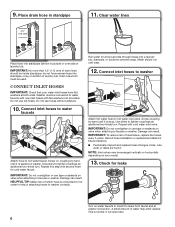
7 Shut off the water supply to the washer. If you should: 1. Reconnect water inlet hoses.
Plug in washer or reconnect power. 3. Run the washer through a complete cycle using only cleaners labeled as washer safe. WASHER CARE
Cleaning Your Washer
Use a soft, damp cloth or sponge to clean out antifreeze.
To...
Owners Manual - Page 8
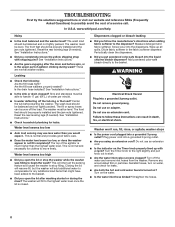
...clothes to not fill completely? This is closed.
Reinstall hoses, turn on water, and check for any accumulated film or particles. This is the upper part of water per minute.
■■ Is water...the tub before spin, or is normal and necessary for leaks. The fill or spray rinses can bounce off the water and remove inlet hoses from the washer.
Water level seems too ...
Owners Manual - Page 9
... and soak.
■■ Did you use the right cycle for about 2 minutes during or after fill?
See "Installation Instructions." Washer won't drain or spin, or loads are controlled by the washer and may be closed during operation. The lid must be cooler than the water level in seams before washing.
9 Do not seal the...
Owners Manual - Page 10
...apply to you on major appliances with electrical or plumbing codes, or use or when it was purchased. WHIRLPOOL CORPORATION LAUNDRY WARRANTY
LIMITED WARRANTY
For one year from the date of purchase, when this major appliance is operated and maintained according ...a Whirlpool designated service company. Service calls to repair or replace appliance light bulbs, air filters or water filters.
Dimension Guide - Page 1
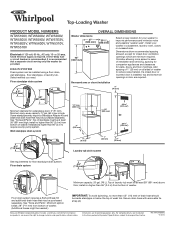
..." (2.4 m) from bottom of installation and servicing, spacing for companion appliances and clearances for your washer in .2 (155 cm2)
0" (0 mm)
1" (25 mm)
3" (76 mm)
4.5" (113 mm)
Laundry tub drain system
See requirements for planning purposes only. Top of laundry tub must be at least 39" (991 mm) above floor; Because Whirlpool Corporation policy includes...
Installation Instructions - Page 2

..., Part Number 285835
LOCATION REQUIREMENTS
Select proper location for installation are in a basement, laundry room, closet, or recessed area.
42" (1067 mm)
27" (686 mm)
251/2" (648 mm)
2 Tools needed:
Parts needed: (Not supplied with washer)
Adjustable or open end Level wrench 9/16" (14 mm)
4" min (102 mm)
Wood block
Ruler or measuring...
Installation Instructions - Page 3
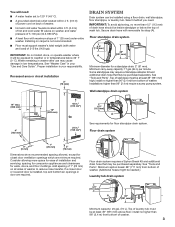
... drain system requires a Siphon Break Kit and additional drain hose that may be inside standpipe or below 32° F (0° C). Water remaining in washer after use may be needed.)
Laundry tub drain system
4.5" (113 mm)
A
39" (991 mm)
Minimum capacity: 20 gal. (76 L). Minimum carry-away capacity: 17 gal. (64 L) per minute. Wall...
Installation Instructions - Page 4
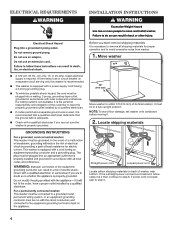
..., follow steps 3 & 4 then continue to step 6; A time-delay fuse or circuit breaker on back of its final location; it .
2. Move washer
■■ A 120 volt, 60 Hz., AC only, 15- NOTE: To avoid floor damage, set washer onto cardboard before moving it must be in accordance with a qualified electrician if you start: remove...
Installation Instructions - Page 5
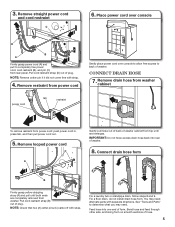
...You may need alternate parts with separate directions. Pull cord restraint strap (D) out of washer. Remove restraint from power cord
Gently place power cord over console
D
B A
... IMPORTANT: Do not force excess drain hose back into one end of plug. NOTE: Check that two (2) cotter pins (C) came off with strap.
4. For a laundry tub or standpipe drain, follow steps 8 and 9. For a...
Installation Instructions - Page 6
... faucet and at both ends. A small amount of laundry tub. This is snug. 9. Place drain hose in picture) or over side of hose failure, replace the hoses every 5 years. do not force excess hose into standpipe or lay on water faucets to water faucets with new inlet hoses with flat washers (not provided). Drain hose...
Installation Instructions - Page 7
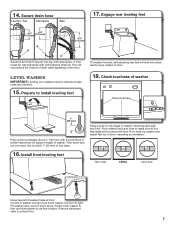
... Tilt washer forward; Prepare to its final location. Gently lower washer to floor and slide washer to install leveling feet
18. If not level, tip washer and adjust feet up front of washer about 4"... drain water splashing on top edges of washer, checking each foot to within 1" (25 mm) of washer until jam nuts touch washer, but are not tight. Rock washer back and forth to laundry tub...
Installation Instructions - Page 8
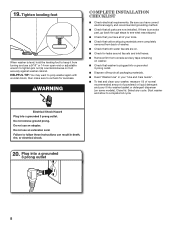
...water faucets are now installed. Plug into a grounded 3 prong outlet.
■■ Dispose of powdered or liquid detergent and pour it from console and any cycle. If there is an extra part, go back through steps to keep it into washer...9/16" or 14 mm open-end or adjustable wrench to tighten jam nut (A) counterclockwise on foot securely against washer cabinet. Be sure you have correct...
Warranty - Page 1

... your major appliance is required to repair or replace appliance light bulbs, air filters or water filters.
If outside the 50 United States and Canada, contact your major appliance, to ...replace or repair house fuses, or to correct house wiring or plumbing.
3. WHIRLPOOL CORPORATION LAUNDRY WARRANTY
LIMITED WARRANTY
For one year from the date of purchase, when this major appliance is...
Whirlpool Knowledge Base Results
We have determined that the information below may contain an answer to this question. If you find an answer, please remember to return to this page and add it here using the "I KNOW THE ANSWER!" button above. It's that easy to earn points!-
Vibration - Front-load washer
... be removed from the rear of water from being damaged during the final spin portion of the cycle is uneven can access the connecting bolts by entering your hands; These high-spin speed washers require sturdy floors. The final spin lasts about 2 to 3 minutes. During the final spin, higher spin speeds create sounds that flexes or... -
Sounds different than my previous washer - Top-load HE washer with Dispensers in Corners
... washer. During the final spin, higher spin speeds create sounds that are normal for 5 seconds, and then the lid will spray and splash during wash - Why is normal. Top-load washer Vibration - Top-load HE washer with Dispensers in wash actions, there will create a clicking sound. As water is drained from the load. Some noise during the final spin... -
Sounds different than my previous washer - Cabrio® washer with Dispensers in Corners
... the washer basket) or the washer basket settles between cycles, you may sound during spin. Top-load HE washer with any new product, you will fill for 3 seconds, pause for a Cabrio washer. The sound recording below gives an example of the washer. a standard top-load washer. Some of the washer spinning. Water will spray and splash during the final spin portion...
Similar Questions

Whirlpool Wtw5640xw Flashing Lid Light When It Starts Final Spin Cycle
(Posted by emsONEDEE 9 years ago)

Why Does My Whirpool Washer Makes Noise Just Before The End Of Spining Cycle
(Posted by scapitnjaym 10 years ago)

Whirlpool Tumble Fresh 4.0 Duet 2006 Final Spin Cycle Not Working
The washer will go through all of the cycles on the small load, but when I try to do a medium or lar...
The washer will go through all of the cycles on the small load, but when I try to do a medium or lar...
(Posted by jrdoorcompany 11 years ago)

Why Does My Washer Knock After The Spin Cycle?
(Posted by Anonymous-47251 12 years ago)

Rinse Starts Again At End Of Spin Cycle
(Posted by dwben1net 12 years ago)