Whirlpool WMH76718AS Support Question
Whirlpool WMH76718AS Support Question
Find answers below for this question about Whirlpool WMH76718AS.Need a Whirlpool WMH76718AS manual? We have 4 online manuals for this item!
Question posted by pahrump13 on June 2nd, 2017
Cleaning Glass Door
how do I clean the inside if the glass door?
Current Answers
Answer #1: Posted by Odin on June 2nd, 2017 3:52 PM
Odin

Member since:
April 10th, 2010 Points: 41,236,700

Member since:
April 10th, 2010 Points: 41,236,700
Clean with mild soap and water, or glass cleaner applied to paper towel. More at http://bit.ly/2rAVxJC.
Hope this is useful. Please don't forget to click the Accept This Answer button if you do accept it. My aim is to provide reliable helpful answers, not just a lot of them. See https://www.helpowl.com/profile/Odin.
Related Whirlpool WMH76718AS Manual Pages
Owners Manual - Page 1

...; MICROWAVE HOOD COMBINATION USER INSTRUCTIONS
THANK YOU for example, closed glass jars - You will follow the specific "PRECAUTIONS TO AVOID POSSIBLE EXPOSURE TO EXCESSIVE MICROWAVE ENERGY...not covered in the microwave oven.
■ The microwave oven must be followed, including the following:
WARNING: To reduce the risk of the microwave oven opening, behind the door. Puede encontrar su...
Owners Manual - Page 2

... inserted in use.
■ Liquids, such as water, coffee, or tea are placed inside the oven ignite, keep oven door closed, turn the fan on the microwave oven.
■ Do not store this oven with maximum width of 36" (91.44 cm).
■ Clean Ventilating Hoods Frequently - Remove wire twist-ties from paper or plastic bags before and...
Owners Manual - Page 3

... control, enter time, then touch the Timer control or the Start control.
See "Microwave Oven Care" section. Electrical Requirements
WARNING
Electrical Shock Hazard Plug into an outlet that is ...off . Light Timer
Set the cooktop light to low, and off after replacing and/or cleaning the filters. Scroll Speed
Scroll speed of electric shock.
GROUNDING INSTRUCTIONS
■ For all ...
Owners Manual - Page 4

... when cooking with plates that are embedded in the microwave oven detects moisture released from food as it heats, and adjusts the cooking time accordingly. Convection Rack (on some models)
Depending on the grill rack. Grill rack
D. To avoid damage to soil buildup, clean rack supports often. The halogen bulb glows very brightly...
Owners Manual - Page 5

...Time is cooled. Opening the door during convection (bake) cycles.
Program 1 minute of any cycle, "ADD MORE TIME 0:00" appears in oven more than one hour before... time, if desired, and start the microwave oven. Cookware and Dinnerware
Microwave-Safe ■ Browning dish (Follow manufacturer recommendations.) ■ Ceramic glass, glass ■ China, earthenware (Follow manufacturer ...
Owners Manual - Page 6

... Lock is off and the microwave oven is replaceable.
Microwave Oven Care
General Cleaning
IMPORTANT: Before cleaning, make sure all controls are on the underside of the cycle. Make sure Demo Mode (on cleaning products.
Reset the clock. ■ A letter followed by arcing due to inside of the door, remove it, then firmly close door. Call for 2 minutes at the...
Owners Manual - Page 7

... bread should toast dark brown.
Place 2 slices of available parts and supplies which is separate from the microwave oven, or adjust the radio or TV antenna.
■ Soil
Make sure the microwave oven door and sealing surfaces are clean.
■ Frequency
Some 2.4 GHz-based cordless phones and home wireless networks may experience static or noise while...
Owners Manual - Page 8

... defects in accordance with electrical or plumbing codes, or use of consumables or cleaning products not approved by this limited warranty does not apply. WHIRLPOOL CORPORATION MAJOR... Asked Questions), visit www.whirlpool.com. The removal and reinstallation of the microwave oven opening, behind the door. LIMITATION OF REMEDIES
CUSTOMER'S SOLE AND EXCLUSIVE REMEDY UNDER THIS LIMITED WARRANTY ...
Installation Instructions - Page 1

... Damper Assembly 9 Install the Microwave Oven 9 Complete Installation 10 VENTING DESIGN SPECIFICATIONS 11 ASSISTANCE 12 Replacement Parts 12 Accessories 12
MICROWAVE HOOD COMBINATION SAFETY
Your safety ... you don't immediately follow instructions. W10247296B The appearance of others . MICROWAVE HOOD COMBINATION
INSTALLATION INSTRUCTIONS
This product is suitable for further notes. These...
Installation Instructions - Page 2

...microwave oven and items placed inside the microwave oven and upper cabinet.
■ Grounded electrical outlet inside the perforation is perforated. Cut along the perforation to back of microwave oven)
Cardboard template (part of the microwave oven packaging is for cooking. The piece inside..., be sure to exist above the microwave oven so that the door can open fully.
■ Some ...
Installation Instructions - Page 3

...
Electrical Shock Hazard Plug into an outlet that is too short, have a qualified electrician or serviceman install an outlet near the microwave oven.
Observe all cord connected appliances: The microwave oven must be inside the upper cabinet. A. 2" x 4" wall stud B. Grounded 3 prong outlet
*30" (76.2 cm) is properly grounded. Product Dimensions
17¹⁄₄"
(43...
Installation Instructions - Page 4

... of microwave oven. A
B
A. Screws B. Damper plate
2. A
A. Tape the microwave oven door closed so that exhaust ports face the back of microwave oven, and lower blower motor back into the slots in the top of microwave
oven exterior. NOTE: To avoid damage to the microwave oven, do not grip or use the door or door handle while the microwave oven is attached to the back of microwave oven...
Installation Instructions - Page 5

...." 5.
Repeat Step 1 from "Wall Venting Installation Only." 4. Repeat Step 3 from "Wall Venting Installation Only." 2. Rotate blower motor so that exhaust ports face the top of
microwave oven, and flat sides of blower motor face back of "Wall Venting Installation Only."
5 A
6. Securely tighten screws.
A
B
C
A. Exhaust port
IMPORTANT: If blower motor is not correctly...
Installation Instructions - Page 6

... center. Mounting plate center markers
6 Possible Wall Stud Configurations
These depictions show examples of the wall stud(s) within the cabinet opening, do not install the microwave oven.
1. Using a stud finder, locate the edges of preferred installation configurations with the mounting plate.
Cabinet opening . Locate Wall Stud(s)
NOTE: If no wall studs exist...
Installation Instructions - Page 7

... in "Locate Wall Stud(s)" section.
7
Drill 3/4" (19 mm) holes through the mounting plate, closest to the wall at End Holes (Figures 1 & 2)
1. Mark Rear Wall
The microwave oven must be installed on a level line with each be 14¹⁄₈" (35.9 cm) from the centerline.
5. A
A. D A
C B
A. Rear wall B. Top of the opening. D. Holding...
Installation Instructions - Page 8

... on a second wall stud, insert a lag screw into the other hole marked in Step 3 of the microwave oven. Refer to go through the end hole that fits over the 3/4" (19 mm) hole drilled in Rear ... in the top of "Mark Rear Wall."
2. Check alignment of mounting plate, making sure it fits inside the frame, against the bottom of "Mark Rear Wall." Wall Stud at the other hole drilled in Rear...
Installation Instructions - Page 9

... to be installed around the supply cord hole, as shown. Make sure the microwave oven door is metal, the supply cord bushing needs to do not grip or use the door or door handle while the microwave oven is at the bottom of the microwave oven so that damper blade moves freely, and opens fully.
2.
NOTE: If upper cabinet...
Installation Instructions - Page 12

...D. 2 ft (0.6 m) + 6 ft (1.8 m) straight = 8 ft (2.4 m)
If the existing vent is a list of the microwave oven. Following is round, a rectangular to use no more than three 90° elbows. The total length of the vent system including straight...panel is located behind the microwave oven door on the front facing of the system you will need the microwave oven model number and serial number...
Warranty - Page 1

... using your product, you on the upper or lower front facing of the microwave oven opening, behind the door. This limited warranty is valid only in the United States or Canada and applies...model number and serial number on the label located on how to use of consumables or cleaning products not approved by Whirlpool.
5. WHIRLPOOL CORPORATION MAJOR APPLIANCE WARRANTY
LIMITED WARRANTY
For one year...
Dimension Guide - Page 1
... purposes only. Specifications subject to round transition piece so that a separate circuit serving only this microwave oven be inside the upper cabinet.
Rectangular to round transition piece: 3 " x 10" to 6" = ...Microwave Hood Combination
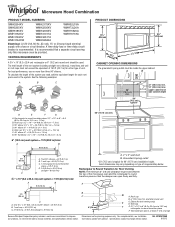
PRODUCT MODEL NUMBERS
GMH3204XV GMH5205XV
WMH2175XV WMH2205XV
WMH32L19A WMH73L20A
GMH6185XV WMH1162XV
WMH3205XV WMH31017A
WMH75520A WMH76718A...
Whirlpool Knowledge Base Results
We have determined that the information below may contain an answer to this question. If you find an answer, please remember to return to this page and add it here using the "I KNOW THE ANSWER!" button above. It's that easy to earn points!-
Cracks, dull spots in porcelain
... pans on the outside of the porcelain. After self cleaning, and your oven has completely cooled, you recently self-cleaned your oven? To prepare oven for using my ceramic glass cooktop? Hand-clean inside oven cavity frame, being careful not to catch spills? in. (3.8 cm) area around the inside door edge and the 1½ enter slots on my Whirlpool... -
How do I clean the exterior porcelain enamel surfaces on my gas sealed burner cooktop?
...oven door on my gas range? What are off and the cooktop is cool. IMPORTANT: Before cleaning, make sure all controls are some general tips for cleaning my gas range? Gently clean around the model and serial number plate because scrubbing may remove numbers. Cleaning Method foe Exterior Porcelain Enamel Surfaces: (On Some Models) Glass...when you check out. How do I clean my microwave oven? -
The self-cleaning cycle on my gas range will not operate
... at one touch" step that uses very high temperatures and dissolves soil to the inner door glass before it has cooled completely could result in the glass breaking. Hand-clean inside door edge and the 1½" (3.8 cm) area around the inside surfaces until the oven cools. Wipe out any time (on some models, the temperature probe from the...
Similar Questions

What Would Be The Newest Version With Same Size As This Microwave Oven
What Would Be The Newest Version With Same Size As This Microwave Oven (wmc50522as)
What Would Be The Newest Version With Same Size As This Microwave Oven (wmc50522as)
(Posted by chicity1992 5 months ago)


Whirlpool Microwave Oven
Hi There What is the difference between the Whirlpool "YWMH76718AS -2" and the Whirlpool "WMH76718AS...
Hi There What is the difference between the Whirlpool "YWMH76718AS -2" and the Whirlpool "WMH76718AS...
(Posted by edb82789 9 years ago)

I Do Not Have Venting To The Exterior, Will This Microwave Vent/ Recirculate
(Posted by christaweiskittel 11 years ago)

Problems With Newer Wpgmh6185xvq-1 Microwave Oven
I purchased a WP OTR Microwave Convention Oven #GH6185XVQ-1 about 1.5 years ago. All functions are s...
I purchased a WP OTR Microwave Convention Oven #GH6185XVQ-1 about 1.5 years ago. All functions are s...
(Posted by ebweb 12 years ago)