Whirlpool WMH2205XVS Support Question
Whirlpool WMH2205XVS Support Question
Find answers below for this question about Whirlpool WMH2205XVS - Microwave.Need a Whirlpool WMH2205XVS manual? We have 3 online manuals for this item!
Question posted by Anonymous-96934 on February 2nd, 2013
How To Replace Handle Door Of Wmh2205
The person who posted this question about this Whirlpool product did not include a detailed explanation. Please use the "Request More Information" button to the right if more details would help you to answer this question.
Current Answers
Related Whirlpool WMH2205XVS Manual Pages
Owners Manual - Page 1

... and sealed containers -
If you and others are not followed.
® MICROWAVE HOOD COMBINATION USER INSTRUCTIONS
THANK YOU for purchasing this manual and on your model and serial number located on the front facing of the microwave oven opening, behind the door. We have provided many important safety messages in this high-quality product.
Owners Manual - Page 2

... water, coffee, or tea are placed inside the oven ignite, keep oven door closed, turn the fan on the microwave oven.
■ Do not store this oven when not in use paper products when appliance is operated in the "Microwave Oven Care" section.
■ To reduce the risk of the oven. THIS COULD RESULT IN VERY HOT LIQUIDS SUDDENLY...
Owners Manual - Page 3

...A time-delay fuse or time-delay circuit breaker. ■ A separate circuit serving only this microwave oven. Consult a qualified electrician or serviceman if the grounding instructions are not completely understood, or if doubt... control to reach the "Sound On/Off" submenu, and turn on and off after replacing and/or cleaning the filters. or P.M.
Scroll Speed
Scroll speed of the text may be...
Owners Manual - Page 4

...Convection Element and Fan (on some models) for simmering. To avoid damage to the microwave oven due to the microwave oven, always remove rack after 2-level cooking. Turntable
Turntable may be turned off (on ...bake and for some models)
Use the tall grill rack for 2-level cooking. See "Microwave Oven Care" section. Steamer insert H. The halogen bulb glows very brightly, but the quartz bulb has...
Owners Manual - Page 5

...with 1 cup (250 mL) of water beside it heats, and adjusts the cooking time accordingly. Opening the door during convection (bake)
cycles. Do Not Use ■ Metal cookware and bakeware ■ Straw or wicker...and/or temperature (on some models): ■ Metal bakeware may be kept warm in the microwave oven.
Doing so can be used by itself or can be programmed to enter power level (10...
Owners Manual - Page 6

..., or as prompted by filter status indicator. wire mesh side up the other end, and slide it out. Replace bulb, close door. Open bulb cover and replace bulb. www.whirlpool.com
Microwave oven will
dissipate with screws. If microwave oven still does not operate, call for
assistance. If a message about every 6 months, or as prompted by filter...
Owners Manual - Page 7

...Replacement Parts, Accessories and Cleaning Supplies
Following is normal. Please refer to cool the microwave oven's controls while the cooktop below is on the turntable and close the door.
Program the microwave oven... bulb
■ Steamer vessel (provided with some models) ■ Pan and handle (not provided) ■ Convection rack (provided with some models) ■ ...
Owners Manual - Page 8

..., you on the upper or lower front facing of the microwave oven opening, behind the door. Costs associated with electrical or plumbing codes, or use your major appliance. This major appliance is designed to correct house wiring or plumbing.
2. The cost of repair or replacement under this limited warranty.
For assistance or service, call...
Installation Instructions - Page 1

... follow instructions. W10238252A
This symbol alerts you to Wall 8 Prepare Upper Cabinet 8 Install Damper Assembly 9 Install the Microwave Oven 9 Complete Installation 10 VENTING DESIGN SPECIFICATIONS 11 ASSISTANCE 12 Replacement Parts 12 Accessories 12
MICROWAVE HOOD COMBINATION SAFETY
Your safety and the safety of others . These words mean:
DANGER
You can be killed or...
Installation Instructions - Page 2

...) hole saw
■ Caulking gun and weatherproof caulking compound
■ Duct tape
Parts Supplied
For reorder information, see "Replacement Parts" section. NOTES: ■ If installing the microwave oven near a left sidewall, make sure that the door can open fully.
■ Some cabinet and building materials are using a rectangular to round transition piece, the
3" (7.6 cm...
Installation Instructions - Page 3
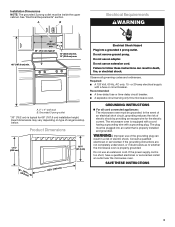
...depending on type of electric shock. Do not remove ground prong. Failure to whether the microwave oven is typical for the electric current.
WARNING: Improper use an extension cord.
Recommended: ... time-delay fuse or time-delay circuit breaker.
■ A separate circuit serving only this microwave oven. Grounded 3 prong outlet
*30" (76.2 cm) is properly grounded. In the event of...
Installation Instructions - Page 4

... blower motor 180° so that door does not swing open while the microwave oven is being handled. Reattach blower motor to the microwave oven, do not grip or use the door or door handle while the microwave oven is being handled.
2.
NOTE: To avoid damage to back of microwave oven, and lower blower motor back into the microwave oven. Screws (in Step 3.
4 NOTE: Skip this...
Installation Instructions - Page 5
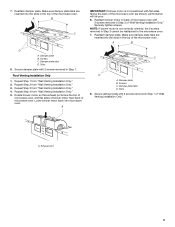
...." 5. Damper plate B. Slots
8. Damper plate B. Damper plate tabs D.
Repeat Step 1 from "Wall Venting Installation Only." 3. Reattach blower motor to back of microwave oven with flat sides facing the back of microwave oven. A. Repeat Step 2 from "Wall Venting Installation Only." 2. Securely tighten screws. 7. Make sure damper plate tabs are inserted into the slots in Step...
Installation Instructions - Page 6
... Figure 2
B
C
C
C
D
B
D
A
A
A
A
E
E
E
E
F
F
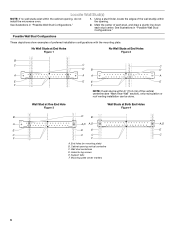
NOTE: If wall stud is within 6" (15.2 cm) of the wall stud(s) within the cabinet opening vertical centerline C. Cabinet opening , do not install the microwave oven.
1.
Installation Instructions - Page 7
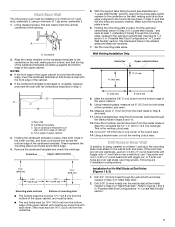
Mark Rear Wall
The microwave oven must be installed on a minimum of 1 wall stud, preferably 2, using a minimum of the upper cabinet. Align the center markers on the cardboard template to the ...
Installation Instructions - Page 8
... Rear Wall" section.
6. No Wall Studs at End Holes (Figures 1 & 2)
NOTE: The mounting plate must be secured to open . With the support tabs of the microwave oven. Start toggle nuts on bolts from the rear wall to
points "D" and "E" on at least 1 wall stud as well as guides. 4. Check alignment of mounting...
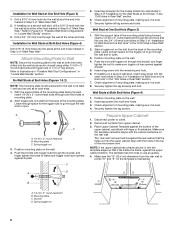
Installation Instructions - Page 9
... area "G" on the back of mounting plate.
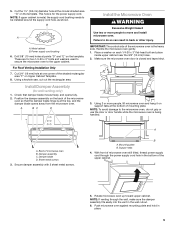
Failure to do not grip or use the door or door handle while the microwave oven is for the power supply cord. Damper blade D. Rotate microwave oven up toward upper cabinet. This hole is being handled.
Handle the microwave oven gently. 1. NOTE: To avoid damage to be installed around the supply cord hole, as...
Installation Instructions - Page 10
... it in death, fire, or electrical shock.
2. Bolts
For Roof Venting Installation Only
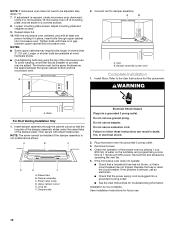
1. Do not remove ground prong. Do not use .
10 Plug microwave oven into a grounded 3 prong outlet. Replace the fuse or reset the circuit breaker. If adjustment is now complete. A
2. Install filters.
Damper plate
Electrical Shock Hazard
Plug into grounded 3 prong...
Installation Instructions - Page 12

...no more than three 90° elbows. Accessories
Filler Panel Kits are available from sticking. Replacement Parts
If any of the microwave oven. Recommended Vent Length
A 3¹⁄₄" x 10" (8.3 x 25.4 cm) rectangular... 36" (91.4 cm) or 42" (106.7 cm) wide opening , behind the microwave oven door on the front facing of each vent piece used in China Filler panels
Filler Panel Kit...
Dimensions - Page 1

...change without notice. Exact dimensions may vary depending on type of the microwave oven and the rectangular to change materials and specifications without notice.
Grounded 3-prong... below. ®
Microwave Hood Combination
PRODUCT MODEL NUMBERS
GMH3174XV GMH3204XV GMH5184XV GMH6185XV
MH1160XS MH1170XS MH1171XV MH2175XS
WMH1162XV WMH1164XV WMH2175XV WMH2205XV WMH3205XV
Electrical: A ...
Whirlpool Knowledge Base Results
We have determined that the information below may contain an answer to this question. If you find an answer, please remember to return to this page and add it here using the "I KNOW THE ANSWER!" button above. It's that easy to earn points!-
Replacing the cooktop light on my SpeedCook microwave oven with convection
... Whirlpool Customer eXperience Center toll free: 1-866-698-2538 or visit our Web site ᾠ TORX is closed Plug in my microwave oven? To locate FSP replacement parts in my SpeedCook microwave oven with convection? Oven light is on when door is a registered trademark of two 10W low-voltage halogen capsule bulbs. Close bulb cover and... -
How do I replace the oven light in my SpeedCook microwave oven with convection?
...Replacing the cooktop light on my SpeedCook microwave oven with convection Oven light is on when door is a registered trademark of the oven. How do I operate the cooktop light on my microwave oven? How do I replace the cooking light in my SpeedCook microwave oven with convection? To replace: Unplug oven...handle bulb. For wall or roof venting, replace the vent deflector removed in oven ... -
How do I replace the cooking light in my microwave oven?
... ) Lift up the bulb cover. Open the door. Remove the burned-out bulb by squeezing the wire clip together, pulling to handle bulb. Replace bulb, using tissue or wearing cotton gloves to the right and lifting. Replace charcoal odor filter. replacement pats. Replacing the cooktop light on my SpeedCook microwave oven with convection How do I use only FSP...
Similar Questions

I Need To Replace The Door Handle Please Advise. Thanks
(Posted by larky2212 8 years ago)

How To Replace A Door Handle On A Whirlpool Microwave Model Wmh1164xws-1
(Posted by torbas 10 years ago)

Replace The Door Handle.
I have a Whirlpool microwave MH3184XPY-0 and need to replace the door handle. I already bought a rep...
I have a Whirlpool microwave MH3184XPY-0 and need to replace the door handle. I already bought a rep...
(Posted by pqngo2696 11 years ago)

Took The Door Off To Replace Handle On The Gh7208xrs Whirlpool Microwave---
Unplugged to replace handle and would not work when plugged back in.
Unplugged to replace handle and would not work when plugged back in.
(Posted by marciefarris 12 years ago)

Microwave Two Years Old And Handle/door Cracking
We purchased our over the stove microwave two years ago. Already, the door and handle are cracking. ...
We purchased our over the stove microwave two years ago. Already, the door and handle are cracking. ...
(Posted by p1tcher 12 years ago)