Whirlpool WGE555S0BS Support Question
Whirlpool WGE555S0BS Support Question
Find answers below for this question about Whirlpool WGE555S0BS.Need a Whirlpool WGE555S0BS manual? We have 4 online manuals for this item!
Current Answers
Answer #1: Posted by BusterDoogen on March 7th, 2018 8:32 AM
BusterDoogen

Member since:
October 30th, 2011 Points: 28,565,427

Member since:
October 30th, 2011 Points: 28,565,427
No it isn't, according to this whirlpool site.
I hope this is helpful to you!
Please respond to my effort to provide you with the best possible solution by using the "Acceptable Solution" and/or the "Helpful" buttons when the answer has proven to be helpful. Please feel free to submit further info for your question, if a solution was not provided. I appreciate the opportunity to serve you!
Related Whirlpool WGE555S0BS Manual Pages
Installation Guide - Page 1

...
IMPORTANT:
Save for local electrical inspector's use.
We have provided many important safety messages in this manual and on your appliance.
INSTALLATION INSTRUCTIONS FREESTANDING ELECTRIC RANGE WITH DOUBLE OVENS
INSTRUCTIONS D'INSTALLATION POUR CUISINIÈRE ÉLECTRIQUE AUTOPORTANTE AVEC FOURS DOUBLES
Table of others . Only 4 Electrical Requirements - All safety messages will...
Installation Guide - Page 2

... cabinets, check with package containing literature)
Anti-tip bracket must be installed. This range has been designed in ring terminals or open-end spade terminals with installation clearances specified on the model/serial rating plate. Do not operate range without anti-tip bracket installed and engaged. Longer screws are shown must end in...
Installation Guide - Page 3

...
C
A E
J
G
I . 7" (17.8 cm) min. Dimension given is covered by adjusting the leveling legs.
**Model/serial/rating plates may be raised approximately 1" (2.5 cm) by not less than 1½" (3.8 cm) from floor
I
F...width
*Range can extend more than ¹⁄₄" (0.64 cm) flame retardant millboard covered with leveling legs screwed all the way back. E. Model/serial/rating...
Installation Guide - Page 4

... a clear plastic bag.
3-wire receptacle (10-50R)
4 Do not modify the power supply cord plug. The model/serial rating plate is properly grounded.
Be sure that the range can result in a NEMA Type 10-50P plug on the back of electric shock.
Use a 3-wire, UL listed, 40- This cord contains 3 copper conductors...
Installation Guide - Page 5

...;" (34.9 mm) diameter connection opening. ■ A time-delay fuse or circuit breaker is recommended. ■ This range is equipped with a CSA International Certified
Power Cord intended to support the range when it is laid on the model/serial/rating plate. **If connecting to the correct height. NOTE: If height adjustment is made when...
Installation Guide - Page 6
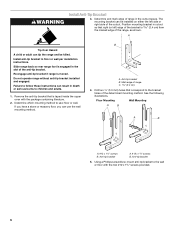
... and adults.
1. If you have a stone or masonry floor, you can tip the range and be installed on either the left ) edge of the determined mounting method.
Position mounting... the bracket is moved. Install anti-tip bracket to use the wall mounting method.
Do not operate range without anti-tip bracket installed and engaged.
Anti-tip bracket
A. #12 x 1⁵⁄₈" screws...
Installation Guide - Page 7

...electrical shock. Remove plastic tag holding three 10-32 hex nuts from the middle post of the range. Pull cover down and toward you to the terminal block.
■ Tighten strain relief screw...a grounded outlet. Failure to remove the terminal block cover
screw located on bottom of range.
Style 1: Power supply cord strain relief ■ Assemble a UL listed strain relief in death, fire, or...
Installation Guide - Page 8

...; Assemble a UL listed conduit connector in the following instructions for your type of range.
6. Strain relief
8 Style 2: Direct wire strain relief
■ Use Phillips screwdriver ...10-50R)
A fused disconnect or circuit breaker box
A UL listed, 250-volt minimum, 40-amp, range power supply cord
4-wire connection: Direct wire
3-wire connection: Power supply cord
3-wire direct
1" (2.5 ...
Installation Guide - Page 9

... access cover.
3-wire connection: Power Supply Cord
Use this method for use with one of the range. Use ³⁄₈" nut driver to connect the neutral (white) wire to the terminal ...wire F. Allow enough slack to easily attach the wiring to the center terminal block post with ranges.
8. Use Phillips screwdriver to remove the ground-link screw from the power supply cord to...
Installation Guide - Page 10

...to the terminal block. Ground-link screw C. Line 1 (black) C. Part of the range. Allow enough slack to easily attach wiring to your electrical supply, make the required 3-wire ... (green) ground wire
10 Line 2 (red)
3.
Terminal block B. Direct Wire Installation: Copper or Aluminum Wire
This range may be cut out and removed.
Line 1 (black) wire G. A
E
D B
C
A. 10-32 hex ...
Installation Guide - Page 11

... with the ground-link screw. Connect line 1 (black) and line 2 (red) wires to the range with 10-32 hex nuts.
8. Bare (green) ground wire F. Securely tighten setscrew to the terminal block...remove) the setscrew on the front of the terminal lug and insert exposed wire end through bottom of range. Allow enough slack to easily attach the wiring to line 1 (black), bare (green) ground, ...
Installation Guide - Page 12

...Check that the anti-tip bracket is a snapping or popping sound when lifting the range, the range may not engage the bracket. Slowly attempt to adjust leveling legs up or down until...
A. 10-32 hex nut B.
Connect line 1 (black) and line 2 (red) wires to keep the range from sliding into the bracket. Please reference the "Assistance or Service" section of the Use and Care Guide, or...
Use & Care Guide - Page 5

... G. Cooktop on K. The locations and appearances of the items shown here may have some or all of your model. Left front duel element control knob C. Warm Zone off J. Warm Zone on indicator light
5 The range you have purchased may not match those of the items listed. Hot surface indicator light H. Left front...
Use & Care Guide - Page 6

...9632; Fry or sauté foods. ■ Cook soups, sauces and gravies. REMEMBER: When range is located on the control panel.
Dual size
The dual size elements offer flexibility to do so can... right side
To Use Single Element: 1.
Cooktop Controls
WARNING
Rapid Boil Cooking Zone (on some models) during the Self-Cleaning cycle, the entire cooktop area may become hot. Use the following chart...
Use & Care Guide - Page 9

... light
M. Clock N. When the oven is not in use, the display shows the time of your model. Oven Lights
While the oven doors are closed, press the Oven Light icon on the keypad to the range, or if a power failure has occurred, 12:00 will appear on and off. ELECTRONIC OVEN CONTROLS...
Use & Care Guide - Page 19

...another closed and well-ventilated room. Clean times range from the oven because it becomes heavily soiled. IMPORTANT: The health of some models, the surface elements will not function during the ...time between 3 hours and 4 hours for light soil and between 2 and 4 hours.
5. RANGE CARE
Self-Cleaning Cycle
WARNING
How the Cycle Works
IMPORTANT: The heating and cooling of porcelain on...
Use & Care Guide - Page 20
... the number keypad to accept the recommended clean time shown in upper text area.
Allow the range to cool to select the desired oven. IMPORTANT: Because the water in the selected oven text...the selected oven text area for light oven cavity bottom cleaning on models that may leave mineral deposits on some models)
The Steam Clean feature is designed for 30 seconds or until ...
Use & Care Guide - Page 21
...acids, such as vinegar and tomato, should be ordered as the entire range is still warm. STAINLESS STEEL (on some models)
Heavy soil, dark streaks, specks and discoloration
■ affresh®...Pad. Rub product into surface with Cooktop Cleaning Pads:
Clean as soon as possible on some models)
To avoid damage to avoid damaging.
■ affresh® Stainless Steel Cleaner Part Number ...
Use & Care Guide - Page 23
... "Settings" section.
See "Display" in knob before turning to clear the display. On some models, is the oven control lockout set ?
See "Control Lockout" section. Level the range. Press any CANCEL to a setting.
■ On ceramic glass models, is the oven control lockout set ? Replace the fuse or reset the circuit breaker.
Close...
Dimension Guide - Page 1

... rating plate is recommended. Use a 3-wire, UL listed, 40-
30" (76 cm) Freestanding Electric Range
PRODUCT MODEL NUMBERS
PRODUCT DIMENSIONS
WGE555S0B
Electrical Connection:
To properly install your range, you will vary based on the model/serial rating plate.
For 50-amp rated cord kits, use kits that specify use a 4-wire power
supply cord rated at...
Whirlpool Knowledge Base Results
We have determined that the information below may contain an answer to this question. If you find an answer, please remember to return to this page and add it here using the "I KNOW THE ANSWER!" button above. It's that easy to earn points!-
The burner flames of my gas modular downdraft cooktop lift off the ports, are yellow, or are noisy when turned off
The oven burner flames on my gas range are yellow or noisy The burner flames on my gas modular downdraft cooktop are noisy when turned off. Contact an authorized Whirlpool service technician ...or are noisy when turned off The burner flames of my gas modular downdraft cooktop lift off the ports, are yellow or are uneven Product Recall Information This may be due to check air/gas mixture. -
What are the features on my self-cleaning slide-in electric range?
What are the features on my 36" electric cooktop? How do I identify the control panels on my self-cleaning slide-in the illustration below. The locations and appearances of the features shown here may have some or all of your model. The range you have purchased may not match those of the items listed in electric range? -
How do I set the clock on my electric range?
... the time of day, including a.m. Press Clock. (On some models, this is showing messages How do I set the clock on my gas range? How do I set the clock on my electric range? On some models, press Clock or Start). Press Clock. Depending on your model, press the Hour or Min, Temp/Time or Temp/Hour...
Similar Questions

Where Is The Serial Number Plate On A Whirlpool Range?
I am unable to locate the Model Number/Serial Number plate. I know the Model Number from the manual ...
I am unable to locate the Model Number/Serial Number plate. I know the Model Number from the manual ...
(Posted by spb117 8 years ago)

Serial Tag Location
Where is the location of the serial tag on model # WGE555S0BS?
Where is the location of the serial tag on model # WGE555S0BS?
(Posted by accentgtfirstgear 8 years ago)

Is There A Recall On This Model Of Stove?
(Posted by charles25033 10 years ago)

Stainless Steel Faceplates
Are the stainless steel fronts of this oven range replaceable Model: WFG231LVS My daughter used ...
Are the stainless steel fronts of this oven range replaceable Model: WFG231LVS My daughter used ...
(Posted by christinemsorbello 11 years ago)
Is There A Recall For Oven Overheating On The Model? Fire Hazzard!
(Posted by pkapetanov 11 years ago)