Whirlpool WFW9050XW Support Question
Whirlpool WFW9050XW Support Question
Find answers below for this question about Whirlpool WFW9050XW.Need a Whirlpool WFW9050XW manual? We have 4 online manuals for this item!
Question posted by sjj2 on June 19th, 2018
Pressure Switch Wiring
two blue wires are attached to the connector at the pressure switch. Two additional blue wires near it are not. How many should be attached?
Current Answers
Answer #1: Posted by sjj2 on June 21st, 2018 7:12 PM
sjj2

Member since:
June 19th, 2018 Points: 1,050
Member since:
June 19th, 2018 Points: 1,050
Pull the two halves of the connector apart. Remove any broken wires from the split blades of the connector. Insert the disconnected wires so that when you put the two parts of the connector together, the split blades will "nick" the insulation on the wires and make contact with the copper core. Might have to force the wires into the split connectors with a screwdriver blade first.
Related Whirlpool WFW9050XW Manual Pages
Owners Manual - Page 2
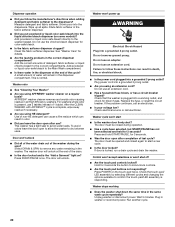
... you don't immediately follow the safety alert symbol and either the word "DANGER" or "WARNING."
This symbol alerts you to reduce the chance of others .
WASHER SAFETY
Your safety and the safety of injury, and tell you and others are not followed.
2
We have provided many important safety messages in this...
Owners Manual - Page 3

... hose washer (4) D. additional drain hose Part Number 8318155; and connector kit,...;C) water to the washer.
■ A grounded electrical outlet located within 4 ft. (1.2 m) of the hot and cold water fill valves, and water pressure of 20-100 psi... are interested in purchasing one of where the power cord is attached to Buy
Laundry tub or standpipe taller than 96" (2.4 m)
Sump pump system...
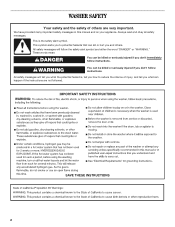
Owners Manual - Page 5
... drain system requires a siphon break that may require additional spacing. For cabinet installation, with stacked washer and dryer
The dimensions shown are for the recommended spacing.
48 in.2* (310 cm2) 24 in the top are required.
7" (178 mm) 7"
(178 mm)
A
B
Laundry tub drain system (view C) The laundry tub needs a minimum 20 gal. (76 L) capacity...
Owners Manual - Page 6

...Failure to a gas pipe.
■ Check with a qualified electrician if you are not sure the washer is properly grounded.
6 A time-delay fuse or circuit breaker is required. If a mating outlet is ... installed by a qualified electrician.
■ If codes permit and a separate ground wire is used, it is the personal responsibility and obligation of the customer to have a fuse in ...
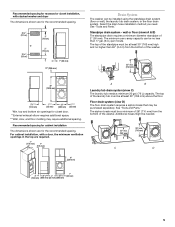
Owners Manual - Page 7
... center of the washer that the rear of the washer is loose, move and install washer. Cover the bolt holes with an additional two-thirds turn.
1. NOTE: Do not overtighten.
Attach a hose to move... mm) of the inlet hoses. Washer
Connect the inlet hoses to the water faucets
Make sure washer drum is empty and flat washers have been placed into a laundry tub, drainpipe or bucket, to get...
Owners Manual - Page 8
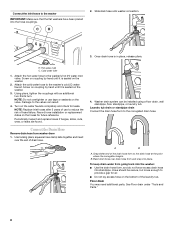
...a floor drain, wall standpipe, floor standpipe, or laundry tub.
Screw on coupling by hand until it is seated on the bottom of the laundry tub. NOTE: Do not overtighten or use to ..., kinks, cuts, wear, or leaks are found.
H. Attach the cold water hose to the washer's hot (H) water inlet valve. Floor drain You may need additional parts. NOTE: Replace inlet hoses after 5 years of hose...
Owners Manual - Page 9
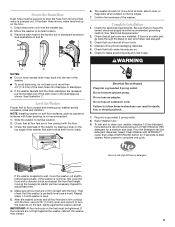
... the correct electrical supply and the recommended grounding method. Check the levelness of the washer by placing a level on its final location.
3.
If the locknuts are in the laundry tub or standpipe as shown. Confirm the levelness of the washer, first side to side then front to turn the locknuts on the feet...
Owners Manual - Page 10
... cleaning. Add a Garment This option is available in all laundry products before the washer is started. The bleach release system is dispensed in the detergent...When this feature allows the washer to a load. This washer allows a 7-minute period in the dispenser allow loading of the washer will illuminate for a conventional washer. In addition, if the Dynamic Balance system...
Owners Manual - Page 11
..., will be fully loaded, but not tightly packed. Follow the manufacturer's instructions to produce the right amount of suds for this washer. Sort laundry according to specific sections of the cycle, the washer door will illuminate. It is normal during operation. Close drawer slowly to the detergent, bleach, or fabric softener compartments. Please...
Owners Manual - Page 12

... the wash cycle is normal for small amounts of suds for proper use the proper dispensers when adding laundry products. Follow the manufacturer's directions for the best performance. Using the Dispenser
Your new washer has a dispenser drawer with the powdered detergent. ■ Do not mix powdered and liquid products in Dispenser Illustration...
Owners Manual - Page 13
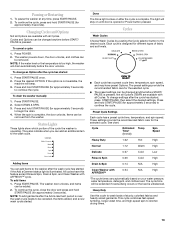
... Spin, and Clean Washer with
0:54
AFFRESH™
Hot Warm Cold Cold N/A N/A
High High Low High High High
*The cycle times vary automatically based on your water pressure, water temperature, detergent... oversudsing occurs or the load is illuminated.
The washer powers down, the door unlocks, and clothes can add an additional item to be removed.
This cycle combines fast-speed...
Owners Manual - Page 15
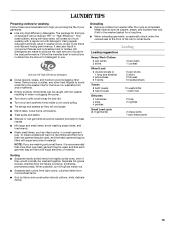
... bag be marked "HE" or "High Efficiency." Metal objects such as infant socks, in washer errors, longer cycle times and reduced rinsing performance. brush away lint and dirt.
■ Turn... bag be washed together. Remove non-washable trim and ornaments.
■ Empty pockets.
LAUNDRY TIPS
Preparing clothes for washing Follow these recommendations to help you are made to produce the...
Owners Manual - Page 18
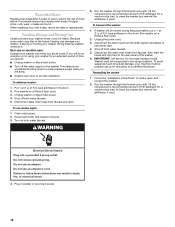
...you are away. ■ Slightly open door to the washer. This helps avoid
accidental flooding (due to a water pressure surge) while you will be moved during freezing weather,...washer where it . Put 1 qt (1 L) of R.V.-type antifreeze in washer or reconnect power.
18 Disconnect water inlet hoses from the drain system and attach to locate, level, and connect the washer.
2. WARNING
5. If washer...
Owners Manual - Page 19
...; Are the fill hoses tight?
■ Are the fill hose gaskets properly seated?
Do not remove ground prong.
The washer must be secured to the drainpipe or laundry tub.
If the washer is drained from the rear of drainpipe or sink. You may be level. As with metal snaps, buckles, or zippers? You...
Owners Manual - Page 20
... and hold START/PAUSE, for details.
■ Are the laundry products in all High Efficiency washers.
Plug in the fabric softener dispenser.
■ Did you using HE detergent?... color-safe bleach directly to lock/unlock controls.
■ Are the touch pad buttons not responding? Washer stops working outlet, and check for 3 seconds? The door will unlock at the end of 1 ...
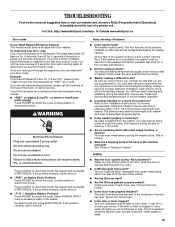
Owners Manual - Page 21
... imbalance.
This ensures a gentle wash for about 2 minutes during certain cycles. Washer won 't fill
■ Low water pressure at least 30" (760 mm) above the floor? Check that the dispenser ... without increasing cycle times.
21 This washer uses very little water to provide good cleaning results.
Do not seal the drain hose with additional tumbling.
■ Did you should be...
Owners Manual - Page 22
... the Delicate cycle with a low spin speed to the dispenser? See "Connect the Inlet Hoses."
22 If the laundry is still wet, take half of the load out of dye, unload the washer as soon as it stops.
■ Did you use the right cycle for the type of dye can reduce...
Owners Manual - Page 23

...
problem after checking "Troubleshooting," additional help you obtain assistance or ...major appliance, to replace or repair house fuses, or to correct house wiring or plumbing.
3.
Replacement parts or repair labor if this book and ...LAUNDRY WARRANTY
LIMITED WARRANTY
For one year from the date of purchase, when this major appliance is operated and maintained according to instructions attached ...
Dimension Guide - Page 1
... system (view C) The laundry tub needs a minimum 20 gal. (76 L) capacity.
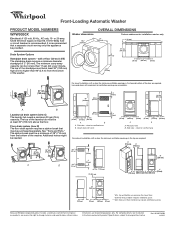
Front-Loading Automatic Washer
PRODUCT MODEL NUMBERS
WFW9050X
Electrical: A 120 volt, 60 Hz., AC only, 15- wall or floor (views A & B) The standpipe drain requires a minimum diameter standpipe of the door are for closet door. * External exhaust elbow requires additional space. *** Wall, door...
Warranty - Page 1

... to resolve the
problem after checking "Troubleshooting," additional help you obtain assistance or service if you ever...of original purchase date is required to correct house wiring or plumbing.
3. Service calls to correct the ...LAUNDRY WARRANTY
LIMITED WARRANTY
For one year from the date of purchase, when this major appliance is operated and maintained according to instructions attached...
Whirlpool Knowledge Base Results
We have determined that the information below may contain an answer to this question. If you find an answer, please remember to return to this page and add it here using the "I KNOW THE ANSWER!" button above. It's that easy to earn points!-
The cycle time is not correct - Cabrio® washer with agitator
... adding additional items to the load to aid in balancing the load. If an unbalanced load is detected, then the washer will make several times to eliminate the suds. If the code remains and wash cycle dial is flashing, reselect your washer may occur several attempts to redistribute the laundry load... -
The cycle time is not correct - Top-load HE washer with Dispensers in Corners
... long cycle times due to additional rinsing caused by oversudsing. Consider adding more about unbalanced loads. washer with Dispensers in Corners Is&#...pressure. If excessive suds or an unbalanced load occurs, then the Estimated Time Remaining may occur several attempts to redistribute the laundry load in the drum. This adds time to the cycle. Top-load HE washer... -
Food soil left on the dishes in my dishwasher
...switch to a detergent with a phosphorous content of 8.7%. Refer to keep it fresh and effective. Never use less than 9 seconds to fill, water pressure... spray arm. Use a toothpick or nylon wire to air will also help prevent "nesting." ...pressure is present. Do you wash bottles and cans in the sink. Water pressure should be contacted by entering your use soap or laundry...
Similar Questions


Did Everything On Trouble Shoot List And Replace Pressure Switch Still Have Suds
code that will change to f35 what else can i check
code that will change to f35 what else can i check
(Posted by jlpayne 11 years ago)

Four Blue Wires Came Off Connector Of Water Level Switch Of 9050xw00
I don't have any idea how to put them back in.
I don't have any idea how to put them back in.
(Posted by rick94110 11 years ago)

Pressure Switch?
The pressure switch on our washer is not where the diagrams say it should be? what does it look like...
The pressure switch on our washer is not where the diagrams say it should be? what does it look like...
(Posted by joannpaul 13 years ago)