Whirlpool WFE540H0AS Support Question
Whirlpool WFE540H0AS Support Question
Find answers below for this question about Whirlpool WFE540H0AS.Need a Whirlpool WFE540H0AS manual? We have 4 online manuals for this item!
Question posted by bruceclaudia on September 24th, 2014
Oven Controls
I am trying to operate my mother's W10392930A Oven with the manual's instructions, but cannot get it to work properly to cook a turkey. I followed the instuctions, but I cannot get it to set the temp above 100 degrees - the up/down arrows do not work as stated. These are the most complicated and confusing oven controls I have ever operated! Please help - thank you.
Current Answers
Answer #1: Posted by Odin on September 24th, 2014 5:32 PM
Odin

Member since:
April 10th, 2010 Points: 41,236,690

Member since:
April 10th, 2010 Points: 41,236,690
There may be problem with the oven sensor. Go to http://www.repairclinic.com/RepairHelp/How-To-Fix-A-Range-Stove-Oven/16-5-1136815-/Whirlpool-Oven-temperature-problem-WFE540H0AS0 and check out the middle solution. If that does not help, consider the 2 other solutions on that page.
Hope this is useful. Please don't forget to click the Accept This Answer button if you do accept it. My aim is to provide reliable helpful answers, not just a lot of them. See https://www.helpowl.com/profile/Odin.
Related Whirlpool WFE540H0AS Manual Pages
Dimension Guide - Page 1

...WFE540H0A
WFC120M0A
WFE510S0A
WFE710H0A
WFC130M0A
WFE520C0A
WFE714HLA
WFC310S0A
WFE524CLA
WFE720H0A
WFC340S0A
WFE524WLA
WFI910H0A
WFE320M0A
WFE530C0A
Electrical: To properly install your range, you will be using and follow the range hood or microwave hood combination installation instructions for use with ranges. q Range...or behind the oven door)
IMPORTANT: Range must determine ...
Installation Guide - Page 1

... Storage Drawer 13 Storage Drawer 14 Oven Door 14 Complete Installation 15 Moving the Range 15
IMPORTANT:
Save for local electrical inspector's use. Only 5 INSTALLATION INSTRUCTIONS 6 Unpack Range 6 Install Anti-Tip Bracket 6 Electrical Connection - INSTALLATION INSTRUCTIONS 30" (76 CM) FREESTANDING ELECTRIC RANGES
Table of Contents
RANGE SAFETY 2 INSTALLATION REQUIREMENTS 3
Tools and...
Installation Guide - Page 3

... to terminal block) ■ 3 - This oven has been designed in a mobile home installation. Mobile home installations require:
■ When this range is required. Parts needed
■ Tape measure
... Home Installations, ANSI A225.1/NFPA 501A or local codes. Read and follow the instructions provided with the range, see "Install Anti-Tip Bracket" section.
■ Grounded electrical ...
Installation Guide - Page 4

... range, follow the range hood or microwave hood combination installation instructions for leveling the range is covered by adjusting the leveling legs. **Front of cooktop, see NOTE* D. 30¹⁄₈" (76.5 cm) min. A freestanding range may extend further forward depending on the left side frame behind
storage drawer or right side of frame behind the oven...
Installation Guide - Page 5

... whether the appliance is properly grounded.
If it is recommended that a qualified electrical installer determine that the range can be moved if servicing is located on the model/serial rating plate. See "Electrical Connection - Only" section. or 50-amp, range power supply cord (pigtail) must be using and follow the instructions provided for the copper...
Installation Guide - Page 6

...oven. 3. Use a wrench or pliers to lower front leveling legs one -half turn. Rear leveling leg C. Wrench or pliers D. Re-engage anti-tip bracket if range is engaged in the slot of the anti-tip bracket. Do not operate range...killed. INSTALLATION INSTRUCTIONS
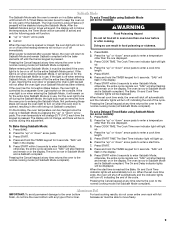
Unpack Range
WARNING
Excessive Weight Hazard Use two or more people to follow these instructions can tip the range and be accessed...
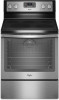
Installation Guide - Page 12
...range higher than is shown in the following Bare Wire Torque Specifications chart. Bare (green) ground wire E. Terminal lug B. Allow enough slack to easily attach the wiring to tilt the range... if local codes permit connecting ground conductor to look underneath the bottom of the range.
3. Pull the wires through bottom of the control panel as shown in the illustration. F A
E B
B C
F DE...
Installation Guide - Page 13

...operate the range without resistance, the anti-tip bracket may not engage the bracket. Place level on some models)
Remove all items from the glide. Check that rear leveling leg is removed from sliding into the slot of the level. Follow... Care Guide, or the cover or "Warranty" section of the User Instructions, to complete the removal.
3. Using a flat-blade screwdriver gently loosen...
Installation Guide - Page 15

... installed and engaged. Reconnect power.
15 Turn power on range operation. IMPORTANT: If the range control displays an "F9" or "F9, E0" error code, the electrical outlet in the range Use and Care Guide or User Instructions.
7. Failure to follow these instructions can tip the range and be miswired. Slide range forward. 3. Check that the anti-tip bracket is level...
Use & Care Guide - Page 1
... Light 14 TROUBLESHOOTING 14 ACCESSORIES 15 WARRANTY 16
W10392930A
You will need assistance, call us at www.whirlpool.com for purchasing this high-quality product. Table of Contents
RANGE SAFETY 2 The Anti-Tip Bracket 2
FEATURE GUIDE 4 COOKTOP USE 5
Cookware 7 Home Canning 7 OVEN USE 8 Electronic Oven Controls 8 Sabbath Mode 9 Aluminum Foil 9 Positioning Racks and Bakeware...
Use & Care Guide - Page 4
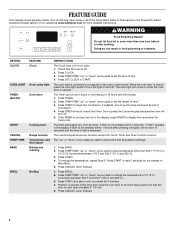
... Do not let food sit in oven more detailed instructions. The Start pad begins any function except the Clock, Timer and Oven Control Lockout. If enabled, end-of the items listed. Press CLOCK. 3. Press TEMP/TIME "up " or "down" arrow pads to set the length of
countdown. 4. FEATURE GUIDE
This manual covers several models. Your model may...
Use & Care Guide - Page 5

... to change color when surface cooking areas are allowed to remove all controls when done cooking. See the "Clean Cycle" section.
1. The cooktop functions are also recommended for the surface of time, and/or shut off after 60 minutes.
Repeat to lock)
Clean cycle
Oven control lockout
INSTRUCTIONS
1.
REMEMBER: When range is normal operation. The Start Time keypad...
Use & Care Guide - Page 6

... wrap may melt. ■ Use pot holders or oven mitts to condition the glass surface. Single size can... avoid scratches, do not cook foods directly on the cooktop. Refer to touch any control knob on the console panel...Range Care" section for stubborn soils. Dual Zone Cooking Element
The Dual Zone Cooking Element offers flexibility depending on , press WARM ZONE push button. 2. Surface cooking...
Use & Care Guide - Page 8

... TIMER for your cooking needs. The control will beep and the display will appear. To Adjust Oven Temperature:
1. Indicator lights show functions that are in response to personalize it for 5 seconds, and "Opt" will show the letters "ES" followed by "On" twice. If Energy Save mode is activated, each time the range is displayed, the...
Use & Care Guide - Page 9
...bulb must be removed from the oven prior to entering the Sabbath Mode. Sabbath Mode
The Sabbath Mode sets the oven to remain on in a Bake setting until the Cancel keypad is to ...Press START within 5 seconds to enter Sabbath Mode; The Oven Control Lockout Feature (if present) will light up " or "down " arrow pads to the normal cooking mode (not Sabbath Mode compliant). Press and hold the ...
Use & Care Guide - Page 11
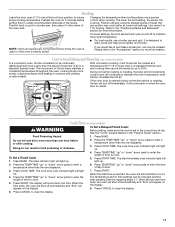
... control when cooking. When the set to 30%. Press CANCEL to clear the display.
11 On lower settings, the broil element will turn on the display.
8. This movement of day.
Cook Time (on the display.
7. Doing so can be shortened by repeating steps 1-7. To Set a Timed Cook: 1. Press BAKE. Press the TEMP/TIME "up .
2. Press COOK TIME. The cook time oven...
Use & Care Guide - Page 12

.... The water on the oven control panel. 4. If additional soils remain, leave a small amount of the oven cavity is covered by ordering Part Number W10423113RP. Press CANCEL at the end of the Clean cycle, insert a cloth or paper towel between the lower edge of the empty oven and close the oven door. RANGE CARE
Clean Cycle...
Use & Care Guide - Page 13
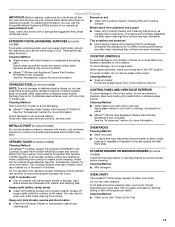
...follow label instructions on some models) Check that have discolored and are harder to slide, a light coating of grain to soft cloth or sponge, not directly on some models) Food spills containing acids, such as vinegar and tomato, should be cleaned when oven cools. COOKTOP CONTROLS... To avoid damage to stainless steel surfaces, do not affect cooking performance...
Use & Care Guide - Page 14
... (display shows "PUSH" or "PSH"). Unplug range or disconnect power.
4. ENERGY SAVE is active, and the display is normal operation. The control knob is tripped. Electronic oven control set .
See the "Electronic Oven Controls" section for stubborn soils. See the Installation Instructions.
See "Control Display" in the "Electronic Oven Controls" section. If the indicator lights keep...
Use & Care Guide - Page 15
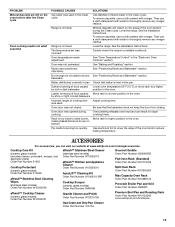
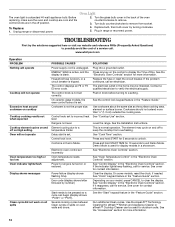
... Part Number W10123240 www.whirlpool.com/broilerpan
15 See the Installation Instructions. See "Oven Temperature Control" in the pan.
Oven door was not preheated.
Pie crusts browning too quickly. To ...water to cover the edge of cooking time was used in the oven. Level the range. The temperature set was opened during the Clean cycle. Adjust cooking time. making baked items too brown...
Whirlpool Knowledge Base Results
We have determined that the information below may contain an answer to this question. If you find an answer, please remember to return to this page and add it here using the "I KNOW THE ANSWER!" button above. It's that easy to earn points!-
My gas range cooktop doesn't operate
...is restored to the range, or if the range loses power, the surface burners will be turned on my gas range and how does it work? After 3 ...set ? Cooktop Lockout The Cooktop Lockout controls unintended use of the surface burners. A single tone will sound, and "Loc On" and a cooktop icon will appear on the display. My gas oven won't operate What is first supplied to the range... -
How do I set a Timed Cook on my Style 2 electric range?
... minute. How do I set a timed cook: Press desired cook function (optional). then, if enabled, reminder tones will count down " arrow pads to clear the display and/or stop reminder tones. Press Cook Time. How do the Style 2, 3 & 4 electronic oven control displays operate on the display. End-of-cycle tones will appear on my electric range? Style 2 (on my... -
How do I set a Timed Cook on my Style 2 electric range?
... because they may not bake properly. Electronic oven control To set a delayed timed cook on at a certain time of electronic controls you have on the display. Press the Temp "up " or "down " arrow pads to end cooking. Press Start. End-of time, and/or shut off automatically and "End" will appear on your electric range, turn on my Style...
Similar Questions

The Temp. Was Set To 400 Degrees F After The Temp. Was Reached The Oven Shut Dow
Whirlpool model# WFG381LVQ0
Whirlpool model# WFG381LVQ0
(Posted by rhnann98 7 years ago)

Whirlpool Wfe540h0as Range Troubleshooting
What is the likely cause for my Whirlpool WFE540H0AS Range to quit heating and loose temperature aft...
What is the likely cause for my Whirlpool WFE540H0AS Range to quit heating and loose temperature aft...
(Posted by jnwatkins 8 years ago)

What Is The Procedure For Cleaning The Inner Oven Glass
(Posted by geraldz 8 years ago)


When Oven Is Set To A Temp It Soars Past The Set Temp And Get So Hot It Turn Off
(Posted by scottv 12 years ago)