Get support for Whirlpool WFE374LVS

Whirlpool WFE374LVS Support Question

Whirlpool WFE374LVS Support Question

Find answers below for this question about Whirlpool WFE374LVS.
Need a Whirlpool WFE374LVS manual? We have 4 online manuals for this item!
Question posted by jwm66ss on April 23rd, 2011

Is A Part Missing?

I removed the rear panel to access the area where the power cord attaches.Just above that area there is a small open area where you can see the insulation.Is there supposed to be a small inspection plate to cover this area or is this correct the way it is? 

Current Answers

There are currently no answers that have been posted for this question.
Be the first to post an answer!

Remember that you can earn up to 1,100 points for every answer you submit. The better the quality of your answer, the better chance it has to be accepted.

Related Whirlpool WFE374LVS Manual Pages

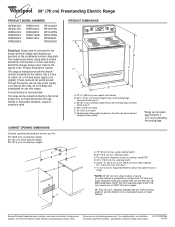
Dimension Guide - Page 1

... all the way in* C. 36" (91.4 cm) cooktop height (max.) with ranges. Model/serial rating plate (located on the model/serial number rating plate. For minimum clearance to the circuit breaker box (or fused disconnect) through the neutral, use a 4-wire power supply cord rated at 250 volts, 40 or 50 amps and investigated for planning...
Installation Instructions - Page 2

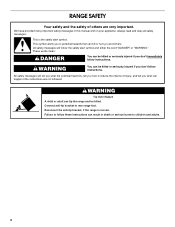
...if the instructions are very important. This symbol alerts you to rear range foot. Reconnect the anti-tip bracket, if the range is the safety alert symbol. All safety messages will follow ...to follow these instructions can be killed or seriously injured if you don't follow instructions. RANGE SAFETY Your safety and the safety of injury, and tell you what the potential hazard is...
Installation Instructions - Page 3

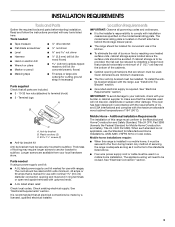
...wire cutters (for convenient use with ranges. The model/serial rating plate is required. To install the ...located above . ■ Four-wire power supply cord or cable must be installed. Additional ...range is marked for use in ring terminals or open-end spade terminals with installation clearances specified on the left side frame behind the storage drawer panel. ■ The range...
Installation Instructions - Page 4

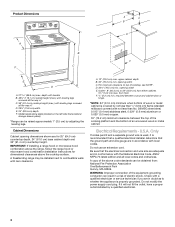
... ¹⁄₄" (0.64 cm) flame retardant millboard covered with zero clearance. A. 13" (33.0 cm) max. opening width C. Outlet - 8" (20.3 cm) to top of electric shock. Do not modify the power supply cord plug. Model/serial rating plate (located on the left side frame behind storage drawer panel) *Range can be obtained from: National Fire Protection Association...
Installation Instructions - Page 5

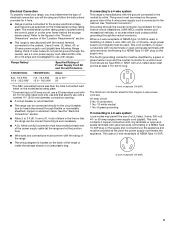
... point the power supply cord enters the appliance. and recreational vehicles, or an area where local codes prohibit grounding through flexible or nonmetallic sheathed, copper or aluminum cable. The model/serial number rating plate is manufactured with the neutral terminal connected to the cabinet. This cord contains 3 copper conductors with ring terminals or open -end spade...
Installation Instructions - Page 6

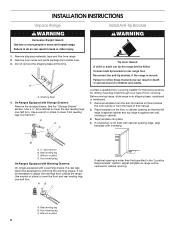
... cabinet and top edge is not flush with cabinet opening . Front leveling leg On Ranges Equipped with Warming Drawers: On ranges equipped with a warming drawer, the rear legs cannot be centered in back or other injury. 1. Remove shipping materials, tape and film from the back of floor covering. Shipping base 4. Reconnect the anti-tip bracket, if...
Installation Instructions - Page 7

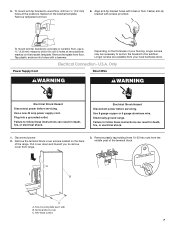
... these instructions can result in floor. Disconnect power. 2. Use 8 gauge copper or 6 gauge aluminum wire. Pull cover down and toward you to wood floor, drill two ¹⁄₈" (3.2 mm) holes at the positions marked on the bracket template. To mount anti-tip bracket to remove cover from range. 3. Remove template from floor. 6. Depending on the...
Installation Instructions - Page 8

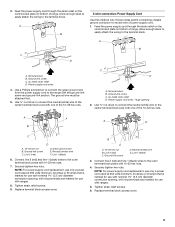
... vehicles ■ In an area where local codes prohibit grounding through the neutral 1. 4. Style 1: Power supply cord strain relief ■ Remove the knockout for your home has: And you will be cut out and removed. Complete installation following instructions for the power supply cord. ■ Assemble a UL listed strain relief in the opening . Part of metal ground strap...
Installation Instructions - Page 9

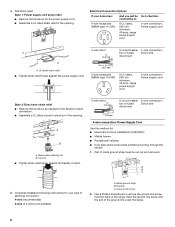
...;⁄₈" (3.5 cm) diameter connection opening, with ring terminals and marked for use with ranges. 8. Neutral (white) wire E. Securely tighten hex nuts. Tighten strain relief screws. 6. Terminal block B. Replace terminal block access cover. 9 Allow enough slack to easily attach the wiring to the range with one of power supply cord. 1. Use a Phillips screwdriver to...
Installation Instructions - Page 10

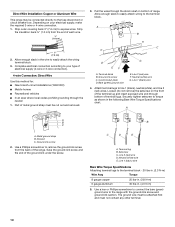
.... Strip outer covering back 3" (7.6 cm) to the range with the ground-link screw and ground-link section. Line 1 (black) wire 4. The ground wire must not contact any other terminal. 10 Cord/conduit plate D. Line 1 (black) wire Bare Wire Torque Specifications Attaching terminal lugs to the fuse disconnect or circuit breaker box. Strip the insulation back ³...
Installation Instructions - Page 11

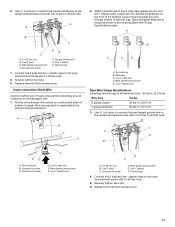
... the front of the terminal lug and insert exposed wire end through bottom of range. Loosen (do not remove) the setscrew on bottom of terminal lugs. Cord/conduit plate F D. Bare (green) ground wire F. Line 2 (red) C. Terminal lug 4. Replace terminal block access cover. 11 Attach terminal lugs to neutral supply wire. 1. Securely tighten setscrew to the terminal block...
Installation Instructions - Page 12

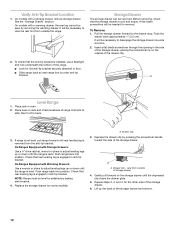
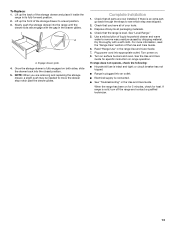
... bracket securely attached to side; Drawer clip 3. Lift up the back of the drawer clip. 2. If range is installed, use a flashlight and look underneath the bottom of the storage drawer. 6. Insert a flat-blade screwdriver through the opening in oven. 2. To Remove: 1. Drawer clip - On models with a warming drawer, the rear leg cannot be removed. Before removing, check...
Installation Instructions - Page 13

... is an extra part, go back through the steps to a level position. 3. If range is intact and tight; Check that you are now installed. Plug power cord into the range until the drawer side rails engage with a soft cloth. If range does not operate, check the following: ■ Household fuse is cold, turn off the...
Installation Instructions - Page 14

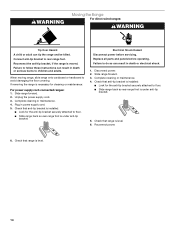
... attached to avoid damaging the floor covering. Slide range forward. 2. Replace all parts and panels before servicing. Slide range forward. 3. Complete cleaning or maintenance. 4. Check that anti-tip bracket is under anti-tip bracket. 5. Connect anti-tip bracket to floor. ■ Slide range back so rear range foot is installed: ■ Look for cleaning or maintenance: For power...
Owners Manual - Page 1

...listo su número de modelo completo. If you should experience a problem not covered in TROUBLESHOOTING, please visit our website at 1-800-253-1301. Puede encontrar su ... marco del horno, detrás del panel del cajón de almacenamiento. ® ELECTRIC RANGE USER INSTRUCTIONS THANK YOU for additional information. Table of Contents RANGE SAFETY 2 The Anti-Tip Bracket 2 ...
Owners Manual - Page 3

...removing or replacing food. ■ Do Not Heat Unopened Food Containers - No commercial oven cleaner or oven liner protective coating of any kind should be left alone or unattended in area where the range is in use aluminum foil to a hot surface. ■ Use Care When Opening...SLIDE RANGE FORWARD, LOOK FOR ANTI-TIP BRACKET SECURELY ATTACHED TO FLOOR, AND SLIDE RANGE BACK SO REAR RANGE FOOT ...
Owners Manual - Page 4

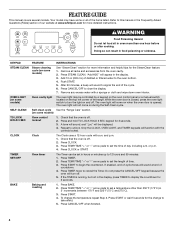
... keypad on the oven control panel or a manual switch located... Push START. 5. Remove any excess water with ...Step 2. To change to begin the countdown. Remove all of time. 3. and p.m. 1. ... Self-clean cycle See the "Range Care" section. (on when ...Timer. If the TIMER is opened. BAKE Baking and roasting 1.... of our website at end of the range. or p.m. 4. The oven light will...
Owners Manual - Page 10

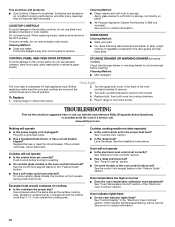
...bulb counterclockwise to remove from control panel to the cooktop controls, do not remove seals under knobs. See the control lock keypad feature in range or reconnect power. Level the range. See "... more than ½" (1.3 cm) outside the cooking area. Replace bulb, then bulb cover by turning clockwise. 5. See cover for service. See the Installation Instructions. STORAGE DRAWER OR...
Owners Manual - Page 12

... frame behind the storage drawer panel. Damage resulting from accident, ...maintained according to instructions attached to or furnished with...cover: 1. Repairs when your major appliance is located in U.S.A. This warranty is contrary to Whirlpool with the removal...7/08 Printed in a remote area where service by a Whirlpool ... in a manner that have access to parts or systems resulting from...
Warranty - Page 1

...WARRANTY This limited warranty does not cover: 1. Repairs when your major appliance..., in a manner that have access to the Internet and you need...oven frame behind the storage drawer panel. Service calls to correct the ...removal from your major appliance is located in which it is used in the country in a remote area... and maintained according to instructions attached to or furnished with the ...

Whirlpool Knowledge Base Results

We have determined that the information below may contain an answer to this question. If you find an answer, please remember to return to this page and add it here using the "I KNOW THE ANSWER!" button above. It's that easy to earn points!

  • How do I replace the cooking light in my microwave oven?
    ... on when the door is opened and when the oven is a 10W low-... cover. Push the bottom until it snaps into place. To locate FSP replacement parts in my convertible range hood...power. Replace bulb, using tissue or wearing cotton gloves to build every new Whirlpool appliance. Assistance and service When calling, please know the purchase date and the complete model and serial number of your area...
  • Vibration - Top-load washer
    ... surface. Play the sound of the following: Straight power cord Looped power cord The power cord restraint attaches to minimize washer sounds in the washer. Normal sound in high speed spin Some noise during spin. This may sound different in the upright position and not tilted before removing the shipping material.  My top-load washer...
  • Deep Clean with Steam not working correctly - Duet® Steam washer
    ... of the cycle. Some condensation may have been missed. Steam dryer Duet® Deep Clean with Steam is...correctly on the following cycles: Whitest Whites, Heavy Duty, Bulky Items and Normal/Casual. If the Deep Clean with Steam option? Unable to select the Deep Clean with Steam option, Sanitize temperature, or Clean Washer cycle have been selected, then steam will remove...

Similar Questions

Self-clean Failed. Error Code E1 F5. Display Is All Lit Up. Do I Need New Board?
The self clean failed about half-way through. The door will not unlock even after remove power. The ...
(Posted by kelli7524 10 years ago)
Whirlpool Model Wfe374lvs
how to get to the top elements
(Posted by jmay43 10 years ago)
What Is The Difference Between The Wfe374lvs And Wfe371lvs?
What is the difference between the WFE374LVS AND WFE371LVS?
(Posted by MKNSHLLITHEVENIN 12 years ago)
Ask a New Question
Use the box below to post a new question about this Whirlpool product .
Points & Prizes
  • You can earn points for nearly everything you do on HelpOwl.com
  • You can trade in those points for gift cards at leading retailers such as Amazon.com and Walmart
  • It's that simple!
See How it Works
Create a Free Account

Whirlpool Manuals

Find free Whirlpool WFE374LVS manuals and user guides available at ManualOwl.com. Try out our unique manual viewer allowing you to interact with manuals from directly within your browser!

Whirlpool Reviews

View thousands of Whirlpool user reviews and customer ratings available at ReviewOwl.com.

Contact Information

Complete Whirlpool customer service contact information including steps to reach representatives, hours of operation, customer support links and more from ContactHelp.com.

Scoreboard Ratings

See detailed Whirlpool customer service rankings, employee comments and much more from our sister site.

Whirlpool Recalls

Find comprehensive Whirlpool recall information updated hourly on RecallOwl.com.