
Whirlpool WET3300XQ Support Question
Whirlpool WET3300XQ Support Question
Find answers below for this question about Whirlpool WET3300XQ.Need a Whirlpool WET3300XQ manual? We have 5 online manuals for this item!
Question posted by OCHOCIENTOSRAMON on December 15th, 2012
The Dryer Dont Heat,flow Coldair.
I CHECK DE VOLTAJE 220 VA ok
THE HEATER GET ONLY 110 VA
THE FIXED THERMOSTATED AND THE THERMAL CUTOFF ARE BOTH OK
Current Answers
Related Whirlpool WET3300XQ Manual Pages
Installation Guide - Page 2
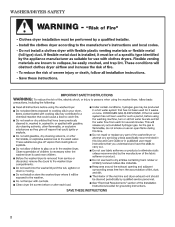
Washer/DRYER Safety
2
Installation Guide - Page 4
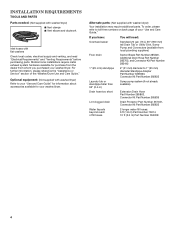
... toll-free numbers on back page of your "Use and Care Guide." Mobile home installations require metal exhaust system hardware available for your washer/dryer.
Optional equipment: (Not supplied with flat washers Check local codes, electrical supply and venting, and read "Electrical Requirements" and "Venting Requirements" before purchasing parts. Alternate parts: (Not supplied with...
Installation Guide - Page 5
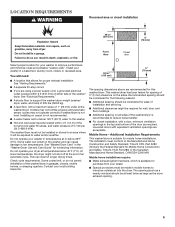
...washer and can result in .2 (310 cm2)
3" (76 mm)
Front View
Closet door
Select proper location for Mobile Home Construction and Safety, Title 24, HUD Part 280) or the Canadian Manufactured Home Standard, CAN/CSA-Z240 MH.
Check...inspector.
24 in a basement, laundry room, closet, or recessed area. The washer/dryer must not be exposed to the washer. Contact your washer in .2 (155 cm2)
...
Installation Guide - Page 7

... mm) from bottom of standpipe must install higher than 96" (2.4 m) from bottom of washer/dryer. Top of washer/dryer. install no more than 96" (2.4 m) from bottom of washer/dryer. (Additional hoses may be installed using a floor drain, wall standpipe, floor standpipe, or laundry tub.
To order, please see toll-free phone numbers in your "Use and Care...
Installation Guide - Page 8
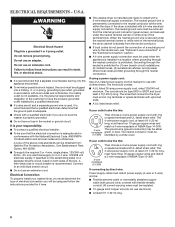
... a separate ground wire is used when the appliance is prohibited.
n This washer/dryer is permanently connected to an individual branch circuit. If the dryer is the personal responsibility and obligation of the customer to install with a ... connection of the line.
The neutral conductor must be insulated. n Check with local codes and ordinances. n It is properly grounded.
Installation Guide - Page 20
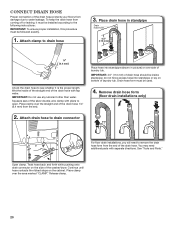
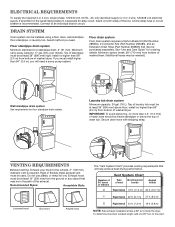
... or lay on bottom of laundry tub. Place clamp over side of laundry tub. Wet the inside standpipe; Place clamp over the straight end of the washer/dryer. Attach drain hose to drain...excess hose into standpipe (shown in standpipe
Drain hose form
4.5" (113 mm)
¼" (6.4 mm)
Check the drain hose to drain hose
3. Remove drain hose form (floor drain installations only)
2. Release ...
Installation Guide - Page 21
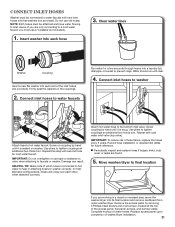
...have water flowing to water faucets with new inlet hoses with flat washers (not ... lines
Washer
Coupling
Insert a new flat washer into a laundry tub, drainpipe, or bucket to tighten couplings an additional two-thirds turn . Firmly seat the washers in...or leaks are working in a closet or recessed area: move the washer/dryer into each other when attached correctly. HELPFUL TIP: Make note of ...
Installation Guide - Page 22
..., remove corner posts and cardboard from under washer/dryer.
22 Move washer/dryer to final location
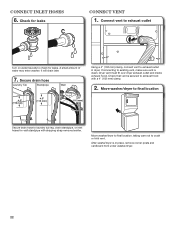
Secure drain hose to check for wall standpipe with a 4" (102 mm) clamp.
2. It will drain later.
7. Check for leaks
Connect vent
1. A small amount of water may enter washer. After washe/dryer is clean. Secure drain hose
Laundry Tub
Standpipe
Wall
4.54".5" (113 mm...
Installation Guide - Page 23
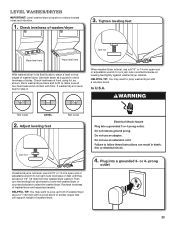
... about 4" (102 mm) with a wood block or similar object that will support weight of sides. In U.S.A. Recheck levelness of washer/dryer
3.
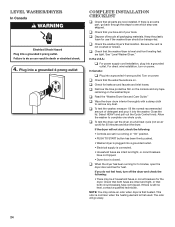
or 4- Level Washer/DRYER
IMPORTANT: Level washer/dryer properly to step 2. Check levelness of washer/dryer and repeat as needed. When washer/dryer is level, use a 9/16" or 14 mm open -end or adjustable wrench to prop up front of...
Installation Guide - Page 24
... cord installation, plug into a grounded 4-prong outlet. q Check that the washer/dryer is connected.
• H ousehold fuses are on. q Check for 20 minutes and start , check the following :
• T here may notice an odor when dryer is still no heat, contact a qualified technician. q Read the "Washer/Dryer Use and Care Guide." q When the dryer has been running or "On" position...
Use & Care Guide - Page 4
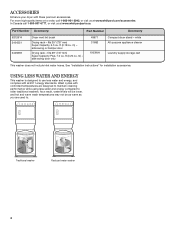
... with these premium accessories. ACCESSORIES
Enhance your dryer with all 2011 energy standards. In Canada call 1-800-901-2042, or visit us at www.whirlpool.com/accessories. m) - white All-purpose appliance cleaner
Laundry supply storage cart
This washer does not include inlet water hoses.
Traditional washer
Reduced water washer
4 fits 29" (737 mm) Super Capacity...
Use & Care Guide - Page 5
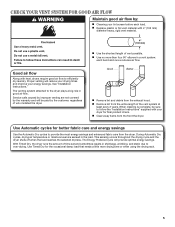
...vent material.
4" (102 mm)
Good air flow
Along with heat, dryers require good air flow to follow the "Installation Instructions" supplied with your dryer for better fabric care and energy savings
Use the...system attached to over-drying. CHECK YOUR VENT SYSTEM FOR GOOD AIR FLOW
Maintain good air flow by:
n Cleaning your energy savings. With Timed Dry, the dryer runs the amount of vent possible...
Use & Care Guide - Page 6
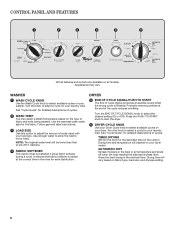
...to select a cycle for your laundry load.
Drying time and temperature will vary based on your washer.
See "Cycle Guide" for even distribution. It ensures that of cycles.
washer
1 WASH CYCLE KNOB Use ...removing clothes at the correct time in the shortest time. TIMED DRYING Will run the dryer for your load size. Follow garment label instructions.
3 LOAD SIZE Use this option to...
Use & Care Guide - Page 9
...items.
• Turn knits inside out to your laundry
2. Separate lint-takers from towels, rugs, and chenille fabrics.
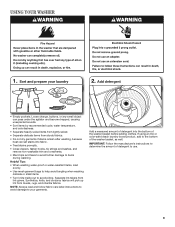
USING YOUR WASHER
1. Add detergent
• Empty pockets.
NOTE: ....
• Do not dry garments if stains remain after washing, because heat can set stains into the bottom of the washer basket before adding clothes.
Add a measured amount of detergent into fabric....
Use & Care Guide - Page 14
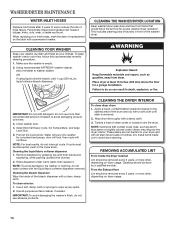
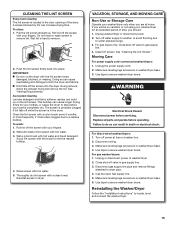
... would block the air flow for a moment and pause, door will lock, then cycle will not stain future loads of laundry in the Cycle knob. Removing accumulated lint
From Inside the Dryer Cabinet Lint should be removed every 2 years, or more often, depending on the label with a clean, damp cloth. WASHER/DRYER MAINTENANCE
WATER INLET...
Use & Care Guide - Page 15
...
to a residue buildup. Make sure leveling legs are secure in washer/dryer base. 4. Reinstalling the Washer/Dryer
Follow the "Installation Instructions" to secure washer/dryer doors. Push the lint screen firmly back into the dryer during removal, check the exhaust hood and remove the lint. Wet both the dryer and fabrics. Thoroughly dry lint screen with a nylon brush every...
Use & Care Guide - Page 16
... blankets or towels into a grounded outlet or reconnect power.
16 In Canada
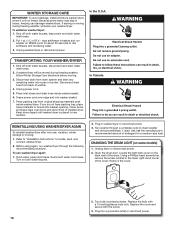
REINSTALLING/USING WASHER/DRYER AGAIN
To reinstall washer/dryer after non-use washer/dryer again:
1. Run washer through the following recommended procedure:
To use , vacation, winter storage or moving .
3. Open the dryer door. Turn bulb counterclockwise. Unplug power cord.
5. Changing the drum light (on RINSE...
Use & Care Guide - Page 17
... of a service call for proper water supply. Water Leaks
Check the following for loading instructions. Do not place tape over drain opening.
Feet may not be attached and have water flowing to drainpipe or laundry tub. See "Level the Washer/Dryer" in washer drain system.
Humming
Washer is normal.
This is in firm contact with floor, and...
Use & Care Guide - Page 22

...dryer at the beginning of the cycle. Solution
The drum may be cleaned before the end of the cycle. If the problem continues, call ...In U.S.A.
Incorrect power supply. Check...; feature to tumble the load without heat to other clothing. Odors
You have heat. Laundry items were removed from dryer. Items removed before removing laundry from the dryer before each load. Select a lower ...
Dimension Guide - Page 2
... length, add one 90º turn inside standpipe or below the top of laundry tub must be at least 12" (305 mm) from bottom of washer/dryer.
Do not use plastic or metal foil vet. VENTING REQUIREMENTS
Exhaust venting: Exhaust your dryer to the outside. 4" (102 mm) diameter vent is recommended. Number of 90...
Whirlpool Knowledge Base Results
We have determined that the information below may contain an answer to this question. If you find an answer, please remember to return to this page and add it here using the "I KNOW THE ANSWER!" button above. It's that easy to earn points!-
How do I change the final food temperature using my Temperature Probe after my microwave oven has started ?
... heating with door open Dryer does not heat - To change the final food temperature using my Temperature Probe: Touch Probe Temp. Touch Start/Enter. How do not touch Start/Enter within one minute after entering the new temperature, the oven will see the current set temperature for three seconds). Top-load washer... -
Cycle is too short - Dryer
...;view the following for an Automatic Dry or Accudry cycle. How Auto Dry and Timed Dry Work If the dryer is too short - Dryer Cycle is heating, check the following: Is the dryer level? Dryers with a dry rack. Automatic Dry or Accudry cycles determine the length of the cycle by sensing the... -
Damp loads or long drying times - Dryer
... air flow? Were you drying a large load? Gas dryer If the dryer is less than a hair dryer on maximum exhaust vent system lengths. Run the dryer for ...dryer drum. Each additional elbow in a room colder than 4 elbows. dryer does not dry Cycle time is not heating, see: If the air movement is heating, check the following: Clean the Lint Screen Check the Outside Exhaust Hood Check...
Similar Questions

My Dryer Is Not Drying The Heating Element Will Not Heat.
I have replaced the heating element and thermal cut off fuse and I have had no luck, the dryer turns...
I have replaced the heating element and thermal cut off fuse and I have had no luck, the dryer turns...
(Posted by msupsog 10 years ago)
Can Dryer Be Stacked On Whirlpool Wfw94hexw2 Washer?
(Posted by zemongmnav 10 years ago)

Washer Filled Won't Drain Checked All Power Its Ok. Also Wont Turn On Now.
(Posted by Anonymous-128509 10 years ago)

Dryer Not Heating. All Fuses /thermoststs Good. New Heater Coil.breaker Good.wha
(Posted by debbierobb11 12 years ago)

Dryer Is Not Fully Heating Up
Our dryer is not heating up and is therefore taking a long time to dry a load of clothes.
Our dryer is not heating up and is therefore taking a long time to dry a load of clothes.
(Posted by dasbluline 12 years ago)