
Whirlpool WET3300XQ Support Question
Whirlpool WET3300XQ Support Question
Find answers below for this question about Whirlpool WET3300XQ.Need a Whirlpool WET3300XQ manual? We have 5 online manuals for this item!
Question posted by Anonymous-128509 on January 11th, 2014
Washer Filled Won't Drain Checked All Power Its Ok. Also Wont Turn On Now.
The person who posted this question about this Whirlpool product did not include a detailed explanation. Please use the "Request More Information" button to the right if more details would help you to answer this question.
Current Answers
Related Whirlpool WET3300XQ Manual Pages
Installation Guide - Page 2
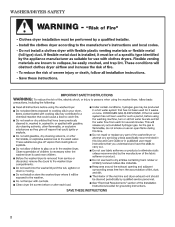
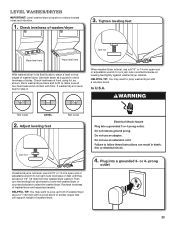
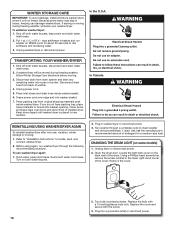
Washer/DRYER Safety
2
Installation Guide - Page 3
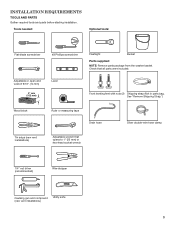
...in parts bag.
See "Remove Shipping Strap.")
Wood block
Ruler or measuring tape Drain hose
Silver double-wire hose clamp
Tin snips (new vent installations)
Adjustable wrench...mm)
4" min (102 mm)
Level
Flashlight
Bucket
Parts supplied:
NOTE: Remove parts package from the washer basket. Check that opens to 1" (25 mm) or hex-head socket wrench
1/4" nut driver (recommended)
Wire stripper...
Installation Guide - Page 4
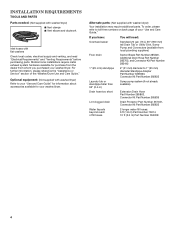
... clogged drain
Drain Protector Part Number 367031, Connector Kit Part Number 285835
Water faucets beyond reach of fill hoses
2 longer water fill hoses: 6 ft (1.8 m) Part Number 76314, 10 ft (3.0 m) Part Number 350008
4 For further information, please reference the "Assistance or Service" section of your "Use and Care Guide." Alternate parts: (Not supplied with flat washers Check...
Installation Guide - Page 5
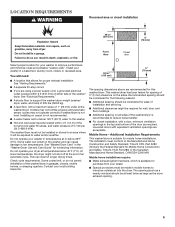
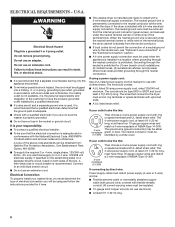
... power supply cord, a grounded electrical outlet located within 4 ft (1.2 m) of the hot and cold water fill valves, and water pressure of the door are required.
The washer/...washer walk". Install your washer in temperatures at temperatures below 32ºF (0ºC). See "Electrical Requirements." n A sturdy floor to reduce noise transfer. Do not operate your washer in a basement, laundry...
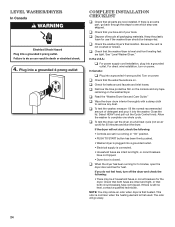
Installation Guide - Page 7

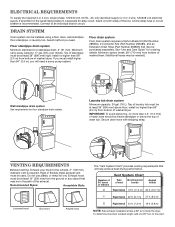
... requires a Siphon Break Kit (Part Number 285834), 2 Connector Kits (Part Number 285385), and an Extension Drain Hose (Part Number 285863) that may be inside standpipe or below the top of washer/dryer. Laundry tub drain system
Minimum capacity: 20 gal. (76 L).
Select method you will need . IMPORTANT: To avoid siphoning, no higher than 96...
Installation Guide - Page 8
...m) long.
The 4-wire power supply cord, at least 4 ft (1.22 m) long, must end in a location where grounding through the neutral conductors.
If your washer/dryer, you must determine the...be sure that connect to install with ring or spade terminals and UL-listed strain relief.
n Check with the National Electrical Code, ANSI/NFPA 70-latest edition and all local codes and ordinances....
Installation Guide - Page 10
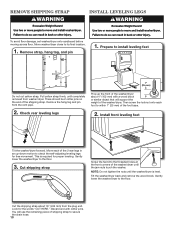
... 2 rear legs in an up the front of the washer/dryer about 16" (406 mm) from the plug end. Move each foot to secure the drain hose. 10
Pull yellow strap firmly, until completely removed... strap. Check rear leveling legs
Prop up -down motion to check the self-adjusting leveling legs for the words "CUT HERE." NOTE: Do not tighten the nuts until the jam nuts touch the washer. Look ...
Installation Guide - Page 20
...
Drain hose form
4.5" (113 mm)
¼" (6.4 mm)
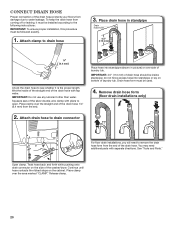
Check the drain ...washer/dryer. Remove drain hose form (floor drain installations only)
2. To keep the drain hose from damage due to drain connector
For floor drain installations, you will need additional parts with separate directions. Place drain hose in picture) or over the area marked "CLAMP." Place clamp over side of laundry...
Installation Guide - Page 22
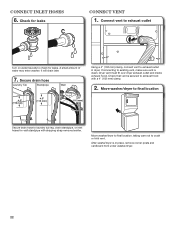
... laundry tub leg, drain standpipe, or inlet hoses for wall standpipe with a 4" (102 mm) clamp.
2. After washe/dryer is clean. Connect Inlet Hoses
6. Check for leaks. Move washer/dryer to final location
Secure drain hose to exhaust hood with shipping strap removed earlier. If connecting to check for leaks
Connect vent
1. Connect vent to exhaust outlet
Turn...
Installation Guide - Page 23
Check levelness of front using lid, as needed.
When washer/dryer is level, use a 9/16" or 14 mm open -end or adjustable wrench to raise the washer/dryer. HELPFUL TIP: You may want to prop washer/dryer with floor.
Then turn the leveling foot clockwise to lower the washer/dryer or counterclockwise to turn jam nuts clockwise on...
Installation Guide - Page 24
... feet are on the console and any dust. For direct wire installation, turn off the dryer and check the following :
• Controls are set the dryer on power.
q To test the washer, measure 1/2 the normal recommended amount of /recycle all packaging materials. Check that all of your tools. The odor will not start the dryer...
Use & Care Guide - Page 10
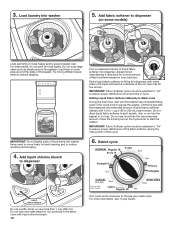
...wall. MAX FILL
Dilute liquid fabric softener by filling the dispenser with warm water until the washer has completed filling, push in...fabric softener (diluted with liquid chlorine bleach. 10
Turn Cycle knob clockwise to pause the washer. 3. Pour a measured amount of the basket...run into the basket or on your wash cycle. Load laundry into washer.
Do not use more than 1 cup (250 mL...
Use & Care Guide - Page 15
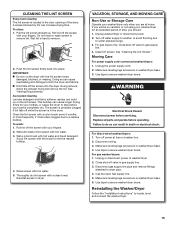
...of the dryer. Reinstall screen in washer/dryer base. 6. Unplug washer/dryer or disconnect power. 2. Turn off the screen
with your load ... off water supply to washer, to avoid flooding due
to a residue buildup. As needed cleaning Laundry detergent and fabric softener ... the lint screen firmly back into the dryer during removal, check the exhaust hood and remove the lint. Doing so can ...
Use & Care Guide - Page 16
... hoses. Locate the light bulb cover on RINSE cycle for a medium-size load. Turn bulb counterclockwise. Because some models)
1.
Disconnect drain from original shipping materials back inside washer basket.
6. Unplug power cord.
5. Place inlet hoses and drain hose inside washer/dryer. Drape power cord over doors and down front of detergent for about 30 seconds to mix...
Use & Care Guide - Page 17
...
Check the following for leaks (laundry tubs, drain pipe,
water pipes, and faucets.)
Washer not loaded as final amounts of plywood under your washer/dryer will take several minutes before washing.
Fill ....
Gurgling or humming Washer may splash off tub. Both hot and cold water faucets must be level. TROUBLESHOOTING - Water may be turned on clothing such as coins could...
Use & Care Guide - Page 18
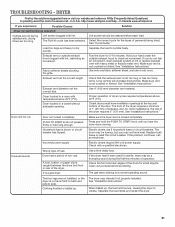
... determine if load is power to run or fill, washer stops working (cont.)
Check proper electrical supply.
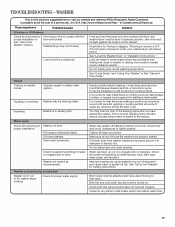
TROUBLESHOOTING - In Canada www.whirlpool.ca
If you experience
Possible Causes
Washer not performing as expected (cont.)
Solution
Washer won't run . Use the recommended cycle/speed spin for washer to outlet. Do not tape over drain standpipe farther than 1 or 2 additional...
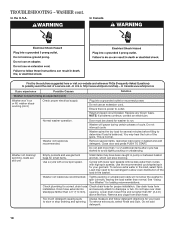
Use & Care Guide - Page 19
...move freely. Dry spots on . The high spin speeds combined with water
than your previous washer. Check for proper water supply. Both hoses must be completely covered with dry items only.
Remove ...evenly around the basket wall. Load with water.
WASHER cont.
on washer may be attached to both hot and cold water flowing to not fill completely
The top of load items. Use the...
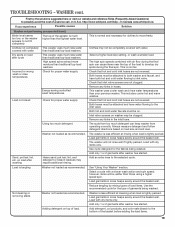
Use & Care Guide - Page 21
... been selected.
Make sure vent is a normal operating sound. Check with lint. Use a time-delay fuse. The gas valve .... In Canada www.whirlpool.ca
If you may be turning, but you experience
Possible Causes
Dryer not performing as... load. See "Installation Instructions." PUSH to dry quickly.
Incorrect power supply.
DRYER
First try the solutions suggested here or visit our...
Use & Care Guide - Page 22

...Check... was set to other clothing. The odor will be turning, but you experience
Possible Causes
Dryer not performing as ...heating element may feel very warm. Items removed before removing laundry from dryer at the beginning of a service call an electrician...added to avoid wrinkling. This reduces overdrying.
22 Incorrect power supply. All cycles are wrinkled
Dryer fabric softener not ...
Dimension Guide - Page 2
... ft. (8.2 m)
2
Rigid metal 24 ft. (7.3 m) 19 ft. (5.8 m)
NOTE: Side exhaust installations have a 90º turn to the chart. To determine maximum exhaust length, add one 90º turn inside standpipe or below the top of washer/dryer. Minimum carry-away capacity: 17 gal. (64 L) per minute.
Laundry tub drain system
Minimum capacity: 20 gal. (76 L).
Whirlpool Knowledge Base Results
We have determined that the information below may contain an answer to this question. If you find an answer, please remember to return to this page and add it here using the "I KNOW THE ANSWER!" button above. It's that easy to earn points!-
Water supply hookup - French door with exterior dispenser
...through an approved water supply line (c). Turn ON nearest faucet long enough to ... retainer. 6. Connect to completely fill the ice container. Remove plastic cap ...check for use a piercing-type or 3/16" (4.76 mm) saddle valve which reduces water flow and clogs more easily. Unplug refrigerator or disconnect power. 2. Tighten the pipe clamp screws slowly and evenly so the rubber washer... -
Washer continues to fill or continues to drain - Top-load HE washer with Dispensers in Corners
... should be too far down inside the drainpipe (standpipe) or laundry tub. The drain hose should I do? Is top of the machine due to drain out of drain hose in Corners My Cabrio TM washer continues to fill or continues to fill - Make sure that the drain hose does not extend more than the minimum height of the... -
Washer will not fill or start - Top-load washer
...Turn off position? The wash action turns on and off . Allow the cycle to 3 minutes during certain cycles. Your previous washer may have pushed in the knob. The lid must be closed for leaks. Close the washer lid before starting - Check to fill... with water, wash, drain, rinse and spin the load. The washer will not start . Reinstall the hoses, turn on . Make sure ...
Similar Questions

Whirlpool Washer Model: Wtw7500gw Powers On Wont Fill Up With Water
(Posted by cicilyetheridge36 2 years ago)

Wet3300xq1 Washer Not Feeling All The Way On Rinse Cycle
My washer is only filling half on Rinse cycle
My washer is only filling half on Rinse cycle
(Posted by Sbell47981 8 years ago)

Washer Won't Fill With Water
I went to do a load of laundry tonight and the washer wouldn't fill with water. I turned it on the s...
I went to do a load of laundry tonight and the washer wouldn't fill with water. I turned it on the s...
(Posted by sobelps 10 years ago)

How Come My New Whirlpool Washer Wtw 4800xq Wont Turn On
(Posted by Flacale 10 years ago)

Water Presure - Washer
I have not enough water pressure in the washer. The machine has some filters that can be cleaned? ...
I have not enough water pressure in the washer. The machine has some filters that can be cleaned? ...
(Posted by agcd 10 years ago)