Whirlpool WED94HEXL Support Question
Whirlpool WED94HEXL Support Question
Find answers below for this question about Whirlpool WED94HEXL.Need a Whirlpool WED94HEXL manual? We have 4 online manuals for this item!
Question posted by dtrent on March 20th, 2013
How To Remove Coins From The Lint Chamber
The person who posted this question about this Whirlpool product did not include a detailed explanation. Please use the "Request More Information" button to the right if more details would help you to answer this question.
Current Answers
Related Whirlpool WED94HEXL Manual Pages
Installation Instructions - Page 2
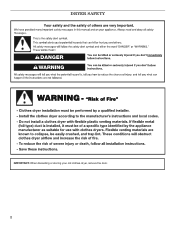
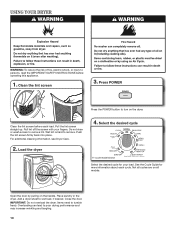
DRYER SAFETY
IMPORTANT: When discarding or storing your old clothes dryer, remove the door. 2
Installation Instructions - Page 5
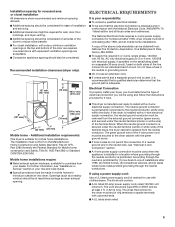
... after 1996, and all local codes and ordinances. Additional installation requirements:
This dryer is adequate. Grounding through the neutral is prohibited for it here.
5" (127...see "Optional 3-wire connection" section.
■■A 4-wire power supply connection must be removed from : National Fire Protection Association, One Batterymarch Park, Quincy, MA 02269.
■■...
Installation Instructions - Page 8
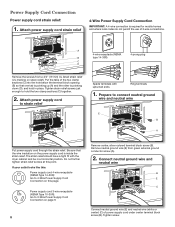
...conductor screw (A).
2. Prepare to 3-Wire Power Supply Cord Connection on strain relief). Remove neutral ground wire (E) from a 3/4" (19 mm) UL listed strain relief (UL marking on page 9.
8
Remove center, silver-colored terminal block screw (B). Put the tabs of the two clamp...4-wire receptacle (NEMA Type 14-30R): Go to strain relief
Spade terminals with the dryer cabinet and be in place.
Installation Instructions - Page 9
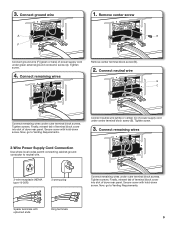
...dryer rear panel. Now, go to Venting Requirements. Connect neutral wire
B
C
Connect remaining wires under center terminal block screw (B). Connect neutral wire (white or center) (C) of power supply cord under outer terminal block screws. Tighten screw.
4. Tighten screws. Connect remaining wires
Remove... with hold -down screw. 3. Remove center screw
A
B
F
Connect ...
Installation Instructions - Page 10

... Direct Connection on strain relief). Direct Wire Connection
Direct wire strain relief
1. Put the threaded section of wires into hooks.
2. Remove neutral ground wire (E) from end of extra length so dryer may be in a horizontal position. Tighten strain relief screw against the direct wire cable. Reaching inside the terminal block opening (B). Shape...
Installation Instructions - Page 11
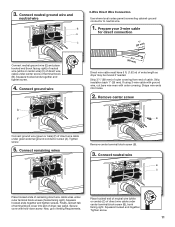
... wire ends into slot of direct wire cable under center screw of extra length so dryer may be moved if needed. Finally, reinsert tab of terminal block cover into hooks....(25 mm).
Connect remaining wires
Remove center terminal block screw (B).
3. Secure cover with outer covering. Place hooked end of neutral wire (white or center) (C) of dryer rear panel. Connect neutral ground...
Installation Instructions - Page 12
...Remove neutral ground wire (E) from green external ground conductor screw (A).
Prepare to Venting Requirements. Tighten screws. Squeeze hooked ends together and tighten screws. Connect remaining wires
E
B
Place ends of dryer... neutral ground wire and neutral wire
B E C
Place hooked ends of dryer rear panel. Secure cover with a qualified electrician that this grounding method is...
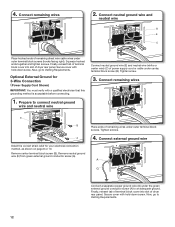
Installation Instructions - Page 13

... (305 mm) from entire length of the system and make sure exhaust hood is not plugged with lint.
Rigid metal vent:
■■ Recommended for exhausting.
4" (102 mm)
Angled Hood
Elbows: ...accessible to clean)
■■ Must be fully extended and supported in final dryer location.
■■ Remove excess to seal all governing codes and ordinances. Clamps:
■■ Use ...
Installation Instructions - Page 15
...that extend into interior of vent to secure vent, because they can catch lint.
2. Attach short hose and
"Y" connector
A
B
If space permits...vent to exhaust hood
Connect Inlet Hose
The dryer must be connected to dryer location using the new inlet hoses. Record ...hand until it is seated on the hoses for future reference.
Remove old rubber washer from inlet hose and replace with 4" (102...
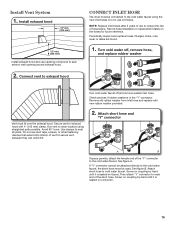
Installation Instructions - Page 16
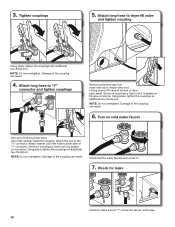
...ttach long hose to the "Y" connector. Attach this end to "Y"
connector and tighten couplings
Remove protective cap from water inlet valve. NOTE: Do not overtighten. Damage to the coupling can...coupling can result. Attach other side of dryer back panel. Using pliers, tighten the couplings an additional two-thirds turn . Damage to dryer fill valve
and tighten coupling
A
Using ...
Installation Instructions - Page 17
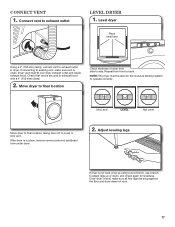
Check that vent is in dryer.
After dryer is secured to exhaust outlet in place, remove corner posts and cardboard from under dryer.
2. Connect vent
1. Move dryer to final location
Check levelness of dryer from front to side. Repeat from side to back.
Level dryer
Place level here
Using a 4" (102 mm) clamp, connect vent to exhaust hood with...
Installation Instructions - Page 18
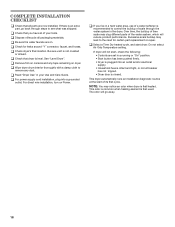
...; Controls are set in your tools. q Check that you live in a hard water area, use of scale through the water system in the dryer.
See "Level Dryer". q Remove film on dryer.
q Wipe dryer drum interior thoroughly with a damp cloth to the need for leaks around "Y" connector, faucet, and hoses. Do not select Air Only Temperature...
Owners Manual - Page 5
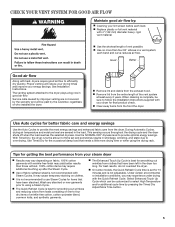
...102 mm) diameter heavy, rigid vent material. See Installation Instructions. n Remove lint and debris from the front the dryer. When cleaning is best for getting the best performance from loads consisting... level to efficiently dry laundry. With Timed Dry, the dryer runs the amount of vent possible. Tips for smoothing out wrinkles and reducing odors from your lint screen before each bend ...
Owners Manual - Page 10
... screen with your load. Push the lint screen firmly back into place. Load the dryer
4. See the Cycle Guide for your fingers. Overloading can lead to remove lint.
Wet lint is hard to wet load, if desired. Add a dryer sheet to remove. Clean the lint screen before operating this appliance.
1. Pull the lint screen straight up. Items need to...
Owners Manual - Page 11
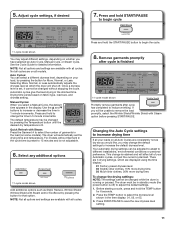
... all options and settings are on some models). Check Lint Screen Sensing Estimated Time Remaining
Timed Dry Adjust
Promptly remove garments after cycle is lit. Select any additional options... button for 6 seconds.
2.
There are 3 drying settings, which the dryer will affect all models. Check Lint Screen Sensing Estimated Time Remaining
Timed Dry Adjust
Wet
High Medium Low Extra...
Owners Manual - Page 12
... the load for air to 150 minutes after the cycle is intended for your dryer, follow the instructions included in the cycle by using the Air Only setting. 6. Remove and discard any lint accumulated from the dryer. Check Lint Screen The Check Lint Screen indicator will indicate that the selected cycle has ended and the load...
Owners Manual - Page 13
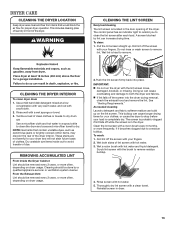
... an indicator light to remind you to remove lint.
Do not rinse or wash screen to clean the lint screen after each load. Rinse well with a clean towel. Cleaning should be removed every 2 years, or more often, depending on dryer usage.
2. Doing so can build up . As needed cleaning Laundry detergent and fabric softener residue can...
Owners Manual - Page 14
... Moving Care For power supply cord-connected dryers: 1. Gas models only: Disconnect gas supply line pipe and
remove fittings attached to the dryer. Gas models only: Cap the open ... leaks are at home. When replacing your dryer.
Plug in dryer or reconnect power as described in dryer base. 8. Transport hose separately. 5. Clean lint screen. Turn off water faucet. 4. Disconnect...
Owners Manual - Page 16
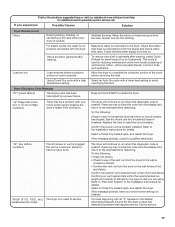
... garment care label instructions.
The dryer was not removed from dryer at the end of drying time... in a closet. Drum stains are too long
The load is turned on.
16 These will change the amount of the cycle. If you may also vary depending on Auto Cycles.
Clean lint screen before each load. If loads are not recommended. Add dryer...
Owners Manual - Page 17
Load removed before removing the load.
Check that water inlet hose is connected to both the faucet and dryer's water inlet valve.
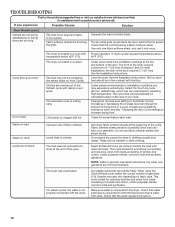
Dryer Displaying Code Message
"PF" (power failure)
The drying cycle has been interrupted by a power failure.
Electric dryers use two household fuses or breakers.
"AF" (low airflow condition)
The lint screen or vent is not...
Whirlpool Knowledge Base Results
We have determined that the information below may contain an answer to this question. If you find an answer, please remember to return to this page and add it here using the "I KNOW THE ANSWER!" button above. It's that easy to earn points!-
How often should I clean the filter in my room air conditioner?
Top freezer FAQs Knowledgebase search tips Changing/removing the water filter animation - Check the filter every two weeks to see whether it needs cleaning. A clean filter helps remove dust, lint, and other particles from the air and is important for best cooling or heating and operating efficiency. -
Lint is on the load - Front-load washer
... a new load of a dryer removes lint from lint takers (corduroys, synthetics, permanent press). Always check all pockets and the interior of the washer before laundering. You can expect some lint on the load - Front-load washer My front-load washer produces a lot of laundry is more lint in pockets? Was the laundry sorted? Leave enough space... -
Lint is on the load - Dryer
... is on your fabric types. Was the load overdried? Dryer Dryer There is hard to ensure that non-clothing items are not present. Clean the lint screen before each load to remove). Roll lint off the screen with lint? Clean the Lint Screen Is the lint screen clogged with hot water and liquid detergent. Over time...
Similar Questions


Dryer Will Not Turn On.
my dryer wil not turn on. I have checked a fuses and they are good. What's next?
my dryer wil not turn on. I have checked a fuses and they are good. What's next?
(Posted by Dtidavid54 7 years ago)

Dryer Turns On But No Heat.
We are getting error code AF, we cleaned the vents and removed all lint. My husband even took the ba...
We are getting error code AF, we cleaned the vents and removed all lint. My husband even took the ba...
(Posted by tjmcgraw91 11 years ago)

What Is The Part Number For The Lint Filter For Dryer Model Number Wed9600tw
(Posted by Anonymous-56884 12 years ago)

Wed5600 Dryer Door Removal
I need to remove the lint trap on my dryer and need to know how to take the door off first. Please l...
I need to remove the lint trap on my dryer and need to know how to take the door off first. Please l...
(Posted by rubiosus 12 years ago)