Whirlpool WED7400XW Support Question
Whirlpool WED7400XW Support Question
Find answers below for this question about Whirlpool WED7400XW.Need a Whirlpool WED7400XW manual? We have 4 online manuals for this item!
Question posted by pdoreika on November 20th, 2012
How To Replace The Exhaust Belt On My Whirlpool Wed7400xw
The clothes didn't dry. No exhaust comes out. I opened the front panel to find that the exhaust drive belt and a threaded nut were at the bottom of the machine. The nut screwed into the top of the exhaust mechanism and the belt fits it, but I've looked ALL OVER the motor and can't find where the other end of the belt connects to. Please help.
Current Answers
Related Whirlpool WED7400XW Manual Pages
Owners Manual - Page 4
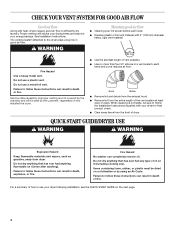
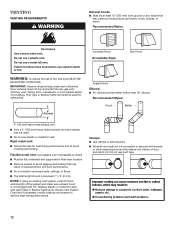
...or fire.
The venting system attached to efficiently dry laundry.
each load.
■ Replace plastic or foil vent material with heat, dryers require good air flow to the dryer plays a big role in death, explosion,...Good
Better
■ Remove lint and debris from the exhaust hood.
■ Remove lint from dryer.
Items containing foam, rubber, or plastic must be sure to use your energy...
Owners Manual - Page 5
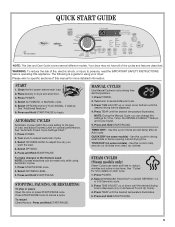
... - Place laundry in dry items. See "Cycles" for optimal performance. Select OPTIONS and/or CYCLE SIGNAL, if desired. Turn knob to help smooth out wrinkles from clean, dry clothes.
STEAM CYCLES ... risk of this cycle to desired Manual Cycle.
3. Press and Hold START/PAUSE. TIMED DRY - Your dryer may not have all of load, and adjust Dryness Level for more detailed information.
The ...
Owners Manual - Page 8
.... ■ Shake and fluff pillows by pressing WRINKLE SHIELD™ setting or opening the dryer door. ■ For the Perm Press/Casual Cycle, the WRINKLE SHIELD™ setting is preset to complete drying, if needed. Press CYCLE SIGNAL until the clothes are removed, or the WRINKLE SHIELD™ setting ends.
Eco Monitor The Eco...
Owners Manual - Page 9
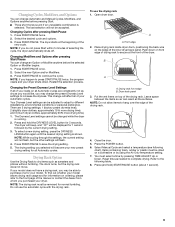
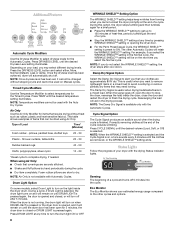
... dealer from whom you may be displayed for all Automatic cycles are 3 drying settings: 1 (factory preset dryness level), 2 (slightly dryer clothes, approximately 15% more drying time), and 3 (much dryer clothes, approximately 30% more drying time).
1. A
A. Close the door. 5. Press START/PAUSE twice.
2. Drying rack front edge B. Reset time as sweaters and pillows without tumbling...
Owners Manual - Page 10
... residue buildup. 4.
IMPORTANT:
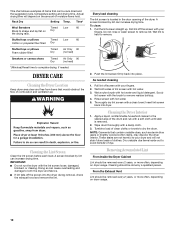
■ Do not run the dryer with your
fingers. Wet lint is located in the door opening of the dryer. As needed . Insert lint screen
back into dryer. From the Exhaust Vent Lint should be rack dried and the suggested cycle, temperature setting and drying time. Time*
Wool Sweaters
Timed Low
60
Block to...
Owners Manual - Page 11

... at home. Changing the Drum Light
The dryer light automatically turns on vacation or not using your dryer only when you are found. Open the dryer door. Replace all parts and panels before servicing. Make sure leveling legs are secure in dryer base. 6.
If you will not freeze. To winterize dryer
1. Shut off the water supply to locate...
Owners Manual - Page 12

...exhaust hood is properly installed. There may be turning, but there may be a problem with a qualified electrician.
■ Was a regular fuse used for the type of lint and debris. If the problem continues, call an electrician.
■ Is the valve open...Timed Dry heated cycle, and restart the dryer.
Replace the fuse or reset the circuit breaker. Try the following : Was the drying cycle...
Owners Manual - Page 13
... or down buttons. Long venting will change the amount of drying time in death or fire.
■ Is the exhaust vent or outside exhaust hood to tumble freely.
■ Are clothes coming out of lint or replace exhaust vent with damp or wet spots? The rear of the dryer requires 5" (127 mm) of airspace, and the sides and...
Owners Manual - Page 15
... repair service, first see the "Troubleshooting" section of the Use & Care Guide. WHIRLPOOL CORPORATION LAUNDRY WARRANTY
LIMITED WARRANTY
For one year from the date of purchase, when this major appliance... cover: 1. Expenses for travel and transportation for product service if your major appliance, to replace or repair house fuses, or to province. If you think you . Service must provide ...
Dimension Guide - Page 1
... vent. Louvered doors with equivalent air ventilation openings are for exhaust vent with product. Specifications subject to change without notice. W10267633A 04/2010 Electric Dryer
PRODUCT MODEL NUMBERS
WED6200S, WED6400S, WED6600V, WED6600W, WED7300X, WED7400X, WED7600X, WED7800X
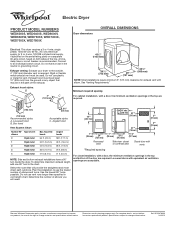
Dryer dimensions
OVERALL DIMENSIONS
Electrical: This dryer requires a 3 or 4 wire, single phase, 120/240...
Installation Instructions - Page 3
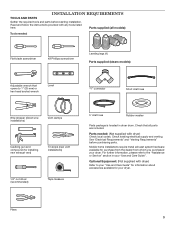
... the instructions provided with dryer) Check local codes. Pliers 3 Parts needed :
Flat-blade screwdriver
#2 Phillips screwdriver
Leveling legs (4) Parts supplied (steam models):
Adjustable wrench that opens to your "Use and Care Guide" for information about accessories available for installing new exhaust vent)
Tin snips (new vent installations)
1/4" nut driver (recommended)
Tape measure...
Installation Instructions - Page 4
...openings in longer drying times. If not level, clothes may not tumble properly and automatic sensor cycles may cause dryer not to reduce noise transfer.
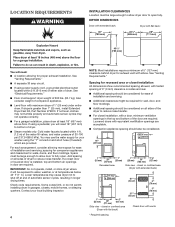
■■ For closet installation, with a door, minimum ventilation openings...arrangement, consider allowing more space for proper exhaust installation. DRYER DIMENSIONS
Dryer with extended back:
Dryer with extended back)
14" max.* (...
Installation Instructions - Page 5
... ground wire), covered with clothes dryers. The neutral conductor must...screw), and secured under the neutral terminal (center or white wire) of NEMA Type 14-30 R.
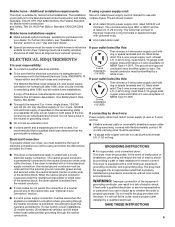
If connecting by a white cover. GROUNDING INSTRUCTIONS
� For a grounded, cord-connected dryer: This dryer...dryer exhaust opening. The 3-wire power supply cord, at least 4 ft. (1.22 m) long, must be plugged into dryer...
Installation Instructions - Page 6

... supply cord 4-wire receptacle (NEMA Type 14-30R): Go to Power Supply Cord Connection. Screw legs into leg holes by hand, use a large flat piece of cardboard from dryer carton;
Firmly grasp dryer body (not console panel) and gently lay dryer down on its final location. Leave enough room for leveling legs
To avoid damaging...
Installation Instructions - Page 12
...
■■ Only a 4" (102 mm) heavy metal exhaust vent and clamps may result in reduced airflow and poor performance.
■■ Do not install in final dryer location.
■■ Remove excess to seal all governing codes and ordinances. Replace plastic or metal foil vents with screws or other fastening devices that may be...
Installation Instructions - Page 13
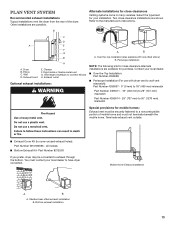
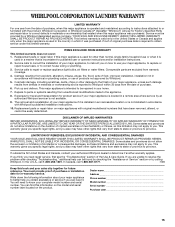
... vent the dryer from the rear of mobile home and must contact your installation. Elbow C. Terminate exhaust vent outside.
■■ Exhaust Cover Kit (to have dryer converted. Moblie Home Exhaust installation
A
B
A. Standard rear offset exhaust installation B. Two close clearances
Venting systems come in many varieties. Exhaust hood
E. Exhaust outlet
Optional...
Installation Instructions - Page 14
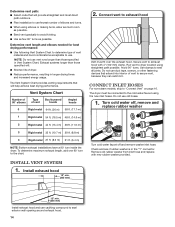
... "Y" connector. Turn cold water off, remove and
replace rubber washer
Turn cold water faucet off and remove washer inlet hose.
Install exhaust hood
12" min. (305 mm)
2. Run ...Install exhaust hood and use caulking compound to use duct tape, screws, or other fastening devices that will :
■■ Shorten life of dryer.
■■ Reduce performance, resulting in longer drying times...
Installation Instructions - Page 16
...If connecting to operate correctly. After dryer is secured to final location.
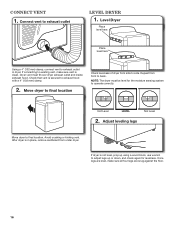
Connect Vent
1. Level Dryer
Place level here
Place level here
Using a 4" (102 mm) clamp, connect vent to exhaust outlet
Level dryer
1. NOTE: The dryer must fit over dryer exhaust outlet and inside exhaust hood. Check that vent is in dryer. Dryer vent must be level for levelness. Connect...
Installation Instructions - Page 19

..., clean exhaust system of lint or replace exhaust vent with lint? Press any key to clear the code from the dryer to see...DRYER OPERATION
Dryer will increase drying times. Use a time-delay fuse. If the message persists, have not tripped. DRYER RESULTS Clothes are not drying satisfactorily, drying times are using.
Elelctric dryers use two household fuses or circuit breakers.Replace...
Warranty - Page 1

... warranty. If outside the 50 United States and Canada, contact your major appliance, to replace or repair house fuses, or to published user or operator instructions and/or installation instructions...
Some states and provinces do not allow limitations on the product.
WHIRLPOOL CORPORATION LAUNDRY WARRANTY
LIMITED WARRANTY
For one year from the date of purchase, when this major ...
Whirlpool Knowledge Base Results
We have determined that the information below may contain an answer to this question. If you find an answer, please remember to return to this page and add it here using the "I KNOW THE ANSWER!" button above. It's that easy to earn points!-
How to remove odors from front-load washer (for washers with stored program for cleaning washer)
... allow for better ventilation and drying of the washer interior. Read these instructions before beginning the cleaning process. Do not add detergent or other laundry products to this cycle. Adding additional products may reduce the effectiveness of this cycle will continue. Replace the detergent compartment divider. Open the dispenser drawer and remove... -
Damp loads or long drying times - Dryer
... vent. Please take longer to be blocking the air intake or exhaust grille inside of this a new installation? Dryer does not heat - Replace any fabric softener sheets from the inside the dryer drum. This slows moist air from leaving the dryer and extends drying time. A dryer softener sheet may be in a garage or on maximum... -
Water supply hookup - Bottom freezer/French door refrigerators
... nut onto the outlet end with water pressure of copper tubing you may further reduce the water pressure when used previously. Slide the brass compression nut over the sleeve and screw nut into a container or sink. Do not overtighten. 6. Pull on nut (1) attached to the water pipe. Continue to observe the water supply connection...
Similar Questions

How Do I Take The Dryer Apat So I Can Replace The Belt?
(Posted by GREGGMAROUSEK 8 years ago)

How To Replace Thermal Fuse On Whirlpool Dryer Gew9868kq1
(Posted by gidli 9 years ago)

How To Replace Heating Element On Whirlpool Dryer Model Wed4800xq1
(Posted by birdjXDa 9 years ago)

Dryer Stops Before Clothes Are Dry
dryer stops before clothes are dry
dryer stops before clothes are dry
(Posted by shannonbolt 9 years ago)

How To Replace Door Switch On Whirlpool Dryer Model Wed7500vw
(Posted by kgarpa 10 years ago)