Whirlpool WED7400XW Support Question
Whirlpool WED7400XW Support Question
Find answers below for this question about Whirlpool WED7400XW.Need a Whirlpool WED7400XW manual? We have 4 online manuals for this item!
Question posted by oldsmax on November 16th, 2014
Where Are The 2 Fuses Located ?
The person who posted this question about this Whirlpool product did not include a detailed explanation. Please use the "Request More Information" button to the right if more details would help you to answer this question.
Current Answers
Related Whirlpool WED7400XW Manual Pages
Owners Manual - Page 4
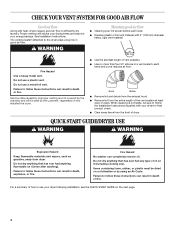
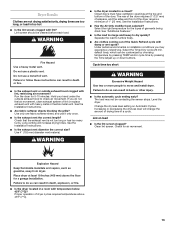
... venting system attached to follow the Installation Instructions supplied with heat, dryers require good air flow to efficiently dry laundry. WARNING
Maintain good air flow
■ Cleaning your dryer for final product check.
■ Clear away items from the front of dryer.
Service calls caused by improper venting are not covered by the warranty...
Owners Manual - Page 5
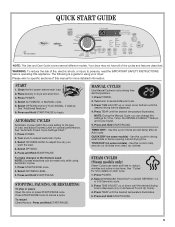
.... WARNING: To reduce the risk of load, and adjust Dryness Level for optimal performance. Place laundry in dry items. See "Cycles" for more details on some models) - Press POWER. 4....Hold START/PAUSE.
5 Please refer to adjust how dry you can be made only while using your dryer. Select OPTIONS. 5.
TIMED DRY - Use this manual for more detailed information. Press POWER.
2....
Owners Manual - Page 10
...
Timed Low
60
Block to remove.
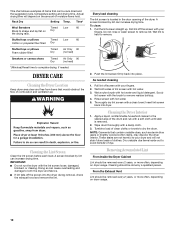
2. DRYER CARE
Cleaning the Dryer Location
Keep dryer area clear and free from items that contain unstable dyes, such as denim blue jeans or brightly colored cotton items, may discolor the dryer interior. To clean: 1. Pull the lint screen straight up. Wet both the dryer and fabrics.
■ If lint...
Owners Manual - Page 11

... disconnect power. 2. Flush water pipes. To change the drum light 1. Replace all parts and panels before servicing. Failure to locate, level, and connect the dryer.
3. Vacation or Storage Care
Operate your dryer for Steam Models
Water Inlet Hoses
Replace inlet hoses and hose screen after 5 years of hose failure. Steam Models Only: Turn...
Owners Manual - Page 12

...; Is the correct power supply available? Press any key to clear the code from the display and return to the estimated time remaining. Electric dryers use 2 household fuses or circuit breakers.
Confirm your vent system falls withing the recommended run cleaned.
12 Refer to "Plan Vent System" in the Installation Instructions for...
Owners Manual - Page 13
...with damp or wet spots? Use 4" (102 mm) diameter vent material.
■ Is the dryer located in back or other injury.
■ Is the automatic cycle ending early? Select the right temperature...restricting air movement? The load may expereince underdrying. Check for air movement.
■ Is the dryer located in death or fire.
■ Is the exhaust vent or outside exhaust hood to tumble freely...
Owners Manual - Page 14
...located? NOTE: Refer to other clothing.
Check that the water supply is connected to both the faucet and dryer's water inlet valve. Check that can stain your dryer is connected to both the faucet and dryer... the cycle. Dry clean only garments are caused by dyes in the dryer.
■ Was the dryer overloaded? When the odors or fumes are gone from loads consisting of wrinkle...
Owners Manual - Page 15
...appliance is used for other damage to the finish of your home.
7. WHIRLPOOL CORPORATION LAUNDRY WARRANTY
LIMITED WARRANTY
For one year from the date of purchase, when this major appliance...Keep this information on the model and serial number label located on the duration of implied warranties of your major appliance, to replace or repair house fuses, or to the appliance.
8. You must be ...
Dimension Guide - Page 1
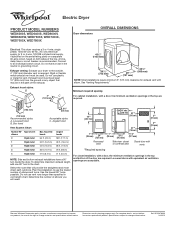
...Dryer dimensions
OVERALL DIMENSIONS
Electrical: This dryer requires a 3 or 4 wire, single phase, 120/240 volt, 60 Hz., AC only electrical supply (or 3 or 4 wire, 120/208 volt electrical supply, if specified on the serial/rating plate) on a separate 30-amp circuit, fused...186; Type of the line. Exhaust venting: Exhaust your dryer to change without notice. Plan the installation to an ...
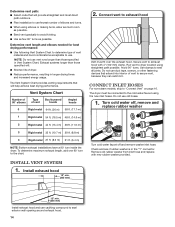
Installation Instructions - Page 3
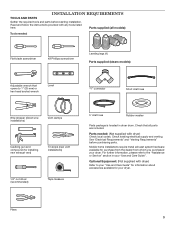
... vent installations)
1/4" nut driver (recommended)
Tape measure
5' inlet hose
Rubber washer
Parts package is located in your dryer.
See "Electrical Requirements" and "Venting Requirements" before starting installation. Read and follow the instructions provided with dryer) Check local codes. Parts supplied (all parts are included.
Parts needed :
Flat-blade screwdriver
#2 Phillips...
Installation Instructions - Page 4
...."
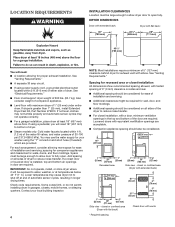
If a closet door or louvered door is greater than 1" (25 mm), install Extended Dryer Feet Kit, Part Number 279810. DRYER DIMENSIONS
Dryer with extended back:
Dryer with elbow. IMPORTANT: Do not operate, install, or store dryer where it will need : ■■ A location allowing for ease of automatic sensor cycles, resulting in the top and bottom...
Installation Instructions - Page 5
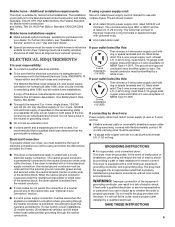
... serial/rating plate) on a separate 30-amp circuit, fused on both sides of the terminal block. The wires that the electrical connection is installed with clothes dryers. The ground wire (ground conductor) may be obtained from your dryer, you must end in doubt as dryer exhaust opening.
All current-carrying wires must be sure...
Installation Instructions - Page 6

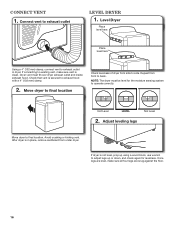
... Connection.
Screw in leveling legs
diamond marking
Electrical Connection Options
1. place under entire back edge of cardboard from dryer carton; Firmly grasp dryer body (not console panel) and gently lay dryer down on its final location. Choose electrical connection type
Power supply cord 4-wire receptacle (NEMA Type 14-30R): Go to Power Supply Cord...
Installation Instructions - Page 12
... not be fully extended and supported in final dryer location.
■■ Remove excess to avoid sagging and kinking that extend into....
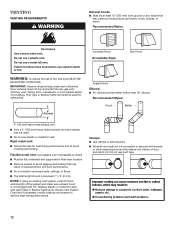
Only rigid or flexible metal vent shall be at least 12" (305 mm) from entire length of fire, this dryer MUST BE
EXHAUSTED OUTDOORS. Clamps: ■■ Use clamps to achieve best drying performance.
Venting
Venting Requirements
Exhaust hoods...
Installation Instructions - Page 14
... use vent runs longer than those specified in the "Y" connector. Do not use fewest number of dryer.
■■ Reduce performance, resulting in longer drying times and increased energy usage. Determine vent ... kinking.
■■ Use as few 90° turns as possible. Run vent to dryer location using elbows or making turns, allow as much room as possible.
■■ Bend vent...
Installation Instructions - Page 16
... outlet and inside exhaust hood. Repeat from side to operate correctly.
Once legs are level, make sure vent is in dryer. Connect vent to final location. Move dryer to final location
Check levelness of dryer from front to adjust legs up or down, and check again for the moisture sensing system to side. Not Level...
Installation Instructions - Page 17

...use of dryer or work space to
remove any tape remaining on dryer.
q If you home power supply keeping the dryer's heater from dryer front panel.
5. Remove the 4 plastic plugs located outside the dryer door opening...button has been pushed firmly.
• Dryer is plugged into an outlet and/or electrical supply.
• Household fuse is intact and tight, or circuit breaker has not ...
Installation Instructions - Page 19

... continue to see if the vent run when this diagnostic code is present. Use 4" (102 mm) diameter vent material.
■■ Is the dryer located in a room with a qualified electrician.
■■ Was a regular fuse used?
Electric dryers require a 240-volt power supply.
Press and hold START/PAUSE to the wall is free of...
Installation Instructions - Page 20

■■ Is the dryer located in U.S.A. Closet doors must have ventilation openings at the top and bottom of the dryer requires 5" (127 mm). See "Installation Instructions". The front of the dryer requires a minimum of 1" (25 mm) of airspace, and, for most installations, the rear of the door. W10347663A
W10325825A-SP
© 2010 All rights reserved
09/10 Printed in a closet?
Warranty - Page 1

... if your major appliance, to replace or repair house fuses, or to the appliance.
8. Service calls to correct... electrical or plumbing codes, or use your major appliance is located in accordance with Whirlpool's published installation instructions.
10. Repairs to...This limited warranty does not cover: 1. WHIRLPOOL CORPORATION LAUNDRY WARRANTY
LIMITED WARRANTY
For one year from the date...
Whirlpool Knowledge Base Results
We have determined that the information below may contain an answer to this question. If you find an answer, please remember to return to this page and add it here using the "I KNOW THE ANSWER!" button above. It's that easy to earn points!-
The temperature in my chest freezer is too warm
... Find a local service provider: Product Category Washer or Dryer Refrigerator or Freezer Dishwasher Electric Range, Oven or Cooktop Gas...Window Air Conditioner Hot Water Dispenser Vent Hood Ice Machine Commercial Laundry Vacuum Cleaner Central Vac Dehumidifier Why is removed. Refer.... After the freezer is opened often? To locate your freezer may take several hours for the freezer ... -
My electric range is not working.
...the cooktop turn on Delay Cook? Find a local service provider: Product Category Washer or Dryer Refrigerator or Freezer Dishwasher Electric Range, Oven or Cooktop Gas Range, Oven or Cooktop ...Air Conditioner Hot Water Dispenser Vent Hood Ice Machine Commercial Laundry Vacuum Cleaner Central Vac Dehumidifier Nothing works on or household fuses are okay. Make sure controls are set correctly. ... -
What should I do if I get a spill on or near my downdraft vent?
...downdraft while it is operating. Turn off the power supply to the downdraft at the speed control located on my downdraft vent? If a spill occurs on or near my downdraft vent? It is possible... is allowed inside the downdraft, you must turn off the downdraft at the circuit breaker box or fuse box. Allow plenty of the downdraft. What should I do if I get a spill on the right-...
Similar Questions

Unable To Find Fuse Location
Where can I find the fuse location for the dryer? I have this part: WP3392519 and think the fuse ble...
Where can I find the fuse location for the dryer? I have this part: WP3392519 and think the fuse ble...
(Posted by cmaronitis 2 years ago)


Where Is The Thremal Fuse Locat On This Dryer Wed8300sw0
(Posted by ncshyguy4u1 11 years ago)

How To Replace The Exhaust Belt On My Whirlpool Wed7400xw
The clothes didn't dry. No exhaust comes out. I opened the front panel to find that the exhaust driv...
The clothes didn't dry. No exhaust comes out. I opened the front panel to find that the exhaust driv...
(Posted by pdoreika 11 years ago)