
Whirlpool WED5700XW Support Question
Whirlpool WED5700XW Support Question
Find answers below for this question about Whirlpool WED5700XW.Need a Whirlpool WED5700XW manual? We have 4 online manuals for this item!
Question posted by Kdmiller77 on November 7th, 2015
Wed5700xw01 Will Not Start
Power will turn on but when you push start it just makes a clicking noise an will not start. We also noticed about a week ago it made a really high pitch squealing noise.
Current Answers
Answer #1: Posted by TechSupport101 on November 7th, 2015 6:00 AM
TechSupport101

Member since:
May 24th, 2013 Points: 12,171,305

Member since:
May 24th, 2013 Points: 12,171,305
Hi. Please follow the troubleshooting steps here http://www.partselect.com/Repair/Dryer/Will-Not-Start/
Related Whirlpool WED5700XW Manual Pages
Dimension Guide - Page 1

... hamper door
*M ost intallations require a minimum 5 1/2" (140 mm) clearance behind the dryer for planning purposes only. To determine maximum exhaust length, add one 90° turn inside the dryer. Do not use plastic or metal foil vent. Specifications subject to change without notice. Minimum required spacing
For cabinet installation, with a door, the minimum ventilation...
Installation Instructions - Page 2
... mean:
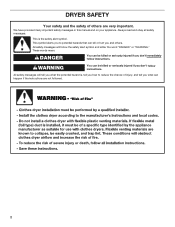
DANGER
You can be killed or seriously injured if you don't immediately follow the safety alert symbol and either the word "DANGER" or "WARNING."
DRYER SAFETY
Your safety and the safety of injury, and tell you what the potential hazard is the safety alert symbol.
This is , tell you how...
Installation Instructions - Page 3

... amp circuit.
3
For further information, please reference the "Assistance or Service" section of the Dryer User Instructions. The wires that all parts are included. Parts needed :
Flat-blade screwdriver
#2 ...Electrical Requirements" and "Venting Requirements" before starting installation. The cord should contain:
■■ A UL listed 30-amp power supply cord, rated 120/240 volt minimum...
Installation Instructions - Page 4

... conform to reduce noise transfer.
■■ For closet installation, with equivalent ventilation openings are for ease of 1" (25 mm) under entire dryer. (If slope is recommended. Dryer Dimensions
43 "... the end of an automatic cycle. The National Electrical Code requires a 4-wire power supply connection for purchase from : National Fire Protection Association, One Batterymarch Park, ...
Installation Instructions - Page 5

... using and follow the instructions provided for it here.
■■ If local codes do not use with clothes dryers. The neutral conductor must be identified by direct wire: Power supply cable must match power supply (4-wire or 3-wire) and be:
■■ Flexible armored cable or nonmetallic sheathed copper cable (with ground...
Installation Instructions - Page 6

... cardboard.
6 place under entire back edge of cardboard from dryer carton; Failure to move and install dryer.
Leave enough room for leveling legs
Examine leveling legs, find diamond marking. Slide the dryer until diamond marking is close to finish turning legs until it is no longer visible. diamond marking
1. Screw legs into leg holes...
Installation Instructions - Page 7
... connector. Fire Hazard
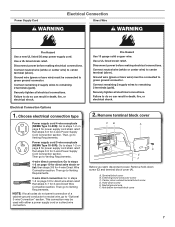
Use 10 gauge solid copper wire.
Remove terminal block cover
CB
A
D
E F
Before you start, disconnect power. Center, silver-colored terminal block screw D.
Disconnect power before making electrical connections.
Choose electrical connection type
Power supply cord 4-wire receptacle (NEMA Type 14-30R): Go to Venting Requirements.
Terminal block cover...
Installation Instructions - Page 8
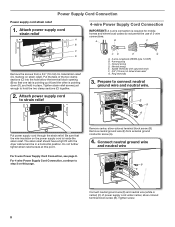
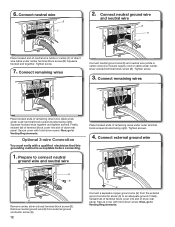
...the use of 3-wire connections. For 4 wire Power Supply Cord Connection, continue to hold in a horizontal position. Spade terminals with the dryer cabinet and be in place.
Remove neutral ground ...8 Tighten strain relief screws just enough to step 3 on this point. Ring terminals
3. For 3-wire Power Supply Cord Connection, see page 8. Put the tabs of power supply cord under center, ...
Installation Instructions - Page 9
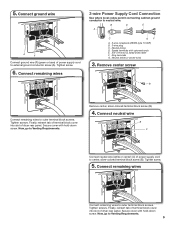
.... 5. Neutral prong D. Tighten screw.
5. Finally, reinsert tab of terminal block cover into slot of dryer rear panel. Connect ground wire
A
F
Connect ground wire (F) (green or bare) of power supply cord to neutral wire. Connect remaining wires
3-wire Power Supply Cord Connection
Use where local codes permit connecting cabinet-ground conductor to center, silver...
Installation Instructions - Page 12
...neutral ground wire
and neutral wire
B E
C
Place hooked end of neutral wire (white or cente) (C) of power supply cord or cable under center terminal block screw (B). Connect remaining wires
Connect neutral ground wire (E) and neutral ... reinsert tab of terminal block cover into slot of dryer rear panel. 6. Tighten screws.
4. Finally, reinsert tab of terminal block cover into slot of...
Installation Instructions - Page 15
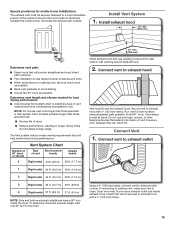
...; Reduce performance, resulting in longer drying times and increased energy usage. The Vent system chart provides venting requirements that vent is clean. Run vent to dryer location using elbows or making turns, allow as much room
as possible. ■■ Bend vent gradually to avoid kinking. ■■ Use as few 90°...
Installation Instructions - Page 16

....
■■ Start button has been pushed firmly.
■■ Dryer is plugged into an outlet and/or electrical supply is on.
■■ Household fuse is intact and tight, or circuit breaker has not tripped.
■■ Dryer door is first used. Avoid crushing or kinking vent. Once legs are level, make sure all...
Use & Care Guide - Page 4

...caused by improper venting are sensed in the load. n Use the shortest length of the dryer.
During Automatic Cycles, drying air temperature and moisture level are not covered by the warranty ...and will default to Normal Dryness Level to efficiently dry laundry.
When cleaning is complete, be paid by the customer, regardless of time set and ...
Use & Care Guide - Page 5

... descriptions of the cycle the dryer is not available on the fabrics in a mixed load to avoid overdrying or remove partially dry items that may vary.
1 POWER BUTTON Press to select available ....
3 START/PAUSE BUTTON Press to start a cycle, or press once while a cycle is in process to turn on until the desired volume (Loud, Soft, or Off) is useful when you when your laundry load. Press...
Use & Care Guide - Page 7

... your fingers.
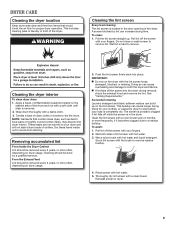
Push the lint screen firmly back into place. For additional cleaning information, see "Dryer Care." Do not rinse or wash screen to tumble freely.
3.
clothes should be able to remove lint. Close the door. Press POWER
Press the POWER button to turn on the dryer.
7 Clean the lint screen
2. Place laundry in the dryer. Do not...
Use & Care Guide - Page 8

... moisture and is used for a starting point for use with all options and settings are unable to remove the load promptly, press the Wrinkle Shield button to turn ON or OFF at any time ...with Automatic Cycles only) You can select a different dryness level, depending on the light inside the dryer drum. See the "Cycle Guide" or the display for other cycles, the WRINKLE SHIELD™ feature...
Use & Care Guide - Page 9
... to remove. Wet lint is located in front of the dryer. Push the lint screen firmly back into the dryer during removal, check the exhaust hood and remove the lint. See "Venting Requirements." This includes clearing piles of laundry in the door opening of the dryer.
Do not rinse or wash screen to both sides...
Use & Care Guide - Page 10
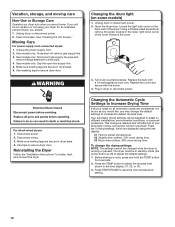
... models only: Close shut-off ) to secure dryer door. Make sure leveling legs are at home. Unplug dryer or disconnect power. 2. Locate the light bulb cover on some models)
1. Turn bulb counterclockwise. This change is retained and will be changed while the dryer is off valve in dryer base. 6. The dryer must be adjusted to adapt to increase...
Use & Care Guide - Page 11

...dried.
Incorrect power supply. The dryer may be turning, but you may not ...turning, but you experience
Possible Causes
Solution
Clothes are not drying satisfactorily, drying times are not installed, or the dryer is open .
Fabric softener sheets blocking the grille.
Closet doors must have heat. START/PAUSE button not pressed firmly or held long enough. Make sure the dryer...
Use & Care Guide - Page 12

...
Possible Causes
Solution
Dryer displaying code message
Cycle time too short
"PF" (power failure), Start LED flashes "F#...fumes are caused by a power failure? Laundry items removed from the dryer before Cool Down may have...make it easier to garment care label instructions. Load is too hot
The electric dryer is best for the first time. Fabric softener sheets added to other clothing. A high...
Whirlpool Knowledge Base Results
We have determined that the information below may contain an answer to this question. If you find an answer, please remember to return to this page and add it here using the "I KNOW THE ANSWER!" button above. It's that easy to earn points!-
My electric range is not working.
... or Dryer Refrigerator or Freezer Dishwasher Electric Range, Oven or Cooktop Gas Range, Oven or Cooktop Microwave Trash Compactor Window Air Conditioner Hot Water Dispenser Vent Hood Ice Machine Commercial Laundry Vacuum Cleaner Central Vac Dehumidifier Nothing works on or household fuses are set on the range display Make sure that the power cord... -
Changing my air purifier filters
...of the air purifier will not reset the timer. Unplug the air purifier or disconnect power. Gently push in the tabs and pull off the front grille to remove it is time... fingers on my air purifier? Use the following procedure to start the air purifier. Turn the fan speed knob to the desired fan speed or press Power to replace your air purifier filters. Press and hold the... -
Water supply hookup - Bottom freezer/French door refrigerators
...pipe clamp screws so the rubber washer makes a watertight seal. Slip the compression... power. Do not overtighten. Pull on the water pipe. Turn ...the water supply to the refrigerator Click here for non-water filter models ...starting installation. Add aprox. 7' (2.1 m) to its permanent location. 7. Using a cordless drill, drill a ¼" hole in the cold water pipe you turn...
Similar Questions

High Pitched Sqeeking At Start Up
after pushing the start button there is a high pitched squeek for about 2 min, then it goes away.
after pushing the start button there is a high pitched squeek for about 2 min, then it goes away.
(Posted by tdriver844 1 year ago)

My Dryer Whirpool Dryer Turns On But It Won’t Start It Makes A Noise How Do I
how do I reset my whirlpool dryer it turns on but won't start
how do I reset my whirlpool dryer it turns on but won't start
(Posted by Watchmework111 4 years ago)

Dryer Does Not Run. Power Turns On But Dryer Won't Start Running Says Sensing?
(Posted by kellyhakenwerth 11 years ago)

Dryer Won't Power On
dryer was running in the middle of a cycle and just shut off. I've checked the breakers and power su...
dryer was running in the middle of a cycle and just shut off. I've checked the breakers and power su...
(Posted by kelly475 11 years ago)

My Dryer Won't Power On At All It Worked Fine At Old House But Does Nothing Here
Wed5500xw about a year old I changed plug and breaker still nothing
Wed5500xw about a year old I changed plug and breaker still nothing
(Posted by Thibeauxjessica 11 years ago)