Whirlpool WED4800XQ Support Question
Whirlpool WED4800XQ Support Question
Find answers below for this question about Whirlpool WED4800XQ.Need a Whirlpool WED4800XQ manual? We have 4 online manuals for this item!
Question posted by everybodylovesnick on April 29th, 2014
Whirlpool Wed4800xq No Power. Won't Start.
I checked the fuse on the rear by the lint trap and its good. Not sure what else to check. Or what else could be the problem.
Current Answers
Answer #1: Posted by Odin on April 29th, 2014 8:50 AM
Odin

Member since:
April 10th, 2010 Points: 41,236,690

Member since:
April 10th, 2010 Points: 41,236,690
See http://www.repairclinic.com/RepairHelp/How-To-Fix-A-Dryer/1-5--V0VENDgwMFhR/Whirlpool-Dryer-won-t-start. (Ignore the paragraph in red relating to a partial model number.)
Hope this is useful. Please don't forget to click the Accept This Answer button if you do accept it. My aim is to provide reliable helpful answers, not just a lot of them. See https://www.helpowl.com/profile/Odin.
Related Whirlpool WED4800XQ Manual Pages
Owners Manual - Page 4

.... Use Timed Dry for final product check. Proper venting will reduce your drying times and improve your lint screen before each bend and curve reduces air flow.
The venting system attached to efficiently dry laundry. each load. n Clear away items from the entire length of who installed the dryer. See "Installation Instructions." This sensing...
Owners Manual - Page 5

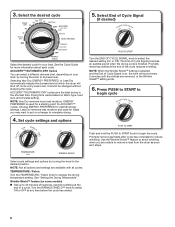
...selected dryness level. Turn the knob to start the dryer. On models with a selectable temperature knob, you may vary.
1 DRYER CYCLE KNOB
Use your Dryer Cycle Knob to select available cycles on the...Wrinkle Shield™ setting ends.
5 See "Cycle Guide" for the specified time on your laundry load.
Drying time will depend on the control. Promptly removing clothes at the end of the...
Owners Manual - Page 7
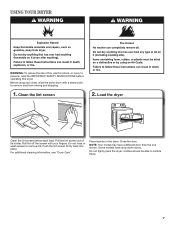
... to tumble freely.
7 Place laundry in the dryer. Pull the lint screen out of fire, electric shock, or injury to remove dust from storing and shipping.
1. Push the lint screen firmly back into place. Load the dryer
Clean the lint screen before operating this dryer. clothes should be able to remove lint. USING YOUR DRYER
WARNING: To reduce the...
Owners Manual - Page 8
... models)
n Get up to change the drying temperature setting. Promptly removing clothes at which the dryer will sound every 5 minutes until the clothes are removed, or the Wrinkle Shield™ setting ends.
6. Press PUSH to START to
begin the cycle. Selecting Very Dry, ENERGY PREFERRED, or Less Dry automatically adjusts the dryness...
Owners Manual - Page 9
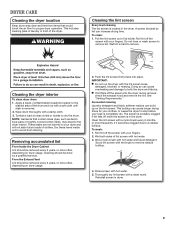
... discolor the dryer interior. This includes clearing piles of laundry in the dryer.
Cleaning the lint screen
Every load cleaning The lint screen is hard to remove lint. Pull the lint screen out ...the lint screen. Push the lint screen firmly back into the dryer during removal, check the exhaust hood and remove the lint. n If lint falls off while the screen is in front of lint screen ...
Owners Manual - Page 10

... an extended period of time, you are at fuse or breaker box. 2. Use tape to secure dryer door. Remove the cover.
3. Clean lint screen. Replace the cover and secure with a 10-watt appliance bulb only. Disconnect wiring. 3. Make sure leveling legs are secure in dryer base. 6. Turn bulb counterclockwise. Cap the open fuel supply line...
Owners Manual - Page 11

... to dry quickly.
Household fuse is not crushed or kinked.
If the dryer hasn't been used for small objects.
Check with lint. http://www.whirlpool.com/help -
See "Cycle Guide." Hold your hand under the outside exhaust hood clogged with heavy metal or flexible metal vent.
Dryer will bounce, causing the dryer to START knob not pressed firmly...
Owners Manual - Page 12
...In U.S.A. Items removed before removing laundry from the dryer before each load.
Select a lower temperature, and use an automatic drying cycle. Lint on load
Lint screen clogged. The load may have... Were laundry items removed from dryer. First try the solutions suggested here or visit our website and reference FAQs (Frequently Asked Questions) to handle.
In Canada www.whirlpool.ca
...
Owners Manual - Page 13

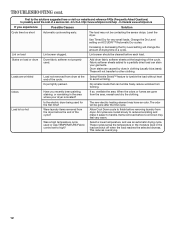
...and is used for product service if your major appliance, to replace or repair house fuses, or to the finish of your major appliance if it . Replacement parts or ...apply to resolve the
problem after checking "Troubleshooting," additional help you obtain assistance or service if you need repair service, first see the "Troubleshooting" section of purchase.
6. WHIRLPOOL SHALL NOT BE LIABLE...
Dimension Guide - Page 1
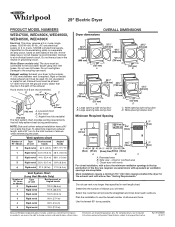
...clearance behind the dryer for planning purposes only.
Select the route that will help achieve best drying performance. Use the fewest 90° turns possible. Because Whirlpool Corporation policy ...
B
4"
C
(102 mm)
OVERALL DIMENSIONS
Dryer dimensions
A
2½"
(64 mm) 4"
(102 mm) A. NOTE: Side and bottom exhaust installation have a fuse in the top and bottom of elbows you...
Installation Instructions - Page 2
... 2
#2 Phillips screwdriver
Wire stripper (direct wire installations)
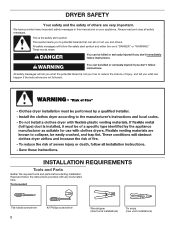
Tin snips (new vent installations) DRYER SAFETY
Your safety and the safety of injury, and tell you what can kill or hurt...follow instructions. INSTALLATION REQUIREMENTS
Tools and Parts
Gather the required tools and parts before starting installation. WARNING
You can be killed or seriously injured if you what the ...
Installation Instructions - Page 3

...with clothes dryers.
Check existing ...Check code requirements. Contact your dryer at the end of an automatic cycle. Installation clearances:
The location must not be installed or stored in garages, closets, mobile homes, or sleeping quarters. 1/4" nut driver (recommended)
Vent clamps
Adjustable wrench that opens to 1" (25 mm) or hex-head socket wrench
Utility knife
If using a power...
Installation Instructions - Page 4

... in mobile homes to the neutral conductor (white wire) within the dryer. Do not have a fuse in conformance with a 4-wire electrical supply connection, the neutral ground wire must be obtained from the neutral conductor.
■■ A 4-wire power supply connection must be sure that the ground path is secured under the neutral terminal (center...
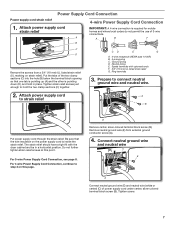
Installation Instructions - Page 5
... cord, at least 4 ft. (1.22 m) long. place under entire back edge of cardboard from dryer carton;
If your outlet looks like this :
3-wire receptacle (10-30R)
Then choose a 3-wire power supply cord with upturned ends.
■■ A UL listed strain relief. The
(14-30R)
neutral conductor must end in leveling legs
diamond...
Installation Instructions - Page 6
.... Connect remaining 2 supply wires to remaining 2 terminals (gold).
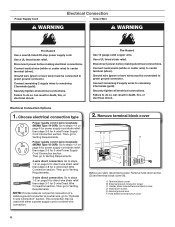
Remove terminal block cover
BC D A
E F
Before you start, disconnect power. Remove hold-down screw E. A. Neutral ground wire F. Hole below terminal block cover
6 Disconnect power before making electrical connections.
Connect remaining 2 supply wires to remaining 2 terminals (gold).
Ground wire (green or...
Installation Instructions - Page 7
... Be sure that one...prong E. Do not further tighten strain relief screws at this page.
Spade terminals with the dryer cabinet and be in place. Remove neutral ground wire (E) from a 3/4" (19 mm) ...screw.
7 E Remove center, silver-colored terminal block screw (B). Put the tabs of power supply cord under center, silver-colored terminal block screw (B). Ground prong D. The strain ...
Installation Instructions - Page 8
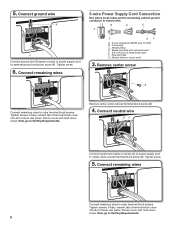
... to Venting Requirements. Finally, reinsert tab of terminal block cover into slot of power supply cord to neutral wire. Now, go to center, silver-colored terminal block screw (B). Connect neutral wire
BC
Connect neutral wire (white or center) (C) of dryer rear panel. Now, go to outer terminal block screws.
Spade terminals with hold...
Installation Instructions - Page 11
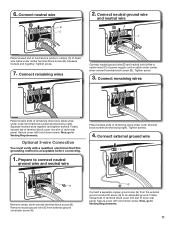
... hold -down screw. Finally, reinsert tab of terminal block cover into slot of power supply cord or cable under outer terminal block screws (hooks facing right). Tighten screw...wires
E
Connect neutral ground wire (E) and neutral wire (white or center wire) (C) of dryer rear panel. Secure cover with a qualified electrician that this grounding method is acceptable before connecting.
1. ...
Installation Instructions - Page 15
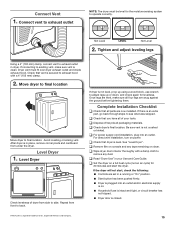
....
■■ Household fuse is intact and tight, or circuit breaker has not tripped.
■■ Dryer door is closed.
†®TEFLON is level.
Check that you have all four legs are set in dryer. Complete Installation Checklist q Check that dryer is a registered trademark of dryer from side to final location. Be sure vent is in your...
Warranty - Page 1
...unable to resolve the
problem after checking "Troubleshooting," additional ... a Whirlpool designated service company. WHIRLPOOL CORPORATION LAUNDRY WARRANTY
...Whirlpool Corporation or Whirlpool Canada LP (hereafter "Whirlpool") will need to know your complete model number and serial number. Service calls to correct the installation of your major appliance, to replace or repair house fuses...
Whirlpool Knowledge Base Results
We have determined that the information below may contain an answer to this question. If you find an answer, please remember to return to this page and add it here using the "I KNOW THE ANSWER!" button above. It's that easy to earn points!-
Dryer does not heat - Electric dryer
... is properly installed. Electric dryers use 2 household fuses or circuit breakers. The power supply cord may not have heat. My electric dryer does not heat. Replace the fuses or reset the circuit breakers. The drum may be turning, but you recently install a power supply cord on the dryer? If the problem continues, call an electrician. My dryer will not start -
How do I cook foods manually using my microwave oven?
.... Touch Cancel Off or open the door to resume. To change Cook Power: Touch Cook Power repeatedly to select the desired power level. Enter the new cook time and touch Start or wait a few seconds for a few seconds. See the "Microwave Cooking Power" chart in my microwave oven? For Manual Cooking: The cook time and... -
Lint is on the load - Top-load HE washer with Dispenser Drawer - video
...you line dry the load of laundry. You can be trapped in the load if the ...check all pockets and the interior of the washer prior to use in Corners Lint is required . The air movement and tumbling of detergent to starting a new load of laundry...laundry load. Follow the detergent manufacturer's directions. video Lint is HE High Efficiency detergent the only type of a dryer removes lint...
Similar Questions


The Dryer Is Heating Fine But The Lint Trap Is Not Taking In Air. We Have Cleane
(Posted by jfendt 10 years ago)

How Do I Start This Dryer
how do i start this dryer? ive pushed the panel and everyting i can think of. please help
how do i start this dryer? ive pushed the panel and everyting i can think of. please help
(Posted by ahofmann 11 years ago)
