Whirlpool LER5636PQ Support Question
Whirlpool LER5636PQ Support Question
Find answers below for this question about Whirlpool LER5636PQ.Need a Whirlpool LER5636PQ manual? We have 1 online manual for this item!
Question posted by ahofmann on January 21st, 2013
How Do I Start This Dryer
how do i start this dryer? ive pushed the panel and everyting i can think of. please help
Current Answers
Related Whirlpool LER5636PQ Manual Pages
Installation Instructions - Page 1
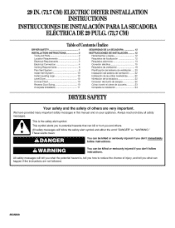
... INSTRUCTIONS
INSTRUCCIONESDEINSTALACIONPARALASECADORA ELECTRICADE 29 PULG.(73,7CM)
Table of Contents / Indice
DRYER SAFETY 1
INSTALLATION INSTRUCTIONS 2 Tools and Parts 2 Location Requirements 2 Electrical... 8 Plan Vent System 8 Install Vent System 10 Install Leveling Legs 10 Level Dryer 10 Connect Vent 10 Reverse Door Swing 10 Complete Installation 11
SEGURIDAD DE LA ...
Installation Instructions - Page 2
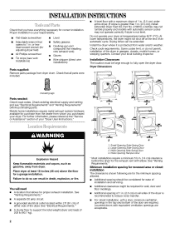
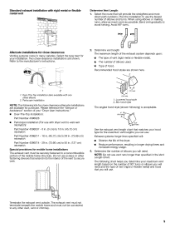
...water and/or weather. Small Opening Side-Swing Door 2.
or haxhead socket wrench (for adjusting dryer feet)
#2 Phillips screwdriver
Tin snips (new vent installations)
• Safety glasses
• Caulking...door are required. Drying times can result in . (14 cm) clearance behind the dryer for wall, door and floor moldings.
Flat-blade screwdriver
• Level
Adjustable wrench that...
Installation Instructions - Page 3
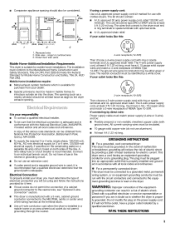
...edition and all local codes and ordinances.
• For a permanently connected dryer: This dryer must be connected to the NEUTRAL (white or center wire) of the ... connected to a grounded metal, permanent wtring system, or an equipment-grounding conductor must be plugged into the dryer. grounded. • Companion appliance spacing should also be obtained from your dealer. m _3,,
14 ma_ ...
Installation Instructions - Page 4
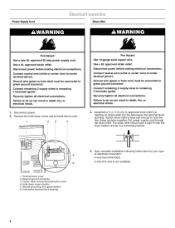
... following instructions for your type of electrical connection: 4-wire (recommended)
3-wire (if 4-wire is not available)
4
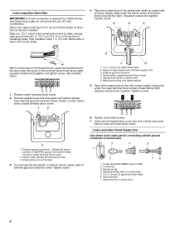
The strain relief should have a tight fit with the dryer cabinet and be in a horizontal position.
1. Remove the hold the two clamp sections together, Put power supply cord through the strain relief. Neutral grounding wire...
Installation Instructions - Page 5

...green or bare) of power supply cord to center terminal block screw
2. Green wire of dryer rear panel. Secure cover with upturned ends 6. 3/_in, (1.9 cm) UL approved strain relief 7. Remove... breaker disconnect or box*
4-wire connection: Direct Wire
A UL listed, 120/ 240 volt
amp., dryer power supply mcoinrdim* um, 30
3-wire connection: Power Supply
Cord
3-wire direct
A fused disconnect or...
Installation Instructions - Page 6
... other power supply cable wires under center, silver colored terminal block screw.
2
f
3
o
)
3
1. Neutral grounding wire (green/yellow)
5. Place the hooked ends of extra length so dryer can be moved if needed. Insert tab of terminal block cover into a hook shape.
4. See example below.
1.
Green or bare copper wire of...
Installation Instructions - Page 7
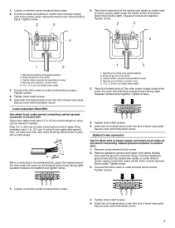
... relief
31 Place the hooked ends of the other power supply cable wires under the center screw of dryer rear panel. Tighten screws. 4. Bend ends of wires into slot of terminal block (hook facing right). Neutral wire...wire. Tighten screws. Loosen or remove center terminal block screw.
4. Insert tab of dryer rear panel. Connect neutral wire (white or center wire) of power supply cord to the ...
Installation Instructions - Page 8
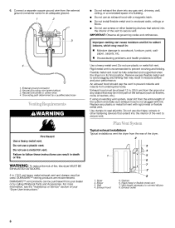
... the path of the exhaust (such as flowers, rocks or bushes, etc.). DURASAFE TM venting products are recommended.
Typical exhaust installations Typical installations vent the dryer from the external ground connector screw to prevent crushing and kinking. Clamps 6. Connect a separate copper ground wire from the rear of a building.
• Do not...
Installation Instructions - Page 9
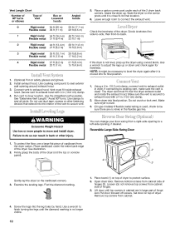
...for close clearances Venting systems come in the Vent Length Chart. The following chart helps you determine your "Dryer User Instructions."
• Over-The-Top Installation:
Part Number 4396028
• ... hood type for the maximum vent lengths you will : • Shorten the life of the dryer. • Reduce performance, resulting in . (127 cm) mismatch
Special provisions for purchase. r-...
Installation Instructions - Page 10
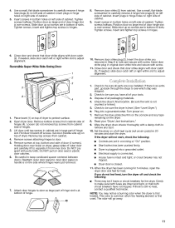
...the legs until it is no kinks in . (10.2 cm) clamp.
2. Vent must fit over the dryer exhaust outlet and inside exhaust hood. Run vent to -back. Do not use a large flat piece of ... cabinet side of hinges.
3. Firmly grasp the body of the dryer (not the top or console panel).
\
\
Gently lay the dryer on top of dryer. Pull door forward off screws. Screw the legs into its final...
Installation Instructions - Page 11
...Reattach outer door panel to be 2 fuses or circuit breakers for 20 minutes and start , check the following :
• There may notice a burning odor when the dryer is on the dryer. 8. Dispose ...If the dryer will go back through the steps to separate it from inner door. When the dryer has been running or "On" position.
• Start button has been pushed firmly.
• Dryer is plugged...
Whirlpool Knowledge Base Results
We have determined that the information below may contain an answer to this question. If you find an answer, please remember to return to this page and add it here using the "I KNOW THE ANSWER!" button above. It's that easy to earn points!-
The ice maker on my upright freezer is not producing ice or not enough ice
...the ice cubes will run constantly until the freezer is first started, the compressor will raise the wire shutoff arm to contact .... Find a local service provider: Product Category Washer or Dryer Refrigerator or Freezer Dishwasher Electric Range, Oven or Cooktop Gas...Hot Water Dispenser Vent Hood Ice Machine Commercial Laundry Vacuum Cleaner Central Vac Dehumidifier Using the control: Turn ... -
Lint is on the load - Front-load washer
... washer FAQs Knowledgebase search tips Washer will not start - Consider reducing your laundered items when line drying. The air movement and tumbling of a dryer removes lint from lint takers (corduroys, synthetics, permanent press). Sort lint-producing fabrics (towels, chenille) from the laundry load. Were you washing new clothing or... -
Fabric is too hot - Dryer
... off when the load reaches the selected dryness. This reduces overdrying. My dryer will not start Loads are wrinkled - Allow the load to run through the Cool Down part of the cycle before removing the laundry items from the dryer. All cycles end with a Cool Down, which cools the fabric for...
Similar Questions

Does Not Start When I Push The Start Button
The dryer does not start when I push the start button. I changed the start switch and the dryer stil...
The dryer does not start when I push the start button. I changed the start switch and the dryer stil...
(Posted by lok4antom 4 years ago)

Dryer Has Power But Won't Start When You Push The Start Button
(Posted by pawlou3 9 years ago)
Can't Find The Capacity Of This Dryer.
Ler5636pq1. I bought a new washer and was wondering the capacity of my dryer and if it could hand a ...
Ler5636pq1. I bought a new washer and was wondering the capacity of my dryer and if it could hand a ...
(Posted by player0811 9 years ago)

Whirlpool Dryer Runs For A Few Seconds Then Cuts Off
(Posted by Anonymous-106711 11 years ago)
What Is The Part Number To My Whirlpool Clothes Dryer Model Number Ler5636pqo
(Posted by Anonymous-98581 11 years ago)