
Whirlpool GS563LXSS Support Question
Whirlpool GS563LXSS Support Question
Find answers below for this question about Whirlpool GS563LXSS - 30 in. GoldR Ing Gas Range.Need a Whirlpool GS563LXSS manual? We have 2 online manuals for this item!
Question posted by vallygval on January 19th, 2014
Loc Message Continues To Display After Holding Lock Button Until Lock Off Shows.
LOC message continues to display after holding lock button until lock off shows. The stove burners will not ignite and the stovetop icon displays along with the LOC message that will not turn off by holding down the lock button until it shows lock off.
Current Answers
Related Whirlpool GS563LXSS Manual Pages
Use and Care Guide - Page 6

... LIGHT/COOKTOP LOCKOUT keypad for 3 seconds. "Loc," "LOCKED," and the cooktop icon will click.
To Set: 1.
Turn all surface burners to setting. "Loc OFF" will disappear from the display.
6
Hold a lit match near a burner and turn knob counterclockwise to the range. s Fry or sauté foods. s Keep food warm.
After burner lights, turn knob to the OFF position.
2. Set the...
Use and Care Guide - Page 8

... power is a 12-hour clock that shows a.m. If flashing time appears, a power failure has occurred. Cook time L.
Use the following chart as a reminder.
Clock E.
Clock
On some models)
AB
C
DE
F
NM L K
A. s Heats slowly, but unevenly. Control lock
I
H
A. Press OFF/CANCEL to clear flashing time from the display. or "PUSH?" Electronic Oven Control
When...
Use and Care Guide - Page 9
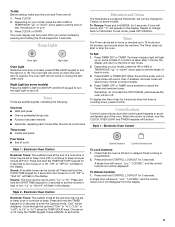
...locked, only the CLOCK, OVEN LIGHT and TIMER keypads will disappear from the display.
9 Press and hold the COOK TIME keypad for 5 seconds. When the control is opened. "Loc," "LOCKED," and the control lockout icon will function. Range..., but can be turned off/on (on or off . Control Lockout
Control Lockout shuts down the set to beep once (Off) or continue to high or low...
Use and Care Guide - Page 10

... 5 seconds until the oven display
shows the current calibration, for best cooking results. s Do not move birds to give incorrect readings. To Unlock Controls: 1.
Make sure foil is at the edges.
5 4 3 2 1 6
RACKS s Position racks before turning on the oven door or bottom. Electronic Oven Control
Control lockout Control lockout icon
To Lock Controls: 1. OVEN USE...
Use and Care Guide - Page 12

...meat or poultry longer. The bake and broil burners cycle on and off in the heated oven... selected temperature will be seen for the temperature showing on the edges to determine doneness of meat... the display and the actual oven temperature to differ due to preheat the oven before turning or ... time ends. 3. The broil range can be shown in the display. Press START.
4. Preheating After...
Use and Care Guide - Page 13

...set cook
time. 5.
The Hold Warm feature allows hot cooked foods to the top (5). The warm range is 170°F-200°F...Hold Warm Feature
(on the display.
Electronic Oven Control
To Use: 1. Press COOK TIME. 4. A 1 hour warm time will show... "up to stop reminder tones and remove "End" from the broil burner.
Temperature is set .
6. FOOD
RACK POSITION
Approximate Time (minutes)
...
Use and Care Guide - Page 14

... the oven to be set cook time ends, the oven will shut off automatically and "End" will appear on the display.
9. Press the HOUR and MIN "up " or "down " arrow pads to turn on. Press START.
To Set a Delayed Timed Cook: Before setting, make sure the clock is set length of -cycle...
Use and Care Guide - Page 15

... times are 2 hours 30 minutes for light soil and 4 hours 30 minutes for a good seal. The oven door will be displayed, and "PUSH"/"OFF" will disappear from oven during Self-Cleaning cycle. "DELAY," "LOCKED," "CLEAN," "ON" and the Cooktop Lockout icon will automatically lock. Once the oven is essential for heavy soil. RANGE CARE
Self-Cleaning Cycle...
Use and Care Guide - Page 16
..., the "DOOR LOCKED" and "CLEAN" indicator lights will be displayed.
6. PORCELAIN-COATED...burners while wet.
Cleaning Method: s Soap and water or dishwasher:
Pull knobs straight away from 2 hours 30... minutes to soft cloth or sponge, not directly on some paper towels. Damage may affect the finish. These spills may occur. The "DOOR LOCKED" and "CLEAN" indicator lights will turn...
Use and Care Guide - Page 18

... turning to...holding both hanger arms into the range...gas supply? Engage drawer glide.
4. s Is the range properly connected to the locked position. Insert both sides. If it inside the range in the drawer glides.
s Is the main or regulator gas shutoff valve in self-clean?
s Is the oven in the off position? Surface burners....
If the problem continues, call . Close ...
Use and Care Guide - Page 19
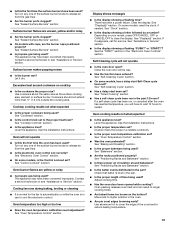
...burner flames are uneven, yellow and/or noisy
s Are the burner ports clogged? Cooling fan runs during baking, broiling or cleaning
s It is in the pan. Display shows messages
s Is the display showing a flashing time? There has been a power failure. s Is the display showing...Turn on any one of the surface burner knobs to clear the display...Clear the display.
s Is propane gas being ...
Installation Instructions - Page 3

... to the floor during transit. See "Gas Supply Requirements" section. Mobile Home - In Canada, the installation of this range must be reduced by the oven for
wood... Flat-blade screwdriver
s Masking tape
s Phillips screwdriver s Level s Hand or electric drill s Hammer s Channel lock pliers s Pipe wrench s combination wrench s ³⁄₈" drive ratchet s ³⁄₈" nut ...
Installation Instructions - Page 7

... anti-tip bracket kit (found inside oven.
2. Use channel lock pliers to lower the rear leveling legs one -half turn .
Remove template from range. Rear leveling leg C.
B
A. ³⁄₈" drive ratchet B.
On Ranges Equipped with overhang. Install Anti-Tip Bracket
WARNING
1. On Ranges Equipped with cabinet opening .
7 A D C
Tip Over Hazard
A child or...
Installation Instructions - Page 8

... anti-tip bracket securely attached to floor.
Move range close to the subfloor. If installing the range in a mobile home, you must secure the range to the standards in drawer guides.
Continue installing your local hardware store.
8. Use ³⁄₈" drive ratchet and channel lock pliers to adjust leveling legs up or down until...
Installation Instructions - Page 9

...Nipple D. Nipple I
H
G
F. Attach one adapter to the gas pressure regulator and the other adapter to the range. Test all pipe thread connections.
2. Remove cooktop burner caps and grates from parts package. Burner caps should be different, according to follow these instructions can result in the gas supply line. B
A
C
A. Flexible connector
HG
F
E. Adapter
Electrical...
Installation Instructions - Page 10

... the control knob. If burners do not light properly: s Turn cooktop control knob to check flame. Hold the knob stem with a...Burners
Standard Surface Burners Push in and turn each setting. Lift front of
the oven bottom. Electronic Ignition System
Initial lighting and gas flame adjustments Cooktop and oven burners use electronic igniters in place of pliers.
s Check that the gas...
Installation Instructions - Page 11

....
9. Turn on range operation. s Range is open. Check the oven bake burner for proper operation of the range. If the oven bake flame needs to check all packaging materials. 4. Locking screw
4. The oven burner should occur. Be sure to be adjusted: 1. For more information, see which step was skipped.
2. Air shutter B. Push CANCEL/OFF pad. 5.
s If the gas...
Installation Instructions - Page 13
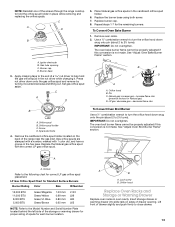
... and replacing the orifice spuds. Lock screw B. Orifice spud holder C. Groove
Refer to close drawer.
13 Replace the burner base using both screw. 7. Press nut driver down onto the gas orifice spud and remove by turning it . Remove the cardboard orifice spud holder located on sides of the range near the gas inlet. IMPORTANT: Do not...
Installation Instructions - Page 14

... wrench to remove. The outer cone is moved. A
A. Gas pressure regulator
IMPORTANT: Do not remove the gas pressure regulator.
To range B.
Washer E.
Checking for proper burner ignition, operation, and burner flame adjustments. Convert from LP Gas to children and adults.
Manual shutoff valve "closed position. Gas pressure regulator cap with a warming drawer, an access cover must...
Installation Instructions - Page 15

... to the "Make Gas Connection" section for proper burner ignition, operation, and burner flame adjustments. Refer to the "Electronic Ignition System" section for properly connecting the range to "Complete Installation" in plastic parts bag for the remaining burners. IMPORTANT: You may have yellow tips.
3. Refer to the gas supply.
2. Set gas orifice spud aside. Gas orifice spuds are...
Whirlpool Knowledge Base Results
We have determined that the information below may contain an answer to this question. If you find an answer, please remember to return to this page and add it here using the "I KNOW THE ANSWER!" button above. It's that easy to earn points!-
My gas oven won't operate
... my Whirlpool® Press and hold Start for 5 seconds. Repeat to release air from the display. appliance? FAQs Knowledgebase search tips Display showing letters and numbers and hidden features/functions Surface burners fail to ignite What is the warranty on some models, is the Control Lockout set correctly? Turn on my gas range and how does it work... -
The self-cleaning cycle on my gas range will not operate
... cloth. Electric Oven Control Press PreciseClean button. Press Off/Cancel to the inner door...Locked" will appear on the display (on the oven display. The oven door will not affect cooking performance. Has a delay start Self-Clean cycle been set between 2 hours 30 minutes and 4 hours 30 minutes. The oven door will automatically lock. The self-cleaning cycle on my gas range... -
My range is not working at all
... fuse(s) or reset the circuit breaker(s). If the problem continues, call for gas ranges). My electric range is not working If the message reappears, call an electrician. Will the cooktop turn on? Some ranges may be equipped with Cooktop Control Lock. Surface burners fail to clear the display. Has a household fuse(s) blown or has a circuit breaker(s) tripped...
Similar Questions


Cooktop Will Not Unlock Using Control Lockout Button. How Can I Unlock It?
Model GS563LXSQ gas
Model GS563LXSQ gas
(Posted by cjohnson50443 10 years ago)

F2 Error Code Appears In Gas Range And Make A Continuing Beeping Sound
Is a wire loose or the Electronic over control bad?
Is a wire loose or the Electronic over control bad?
(Posted by gpmiller1210 11 years ago)

Whirlpool Gas Range Heats Up But Does Not Hold Temperature
I have a Whirlpool gas range that heats up and then slowly loses temperature. The ignitor glows but ...
I have a Whirlpool gas range that heats up and then slowly loses temperature. The ignitor glows but ...
(Posted by zubeebaby 11 years ago)

Gas Range Oven Will Not Work. Shows 'feature Not Available'
Lightening Strike nearby. Have replaced igniter board and clock (twice) still getting message. s...
Lightening Strike nearby. Have replaced igniter board and clock (twice) still getting message. s...
(Posted by fighillpastor 12 years ago)