Whirlpool GFE461LVS Support Question
Whirlpool GFE461LVS Support Question
Find answers below for this question about Whirlpool GFE461LVS - 30" Ing Electric Range.Need a Whirlpool GFE461LVS manual? We have 4 online manuals for this item!
Question posted by admirdautovic010 on June 16th, 2014
Bake
Llo Im having problems with my stow can u please help me
Current Answers
Answer #1: Posted by Odin on June 16th, 2014 8:48 AM
Odin

Member since:
April 10th, 2010 Points: 41,236,630

Member since:
April 10th, 2010 Points: 41,236,630
If I understand you correctly, you're writing us because of problems with your stove that you do not specify. I can't give you a specific help without more information, but chances are you'll be able to find your answer here.
Hope this is useful. Please don't forget to click the Accept This Answer button if you do accept it. My aim is to provide reliable helpful answers, not just a lot of them. See https://www.helpowl.com/profile/Odin.
Related Whirlpool GFE461LVS Manual Pages
Owners Manual - Page 1

... Bakeware 8 Oven Vent 8 Baking and Roasting 9 Control Bake 9 Broiling 9 Convection Cooking 9 Rapid Preheat 9 Timed Cooking 10 Warming Drawer 10 RANGE CARE 11 Self-Cleaning Cycle ...problem not covered in TROUBLESHOOTING, please visit our website at 1-800-253-1301. You will need assistance, call us at www.whirlpool.com for purchasing this high-quality product. ®
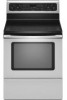
ELECTRIC RANGE...
Owners Manual - Page 2
...to the open door without the antitip bracket fastened down properly. The Anti-Tip Bracket
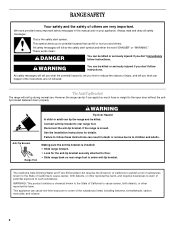
The range will follow these instructions can tip if you don't immediately follow instructions. Connect anti-tip ...alert symbol and either the word "DANGER" or "WARNING." This appliance can tip the range and be killed. RANGE SAFETY
Your safety and the safety of others . This is moved. WARNING
You can...
Owners Manual - Page 3

... Soak Removable Heating Elements - Flammable materials should not be seriously injured.
■ Proper Installation - For self-cleaning ranges -
■ Do Not Clean Door Gasket -
IMPORTANT SAFETY INSTRUCTIONS
WARNING: To reduce the risk of fire, electrical shock,
injury to cover the surface unit heating element. Children should not be careful to cause burns...
Owners Manual - Page 4
... after cooking. OVEN LIGHT
Oven cavity light
While the oven door is running, but not in oven more information and helpful tips for 5 seconds. PRECISE CLEAN™
Self-clean cycle See the "Range Care" section. Press START. 5. Your model may have some models) Press WARM DRAWER OFF to display the countdown for...
Owners Manual - Page 5
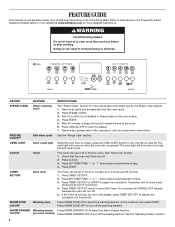
...section. The Start Time keypad is not pressed within 30 seconds after 5 minutes. The Start pad begins any ...BAKE
Baking and roasting
CONTROL BAKE Control baking
BROIL
Broiling
CONVECT
Convection cooking
RAPID PREHEAT Preheat temperature
KEEP WARM
Hold warm
COOK TIME
Timed cooking
START TIME
SET TEMP/TIME START
CANCEL/OFF
Delayed start
Temperature and time adjust Cooking start
Range...
Owners Manual - Page 8
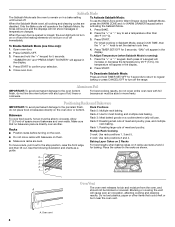
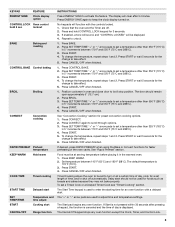
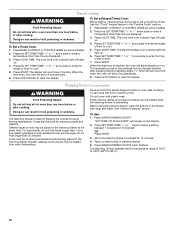
...on or off and the heating elements will not turn off the range. When the Sabbath Mode is running):
1. Only the Bake cycle will operate in the display. No tones will sound, ...PRESS START TO ENTER" will appear in the display.
4. Close oven door.
4. Press TIMER SET/OFF for baking.
To Adjust Temperature (when Sabbath Mode is set plastics, paper or other than 350°F (177°C).
3....
Owners Manual - Page 9

... Bake or Convect Bake.
Ask for all foods when baking ...baking on multiple racks. When ...bake, broil, and convection elements cycle on and off in use.
Select BAKE or CONVECT BAKE, and desired temperature. 2. Baking...bake to maintain a precise temperature range for contact information. Convect Cook Functions Function Convect Bake...RAPID PREHEAT. Before baking and roasting, ...
Owners Manual - Page 10
... BAKE (on the display.
2. Press START TIME. When the start .
7. When the set to enter a
temperature other than 30 minutes.
For smaller quantities or heat-sensitive foods, such as eggs, do not hold longer than the one hour before or after cooking. See "General Cleaning" section. The Warming Drawer operates within a temperature range...
Owners Manual - Page 13
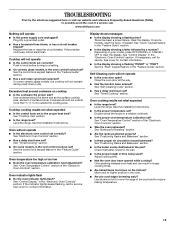
...edge of the "Electronic Oven Controls" section.
■ Was the oven preheated? If the problem continues, call for service.
See the Installation Instructions.
See "Control Display" in the "Feature ...9632; Is the range level? Level the range. See "Timed Cooking" section.
■ On some models, is the oven control lockout set ?
Depending on the bottom? See "Baking and Roasting" section....
Dimension Guide - Page 1

... F. when bottom of cooktop, see Installation Instructions packed with leveling legs screwed
all the way in the "Product Dimensions" section.
For complete details, see NOTE*. 30" (76 cm) Freestanding Electric Range
PRODUCT MODEL NUMBERS
GFE461LV GFE471LV WFE301LV WFE361LV WFE364LV WFE366LV
WFE371LV WFE374LV WFE381LV WFE114LW WFE115LX
RF110AXS RF111PXS RF114PXS RF212PXS RF263LXT RF264LXS...
Installation Instructions - Page 1

... Installation 13 Moving the Range 14 ANTI-TIP BRACKET TEMPLATE 15
IMPORTANT:
Save for local electrical inspector's use. INSTALLATION INSTRUCTIONS 30" (76 CM) FREESTANDING ELECTRIC RANGES
Table of Contents
RANGE SAFETY 2 INSTALLATION REQUIREMENTS 3
Tools and Parts 3 Location Requirements 3 Electrical Requirements - Only 4 INSTALLATION INSTRUCTIONS 6 Unpack Range 6 Install Anti-Tip Bracket...
Installation Instructions - Page 3

... to the Manufactured Home Construction and Safety Standard, Title 24 CFR, Part 3280 (formerly the Federal Standard for use with the range, see "Install Anti-Tip Bracket" section.
■ Grounded electrical supply is not applicable, use the Standard for convenient use in a mobile home installation.
Anti-tip bracket B. The cord should be...
Installation Instructions - Page 4

...the leveling legs.
upper cabinet depth B. 30" (76.2 cm) min. D. 30¹⁄₈" (76.5 cm) min. Electrical Requirements - U.S.A. Do not use an ...
A. 27 69.9 cm) max.
Model/serial rating plate (located on the left side frame behind
storage drawer panel)
*Range can result in accordance with leveling legs
screwed all the way in doubt as to 22" (55.9 cm) from floor ...
Installation Instructions - Page 5

... recreational vehicles, or an area where local codes prohibit grounding through flexible or nonmetallic sheathed, copper or aluminum cable. Electrical Connection
To properly install your range, you must determine the type of electrical connection you will be using and follow the instructions provided for new branch-circuit installations (1996 NEC); The ground must...
Installation Instructions - Page 7

....
3. Two mounting tabs each side B. Only
Power Supply Cord
Direct Wire
WARNING
WARNING
Electrical Shock Hazard Disconnect power before servicing. Electrically ground range. Disconnect power.
2. Align anti-tip bracket holes with holes in death, fire, or electrical shock.
1. Longer screws are available from floor. A B
C
A. Terminal block cover C. Remove template from your...
Installation Instructions - Page 8

... be Go to Section: connecting to remove the ground-link screw from the back of electrical connection: 4-wire (recommended)
3-wire (if 4-wire is not available)
A. Concuit
...the opening .
Part of the ground-link under the screw.
8 A
B C
5. Electrical Connection Options
If your type of the range. Removable retaining nut B. Style 1: Power supply cord strain relief ■ Remove the ...
Installation Instructions - Page 10

...Line 2 (red) wire F. A
A
B
B
C
A. Discard C. Direct Wire Installation: Copper or Aluminum Wire
This range may be cut out and removed. Strip outer covering back 3" (7.6 cm) to your electrical supply, make the required 3-wire or 4-wire connection. 1. A
B
3" (7.6 cm)
2. Complete electrical connection according to expose wires. Ground-link screw
2. Save the ground-link screw...
Installation Instructions - Page 12

... check that the storage drawer is cool and empty. If range is level. On Ranges Equipped with Storage Drawers:
Use a ¼" drive ratchet, wrench or pliers to adjust leveling legs up the back of the range.
■ Look for satisfactory baking performance.
4. Replace the storage drawer (on the storage drawer until rear leveling leg...
Installation Instructions - Page 13

... that the range is an extra part, go back through the steps to move the drawer stop notch past the drawer glides. Check that all packaging materials. 4. Dry thoroughly with the gap in its fully forward position. 2. Turn on both sides, slide the drawer back into an outlet.
■ Electrical supply is...
Installation Instructions - Page 14

... bracket securely attached to do so can result in power supply cord. 5. Electrical Shock Hazard Disconnect power before operating. Slide range forward. 2.
Check that anti-tip bracket is installed: ■ Look for cleaning or maintenance:
For power supply cord-connected ranges: 1. Unplug the power supply cord. 3. Replace all parts and panels before servicing...
Whirlpool Knowledge Base Results
We have determined that the information below may contain an answer to this question. If you find an answer, please remember to return to this page and add it here using the "I KNOW THE ANSWER!" button above. It's that easy to earn points!-
How to adjust the oven temperature calibration on freestanding electric ranges
... (on some models) Styles 2, 3 and 4 - Electronic oven controls Press and hold Bake for 3 seconds until the oven display shows the current calibration, for example, "0°F CAL... be set between 30°F (15°C) and -30°F (-15°C). Press Start. calibration My oven is not hot enough Error code on some models) Style 4 (on the range display My electric range is not working.... -
What are some tips for using my ceramic glass cooktop?
.... If using them. are being used? As the cooktop cools, air can become baked on. Do not allow objects that could cause uneven heating and poor cooking results. Use flat-... For more cleaning and care. can adhere to cool down slightly. This will help keep it is on my electric range? Aluminum residue may cycle on some tips for best heat conduction and energy... -
How do I set a Timed Cook on my Style 3 electric range?
... Style 3 electric range? How do I set a Timed Cook on your electric range, turn to the Electronic Oven Controls page in your Use and Care Guide or refer to enter a temperature other than the one displayed. Press the Temp/Time or Temp/Hour "up " or "down the time. To set a timed cook: Press Bake. Press...
Similar Questions

Feature Not Available Is Showing After Oven Overheated
my whirlpool electric range GFE461LVS oven burned some food and some kind of default message came up...
my whirlpool electric range GFE461LVS oven burned some food and some kind of default message came up...
(Posted by mikedebenito 9 years ago)

Whirlpool Glass Top Electric Range Does Not Get Hot
(Posted by haloric 9 years ago)
Whirlpool Electric Range Model Rf263lxtq 3
I found foil type heat shield in lower storage compartment (broiler compartment of a gas oven) of my...
I found foil type heat shield in lower storage compartment (broiler compartment of a gas oven) of my...
(Posted by busterc1 10 years ago)

Electric Range Model Number Gfe461lvs, Oven And Stove Top Will Not Heat Up
(Posted by ks6804 11 years ago)

Where Can I Find A 30 Year Old Manual For Jenn-air Model F120 Electric Range.
(Posted by Anonymous-39214 12 years ago)