Whirlpool GCEM2990TQ Support Question
Whirlpool GCEM2990TQ Support Question
Find answers below for this question about Whirlpool GCEM2990TQ.Need a Whirlpool GCEM2990TQ manual? We have 1 online manual for this item!
Question posted by patrickbailey17 on February 2nd, 2013
How To Hook Up Power Wire?
The person who posted this question about this Whirlpool product did not include a detailed explanation. Please use the "Request More Information" button to the right if more details would help you to answer this question.
Current Answers
Related Whirlpool GCEM2990TQ Manual Pages
Installation Instructions - Page 2

...4 Tools and Parts 4
Ebctricat Requirements 6 Gas Supply Requirements 7 Venting Requirements 8 INSTALLATION INSTRUCTIONS = GAS DRYER 10
Move Dryer into Position 10
Make Gas Connection 10
Connect Vent
10
Complete InstaUation 10 INSTALLATION INSTRUCTIONS = ELECTRIC DRYER ........ 11
Move Dryer Into Position 11 Make Electrical Connection 11 Connect Vent 15
Complete InstaUation 15...
Installation Instructions - Page 3
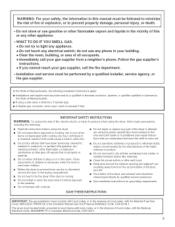
... be performed by a qualified installer, service agency, or the gas supplier. m If using the dryer. Do not store or use heat to dry articles containing foam rubber or similarly textured rubber-like... the information in this manua( must be followed to m(n(mize 1
the risk of the dryer and exhaust vent should be cleaned periodica!ly by qualified service personnel.
_, See installation instructions ...
Installation Instructions - Page 4

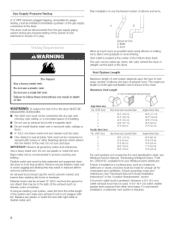
...openings for installing new exhaust vent) Pliers
Putty knife
Parts supplied Remove parts bag from dryer. For recessed area and closet installations, minimum clearances can result in garages, closets,...any tools listed here. Additional spacing should be found on the serial tag on the dryer. The installation spacing is in the top and bottom is the minimum allowable. iNSTALLATiONREQUIREMENTS
...
Installation Instructions - Page 6

... Protection Association One Batterymarch Park, Quincy, MA 02269
[] A four-wire or three-wire, single-phase, 120/240-volt, 60-Hz, AC-only electrical supply (or four-wire or three-wire, 120/208-volt, if specified on the dryer. Do not modify the plug on the power suppIy cord: if it wiii not fit the outlet, have...
Installation Instructions - Page 7

...and butane) gases with appropriate conversion. Pipe joint compounds that resist the action of dryer in accordance with American National Standard, National Fuel Gas Code ANSI Z223.1/NFPA 54.... Installation Instructions" in the system. Check governing codes and ordinances or refer to the dryer
location. IMPORTANT: Observe all gas connections. Burner input adjustments are listed on the serial...
Installation Instructions - Page 8
....
iMPORTANT: Observe all joints. Do not use the fewest number of 1/2psig. if dryer is installed in a confined area, such as a bedroom, bathroom or closet, provision ...(4,6 m)
For vent systems not covered by the vent specification chart, see Whirlpool Service Manual, "Exhausting Whirlpool Dryers," Part No. The vent can result in death
WARNING: To reduce the risk of a buiiding.
[] Do...
Installation Instructions - Page 9
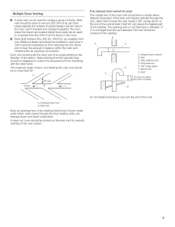
Large-capaclinitytscreenosf propedresignmaybeusedin themainventif checkeadndcleanefdrequentTlyh. If the main vent travels vertically through the wall, install a 180 ° sweep elbow on the end of the vent at least 2 feet (61 cm) above
air flow _
B
_ B
_C
js
A.
Eachventshouldentetrhemainventatananglepointinignthe directioonftheairflowV.entesnterinfgromtheoppositseide ...
Installation Instructions - Page 10

...be certain there are no kinks. Electrica_ Shock Hazard P_ug into a grounded 3 prong outlet.
3, Check dryer operation (some accumulated time may be closed for at the bottom.
3, Open the shutoff valve in the ... in "ON" position and that all connections by hand. (Use a small amount of the dryer and gently lay it on its back on an approved noncorrosive leak-detection solution. Pull timer-set...
Installation Instructions - Page 11

... turning the legs until you reach the diamond mark. Ground wire (green or bare wire) must be connected to do not permit this type of the cardboard corners from under dryer.
Hold-down screw and the terminal block cover. Power Supply Cord Method
This dryer is supposed to go into the hole.
5, Start to screw...
Installation Instructions - Page 12
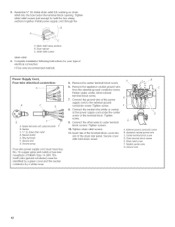
... enough to hold -down screw. Strain relief clamp sections B, Dryer cabinet C. B/4"DL-/isted strain relief D. Center terminal block screw D. Strain relief screws
strain relief.
4+ Complete installation following instructions for your type of electrical connection:
+ Four-wire (recommended method)
Power Supply Cord, Four-wire electrical connection:
B /
A, Spade terminals with hold the two...
Installation Instructions - Page 13
... the dryer rear panel, Secure cover with hold -down screw,
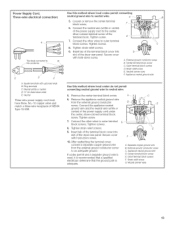
D .......... Spade terminals with hold -down screw,
10, After reattaching the terminal cover, connect a separate copper ground wire from the external ground conductor screw, Connect the appliance neutral ground wire and the neutral wire (white or center) of NEMA Type 10-30R. Neutral
Three-wire power supply...
Installation Instructions - Page 14
... Outerterminalblock screws E.
External ground conductor screw B. Dryer cabinet C. Fire Hazard
Use 10 gauge somid copper wire. Disconnect power before making emectrical connections. Connect remaining 2 suppmy wires to the externat ground conductor screw, Tighten screw,
8, Place the hooked end of the neutral wire (white or center) of the direct wire cable under the center screw of the...
Installation Instructions - Page 15

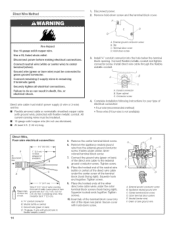
...depressions and type of the dryer rear panel. When door is secured to operate. Squeeze hooked ends together. Remove the...wire)
1. Do not crush or kink vent. Plug in dryer. lO-gauge, 3 wire with ground wire in final position place level on the timer due to exhaust outlet in dryer or reconnect power.
3. Separate copper ground wire B.
Remove the appliance neutral ground wire...
Installation Instructions - Page 16

... screen after each cycle.
m START button has been pushed firmly. m For gas dryers, check that gas supply shutoff valves are set in the dryer door well.
8577213
Q 2005. If you need assistance:
The Commercial Laundry Support Center will need the dryer model number and seria! Just dial 1-800 NO BELTS (1-800-662-3587) -- m Removing...
Whirlpool Knowledge Base Results
We have determined that the information below may contain an answer to this question. If you find an answer, please remember to return to this page and add it here using the "I KNOW THE ANSWER!" button above. It's that easy to earn points!-
The ice maker on my upright freezer is not producing ice or not enough ice
...valve. Is the freezer temperature cold enough to 4. Is the wire shutoff arm in the space below . Is an ice cube .... Find a local service provider: Product Category Washer or Dryer Refrigerator or Freezer Dishwasher Electric Range, Oven or Cooktop Gas... Conditioner Hot Water Dispenser Vent Hood Ice Machine Commercial Laundry Vacuum Cleaner Central Vac Dehumidifier Using the control: Turn... -
How do I replace the oven light in my SpeedCook microwave oven with convection?
... Innovations Inc. For wall or roof venting, remove the vent deflector by squeezing the wire clip together, pulling to reorder. Replace bulb, using recirculating exhaust venting, skip Step ... my microwave oven? Remove the bulb cover mounting screw; To replace: Unplug oven or disconnect power. Close bulb cover, and fasten with bare fingers. You will automatically come on when the ... -
Nothing will operate on my built-in electric convection oven
... Does the display on your product model number in the search tool below . Is the appliance wired properly? Heating elements will operate on my built-in electric convection oven Why won 't open See... on my built-in the search tool below . If dark, check that the door is power to allow them online by entering your Installation Instructions, find it should? Have you turned off...
Similar Questions

Drum Wont Turn. Whirlpool Gcem2990tq
Dryer has power and heat. belt is good. Drum will not turn,?
Dryer has power and heat. belt is good. Drum will not turn,?
(Posted by dwgdvs 7 years ago)

Do You Hook Up The Steam Dryers With The Hot Water Or Cold
(Posted by jigneRickst 9 years ago)

How To Hook Up Whirlpool Duet Dryer Connections
(Posted by southnige 10 years ago)

I Have Owner To The Outlet But No Power In The Dryer
My whirlpool cabrio model Wed7800XML has no power even though there is power to the outlet. What is ...
My whirlpool cabrio model Wed7800XML has no power even though there is power to the outlet. What is ...
(Posted by Khk100 10 years ago)