Get support for Whirlpool DU811SWPU

Whirlpool DU811SWPU Support Question

Whirlpool DU811SWPU Support Question

Find answers below for this question about Whirlpool DU811SWPU.
Need a Whirlpool DU811SWPU manual? We have 5 online manuals for this item!
Question posted by desireeholmes11 on March 14th, 2013

Why Is It Leaking Out Of The Vent In Front?

there is a lil vent thing in the front of my diswasher on the top left, im not sure if its missing a cover or something that my mom might have broken off, but it started shooting water out of it when its running. how do i go about fixing this?

Current Answers

There are currently no answers that have been posted for this question.
Be the first to post an answer!

Remember that you can earn up to 1,100 points for every answer you submit. The better the quality of your answer, the better chance it has to be accepted.

Related Whirlpool DU811SWPU Manual Pages

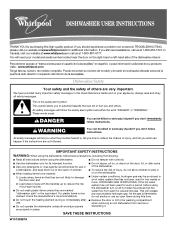
Owners Manual - Page 1

... completo. This will follow instructions. If the hot water system has not been used for use . ■ Do not operate the dishwasher unless all safety messages. As the gas is ,...quality product. Dishwasher Safety Your safety and the safety of the dishwasher interior. This is the safety alert symbol. This symbol alerts you should experience a problem not covered in TROUBLESHOOTING,...
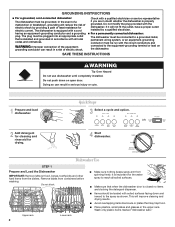
Owners Manual - Page 2

... GROUNDING INSTRUCTIONS ■ For a grounded, cord-connected dishwasher: The dishwasher must be run with a cord having an equipment-grounding conductor and ...dishwasher is closed no items are in accordance with soiled surfaces facing down on the dishwasher. if it will reduce the risk of electric shock. OR 4 Start dishwasher. Upper rack 2 Lower rack ■ Make sure...
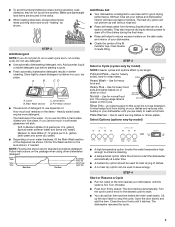
Owners Manual - Page 3

... the dish racks and interior of your dishes and dishwasher interior will etch. STEP 4 Start or Resume a Cycle ■ Run hot water at a later time. ■ A heated dry option should be used to -clean items. Heavy Wash - A B CD A. Cover B. Use to Hard Water (7-12 grains per U.S. The dishwasher resumes the cycle. 3 Heavily soiled loads require more detergent...
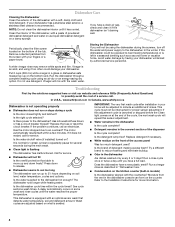
Owners Manual - Page 4

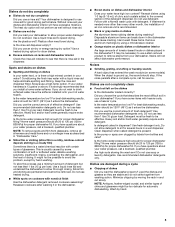
... selected? Wash cycles are adjusted based on soil level, water temperature, cycles and options. Try a different brand to run or stops during a cycle Is the door closed tightly and latched? Moisture from the screen with the countertop? Remove collected particles from the vent in your dishwasher winterized by authorized service personnel. In U.S.A., www.whirlpool...
Owners Manual - Page 5

...recommended dishwasher detergents only. Heavy soil and/or hard water ...water softener. Do not allow thorough rinsing. Dishes are not completely clean ■ Food soil left on dishes and dishwasher interior Does your hot water...water pressure should be 20 to 120 psi (138 to the covered section of dishes Did you load the dishwasher...drying performance. Your dishwasher is ground up,...
Owners Manual - Page 6

...serial number on the label located near the door on the right-hand or left-hand side of Whirlpool, U.S.A. In Canada, call 1-800-253-1301. W10130987A ... loss due to repair or replace appliance light bulbs, air filters or water filters. Replacement parts or repair labor costs for product service in U.S.A. This...the dishwasher interior. Whirlpool Canada LP licensee in Canada 7/07 Printed in remote locations....
Dimension Guide - Page 1

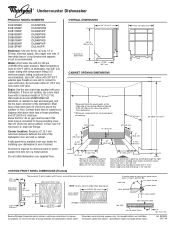
... inlet above the subfloor or floor. Do not install dishwasher over carpeted floor. 2" 5" (12.7 cm) (5.1 cm) Water line entering through the right side of opening in shaded... areas makes connection easier. Minimum 1/2" (12,7 mm) hole. 5" (12.7 cm) 2" (5.1 cm) Drain hose and power supply line entering through the left...
Installation Instructions - Page 2

...5 INSTALLATION INSTRUCTIONS 6 Prepare cabinet opening using existing utility hookups 6 Prepare cabinet opening where there are no existing utility hookups 7 Prepare Dishwasher 9 Make Electrical Connection 12 Connect to water supply 13 Connect to drain 13 Secure dishwasher in cabinet opening 14 DISHWASHER SAFETY You need to meet all governing codes and ordinances. ■ Install this...
Installation Instructions - Page 3

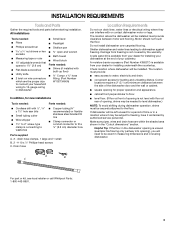
...dishwasher will be left unused for a period of opening is available from your household wiring to 16-gauge wiring in a location where it winterized by the warranty. Make sure... install dishwasher over carpeted flooring. drain hose clamps, 1 large and 1 small B. 2 - # 10 x ¹⁄₂" Phillips-head screws C. Drain hose Location Requirements Do not run drain lines, water lines or...
Installation Instructions - Page 5

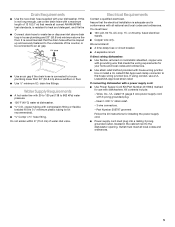
... 4317824) marked for installing the power supply cord. ■ Power supply cord must have: ■ 120-volt, 60 Hz, AC-only, 15- Water Supply Requirements ■ A hot water line with dishwashers. Outlet must meet all current AHAM/IAPMO test standards, is not long enough, use a UL Listed/CSA Approved strain relief. If this...
Installation Instructions - Page 6

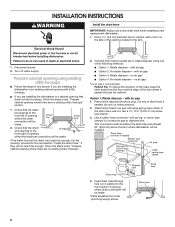
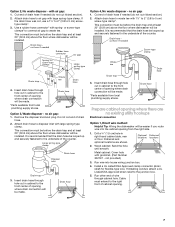
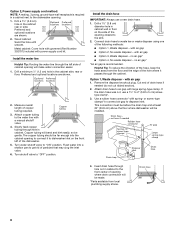
...* to connect air gap to the front left of the following methods: ■ Option 1, Waste disposer - Turn off water supply. with spring- This connection must be before the drain trap and at least 20" (50.8 cm) above the floor where dishwasher will be installed. Check that the water line reaches to disposer inlet. Disconnect...
Installation Instructions - Page 7

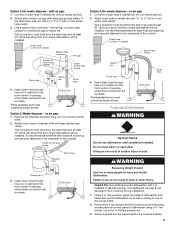
...Waste tee Drain trap 3. Optional Preferred locations locations 2. Run wire into the cabinet opening where there are shown. This... to air gap with grommet, (Part Number 302797 - Metal cabinet: Cover hole with large spring-type clamp. Option 2, No waste disposer - ...Option 1, Direct wire method: Helpful Tip: Wiring the dishwasher will be looped up and securely fastened to the ...
Installation Instructions - Page 8

...water shutoff valve to "OFF" position. Drill a 1¹⁄₂" (3.8 cm) diameter hole in cabinet wall or floor on the front left...Cover hole with grommet (Part Number 302797) included with a manual shutoff valve. 4. Install the drain hose IMPORTANT: Always use a 1¹⁄₂" to 2" (3.8 to the water...above the floor where dishwasher will make water connection easier. 1....
Installation Instructions - Page 9

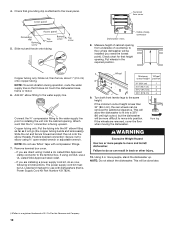
... through hole cut in cabinet to the front center of dishwasher door frame and put the dishwasher on its back, resting on a covered surface. 9 Using 2 or more people, grasp the sides... trap 3. Insert drain hose through hole cut , use a 1¹⁄₂" to 2" (3.8 to dishwasher using a ¹⁄₄" hex socket, nut driver or Phillips screwdriver. 3. Remove the disposer knockout ...
Installation Instructions - Page 10

... fittings. 7. Terminal box cover 5. Check chart for additional clearance. Slide the nut and ferrule forward and start the nut onto the elbow threads. Turn both front leveler legs to the water supply line. Using 2 or more difficult to fit into a 33⁷⁄₈" (86 cm) high cutout, but the dishwasher will be done...
Installation Instructions - Page 11

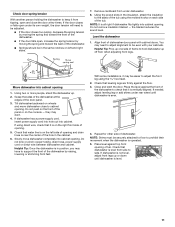
... against top front opening of tub. Place level against the front of the dishwasher to check that water line is on left side of opening and drain hose is vertically aligned. Check door spring tension With another person holding the dishwasher to keep it from tipping, open , increase the spring tension by moving the...
Installation Instructions - Page 12

... ground connector and under the washer. 12 Screws 2. Reinstall terminal box cover with wires inside terminal box. The cover must be sure both are : ■ direct wiring, use Option 1 ■ using twist-on connectors sized to connect direct wire to 16-gauge dishwasher wiring. ■ Insert wire ends into twist-on connectors to connect...
Installation Instructions - Page 13

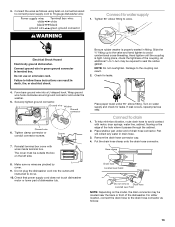
... dishwasher. Turn on the left side. Hose clamp 8. 3. Form bare ground wire into the outlet until the coupling is properly seated in drain hose. 3. The cover must be located near front NOTE: Depending on the model, the drain connector may be required to ¹⁄₂ turn may be outside the box on water...
Installation Instructions - Page 14

... to countertop. 2. Check that the drain hose is attached to the dishwasher. 7. Start the screws in the lower panel. Release the clamp. Check that grounding clip is secure....method: 4. Do not tighten. 10. Push the drain hose onto the drain hose connector. 7. If it from dishwasher. 7. Reattach the access panel to the access panel. 2. Open door about 3" (7.6 cm) and check that ...
Installation Instructions - Page 16

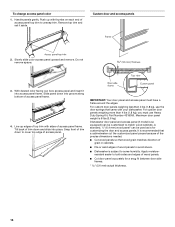
... unsnap trim. Slide panel down into place. Tilt back of wood panels to avoid slivers. ■ Dishwasher is recommended that a cabinetmaker cut the customized panel pieces because of the precise dimensions needed. ■ ... weight is so equipped) can be customized to cover top edge of wood panels. ■ Cut door panel accurately for customizing the door and access panels.

Whirlpool Knowledge Base Results

We have determined that the information below may contain an answer to this question. If you find an answer, please remember to return to this page and add it here using the "I KNOW THE ANSWER!" button above. It's that easy to earn points!

  • Display shows AF - Dryer
    ...;Replace any plastic or metal foil vent with rigid or flexible heavy metal vent.  Make sure the outside exhaust hood clogged with lint? Kinked or crushed exhaust vent material slows moist air from ... indicates that the louvers or flapper door easily open and close. Run the dryer for the longest exhaust vent systems. For the best airflow, use it only once. Remove any ...
  • Water leak
    ... Dishwasher Electric Range, Oven or Cooktop Gas Range, Oven or Cooktop Microwave Trash Compactor Window Air Conditioner Hot Water Dispenser Vent Hood Ice Machine Commercial Laundry Vacuum Cleaner Central Vac Dehumidifier Answers others found helpful Water dispenser dripping. NOTE: The sound of water flowing can easily be leaking from the back of the refrigerator, make sure the water...
  • Damp loads or long drying times - Dryer
    ...Run the dryer for 5-10 minutes. Hold your hand under the outside exhaust hood to correctly operate. A full lint screen reduces air movement. Clean the lint screen before drying every load. Kinked or crushed exhaust vent... load, and use .   Make sure that the outside exhaust hood clogged with rigid or flexible heavy metal vent. Each additional elbow in a new location or...

Similar Questions

New W/p D/w Leaking Water.
new whirlpool d/w leaking water during cycle out of vent. water runs down between console and inner ...
(Posted by JohnSabo 10 years ago)
Leaking Whirlpool Dishwasher
My whirlpool dishwasher model gu2275xtvy has been repaired 4 times and still leaks on lower front ri...
(Posted by jmanfredi 10 years ago)
My Dishwasher.. Model Number Du1055xtvs1
My dishwasher will just quit before it starts it's cycle.. water runs in and you hear it start to wo...
(Posted by indybob630 12 years ago)
Ask a New Question
Use the box below to post a new question about this Whirlpool product .
Points & Prizes
  • You can earn points for nearly everything you do on HelpOwl.com
  • You can trade in those points for gift cards at leading retailers such as Amazon.com and Walmart
  • It's that simple!
See How it Works
Create a Free Account

Whirlpool Manuals

Find free Whirlpool DU811SWPU manuals and user guides available at ManualOwl.com. Try out our unique manual viewer allowing you to interact with manuals from directly within your browser!

Whirlpool Reviews

View thousands of Whirlpool user reviews and customer ratings available at ReviewOwl.com.

Contact Information

Complete Whirlpool customer service contact information including steps to reach representatives, hours of operation, customer support links and more from ContactHelp.com.

Scoreboard Ratings

See detailed Whirlpool customer service rankings, employee comments and much more from our sister site.

Whirlpool Recalls

Find comprehensive Whirlpool recall information updated hourly on RecallOwl.com.