Get support for Vizio XMA1200

Vizio XMA1200 Support Question

Vizio XMA1200 Support Question

Find answers below for this question about Vizio XMA1200.
Need a Vizio XMA1200 manual? We have 1 online manual for this item!
Question posted by shannon55 on August 19th, 2012

Looking For Locking Tool

Where does one find a locking tool for the vizio xma 1200.  Vizio no longer carries this model and I can't relocte the TV without the locking tool (which I lost) to remove two bolts.  I think K2 Mounts made these mounts for Visio and I've emailed them for information. Thought some of you might know where I could go locally and find this flat little security tool.

Current Answers

There are currently no answers that have been posted for this question.
Be the first to post an answer!

Remember that you can earn up to 1,100 points for every answer you submit. The better the quality of your answer, the better chance it has to be accepted.

Related Vizio XMA1200 Manual Pages

Quick Installation Guide - Page 1

QUICK INSTALL GUIDE FULL ARTICULATING MOUNT UNIVERSAL FOR 40" - 60" TVS UP TO 120 LBS XMA1200 -
Quick Installation Guide - Page 2

VIZIO is for damage or injury caused by incorrect mounting, assembly, or use only. If you have any doubts about the ability of the wall to support the mounting system or your TV. Only attach this mount system to vertical walls as instructed in this Quick Install Guide. Always follow the instructions in personal injury or...
Quick Installation Guide - Page 3

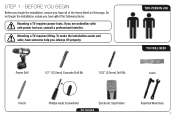
... 7/32" (5.5mm) Drill Bit Level Pencil Phillips-head Screwdriver Electronic Stud Finder Not Included Assorted Wrenches 1 Mounting a TV requires lifting. To make the installation easier and safer, have someone help you are unfamiliar with safe power tool use, consult a professional installer. STEP 1 - If you . BEFORE YOU BEGIN Before you begin the installation unless...
Quick Installation Guide - Page 4

STEP 2 - x 2 Quick Install Guide & Wall-Mount Template x 1 x 2 (Attached to Mount) x 2 Sec X1 x 1 x 4 x 4 x 4 x 1 x 2 x 4 2 If any parts are included and undamaged. REVIEW THE PACKAGE CONTENTS Before you begin, ensure all parts are missing or damaged, contact VIZIO Customer Service (877) 698-4946. To prevent loss, do not unpack the small parts until they are required.
Quick Installation Guide - Page 6

... nothing. If you want the arm to swing to the left or to the left as it is assembled in Box - Like a door, the mount can swing open to the right. The mount is ready to swing to the left or to swing away from the wall like a door. STEP 3 - Ready to Step...
Quick Installation Guide - Page 7

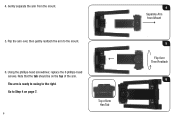
... 2 1 3 5 There are close to the right: 1. On the top of the arm. Lay the mount on the top of the arm, do not loosen the screws inside the arm and 2 screws on the floor. Using the screwdriver, remove the 2 philips-head screws as shown and swing the arm away from the arm.
Quick Installation Guide - Page 8

4. Note that the tab should be on page 7. 6 Top of the arm. Flip the arm over, then gently reattach the arm to the right. Using the phillips-head screwdriver, replace the 6 phillips-head screws. Gently separate the arm from Mount 5 Flip Over Then Reattach 6 The arm is ready to swing to the mount. 6. Go to Step 4 on the top of Arm Has Tab 4 Separate Arm from the mount. 5.
Quick Installation Guide - Page 9

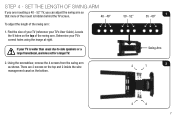
... use holes set for a larger TV. 2. There are mounting a 40 - 52" TV, you are 2 screws on the top and 2 inside the wire management canal on the top of your TV (reference your TV's User Guide). STEP 4 - SET.... 50 - 52" 1 55 - 60" Swing Arm 2 2 1 3 4 7 If your TV's correct holes using the image at right. Using the screwdriver, remove the 4 screws from the swing arm as shown.
Quick Installation Guide - Page 10

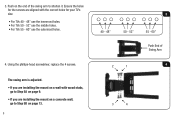
..., go to Step 5A on page 9. • If you are installing the mount on a wall with the correct holes for your TV's size: • For TVs 40 - 48" use the innermost holes. • For TVs 50 - 52" use the middle holes. • For TVs 55 - 60" use the outermost holes. 4. The swing arm is adjusted...
Quick Installation Guide - Page 11

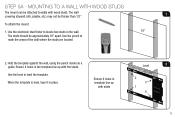
...level, tape it in template line up with wood studs. Ensure 4 holes in place. To attach the mount: 1. Hold the template against the wall, using the pencil marks as a guide. Use the electronic stud ... attached to mark the areas of the wall where the studs are located. 2. MOUNTING TO A WALL WITH WOOD STUDS The mount can be thicker than 1/2". Use the pencil to walls with the studs.
Quick Installation Guide - Page 13

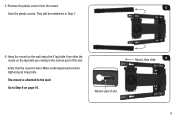
Use the thumb holes 5 to lift the covers away from the mount. They will be reattached in the narrow part of slot 11 Hang the mount on the wall using the 2 lag bolts, then slide the mount so the lag bolts are resting in Step 7. Use the Thumb Hole 6. Save the plastic covers. Remove the plastic covers from the mount. Mount, then slide 6 Narrow part of the slot. 5.
Quick Installation Guide - Page 14

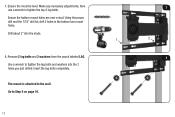
.... 12 Insert the lag bolts completely. Go to tighten the top 2 lag bolts. Using the power drill and the 7/32" drill bit, drill 2 holes in the bottom two mount holes. The mount is level. Ensure the bottom mount holes are over a stud. Drill about 2" into the 2 holes you just drilled. 7. Remove 2 lag bolts and 2 washers from the...
Quick Installation Guide - Page 15

Drill about 2 1/2" deep. Level 1 When the template is level, tape it in place. 2. STEP 5B - Using the power drill and the 1/2" drill bit, drill into 6 of the template holes as shown. Hold the template against the wall, using the level to level the template. Remove the template from the wall. 3 (choose one) 21 2 4 (choose one) 56 13 MOUNTING TO A CONCRETE WALL 1.
Quick Installation Guide - Page 17

... 6 on the wall using the 6 lag bolts, then slide the mount so the lag bolts are resting in Step 7. 6. Narrow part of the slot. Remove the plastic covers from the mount. 5 Save the plastic covers. Make small adjustments before tightening all 6 lag bolts. Hang the mount on page 16. The mount is level. They will be reattached in...
Quick Installation Guide - Page 18

... will be listed as shown. In your TV's User Guide, find one that matches your TV's mounting holes. If you have a small screen (mounting holes are 400-600mm apart), place the brackets inward. If you find the size of your TV's mounting holes. Place the vertical TV brackets against the mounting holes as M4, M5, M6, or M8. You may...
Quick Installation Guide - Page 19

Because each TV is different, your TV has protruding components, place spacers between the brackets and the mounting holes. Do not use the large ... short screw if a longer screw can be inserted completely. Using the screwdriver, insert the screws, star washers, and 3 washers as shown. 3. If your TV has a curved back, or if your VIZIO TV mount includes screws of different ...
Quick Installation Guide - Page 20

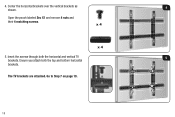
Center the horizontal brackets over the vertical brackets as 4 shown. x 4 x 4 5. Insert the screws through both the top and bottom horizontal brackets. Go to Step 7 on page 19. 18 The TV brackets are attached. 4. Ensure you attach both the horizontal and vertical TV 5 brackets. Open the pouch labeled Sec X1 and remove 4 nuts and their 4 matching screws.
Quick Installation Guide - Page 21

... of another person, lift the TV and hang it rests against the arm. 1 2 2 Tab on Arm Fits into the slot on Bracket 19 Swing the arm away from the mount. 1 Swing Arm Away 2. With the help of another person. 1. HANGING THE TV ON THE MOUNT This step requires lifting the TV. STEP 7 - First, hang the top...
Quick Installation Guide - Page 22

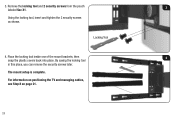
... X1. Place the locking tool inside one of the mount brackets, then 4 snap the plastic covers back into place. For information on positioning the TV and managing cables, see Step 8 on page 21. 20 By saving the locking tool in this place, you can remove the security screws later. Locking Tool 4. The mount setup is complete. Using the locking tool, insert and tighten...
Quick Installation Guide - Page 23

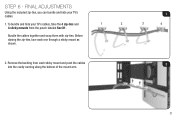
STEP 6 - FINAL ADJUSTMENTS Using the included zip-ties, you can bundle and hide your TV's cables, take the 4 zip-ties and 4 sticky mounts from each one through a sticky mount as shown. 2. To bundle and hide your TV's cables. 1. Remove the backing from the pouch labeled Sec X1. 1 2 Bundle the cables together and wrap them with zip...

Similar Questions

Wall Mount Xma500
need screen plate too
(Posted by tfilippone13 3 years ago)
Vizio E320vp
what is the distance, in mm or inches, between the mounting screws on the back of the TV. I am wanti...
(Posted by picks1 5 years ago)
Undo A Tv Wall Bracket From Tv
how to remove tv from mounting bracket? Wall mount bracket.Thias is a XMT1200/XMT500
(Posted by pfbeatty8 10 years ago)
Ask a New Question
Use the box below to post a new question about this Vizio product .
Points & Prizes
  • You can earn points for nearly everything you do on HelpOwl.com
  • You can trade in those points for gift cards at leading retailers such as Amazon.com and Walmart
  • It's that simple!
See How it Works
Create a Free Account

Vizio Manuals

Find free Vizio XMA1200 manuals and user guides available at ManualOwl.com. Try out our unique manual viewer allowing you to interact with manuals from directly within your browser!

Vizio Reviews

View thousands of Vizio user reviews and customer ratings available at ReviewOwl.com.

Contact Information

Complete Vizio customer service contact information including steps to reach representatives, hours of operation, customer support links and more from ContactHelp.com.

Scoreboard Ratings

See detailed Vizio customer service rankings, employee comments and much more from our sister site.