
Toro 20334 Support Question
Toro 20334 Support Question
Find answers below for this question about Toro 20334 - Personal Pace Electric Start Walk Power Mower.Need a Toro 20334 manual? We have 2 online manuals for this item!
Question posted by cutchy12180 on May 4th, 2016
Electric Start
when key is turned ther is nothing. i don't see a battery. help
Current Answers
Answer #1: Posted by freginold on May 4th, 2016 7:58 AM
freginold

Member since:
December 20th, 2011 Points: 23,253,885

Member since:
December 20th, 2011 Points: 23,253,885
You can see the location of the battery -- as well as instructions for charging it -- on page 15 of the owner's manual. If you don't have the manual, you can download it here. You can also download the parts manual if you need it.
Related Toro 20334 Manual Pages
Owner's Manual - Page 1
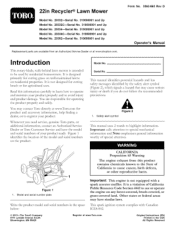
...the product. 22in Recycler Lawn Mower
Form No. 3363-863 Rev D
Model No. 20332mSerial No. 310000001 and Up Model No. 20332CmSerial No. 310000001 and Up Model No. 20334--Serial No. 310000001 and ...,wv,Toro.com for product and accessory information, help finding a dealer, or to register your product. Introduction
This rotary-blade, walk-behind lawn mower is intended to be used by the safe_ _alert...
Owner's Manual - Page 2

...operating requirements, the actual engine horsepower on slopes.
• Watch for walk-behind rotary lawn mowers and the B71.1 specifications of the American National Standards Institute in serious...following safety instructions. Failure to potential personal injury hazards. Stay behind before starting the engine.
• If the machine should start the engine. Always be
ordered ...
Owner's Manual - Page 3
... your vehicle before starting .
Allow engine to prevent unintended starting . Keep the nozzle...setting or overspeed the engine. Remove gas-powered equipment from your view of a child...tight to the presence of Gasoline
To avoid personal injury or property damage, use extreme care ...Allow machine to operate the machine.
Be alert and turn mower off if a child enters the area. Never refuel...
Owner's Manual - Page 5
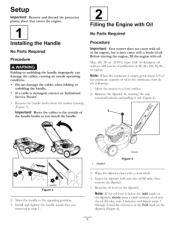
Before starting the engine, fill the engine with an API service classification of oil in the crankcase, then do the ...discard the protective plastic sheet that you install the handle.
[2
Filling the Engine with Oil
No Parts Required
Procedure
Important: Your mower does not come with a clean cloth. 4. Remove the dipstick by rotating the cap counterclockwise and pulling it does come with...
Owner's Manual - Page 6

... handle
7. Fuel tank cap
11. Washout port (not shown) 13. Handle 2. Blade control bar 3. Grass bag 2. Battery charger (electric-start
8.
Side discharge chute
3. with oil until
6.
Handle knob (2)
6. Spark plug
1
G009526
Figure 6
1. Ignition key (electric-start models only) Oil fill/dipstick
12. Drain the excess the oil level on -demand lever
5. Side-discharge...
Owner's Manual - Page 7
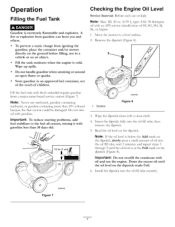
... Note: If the oil level is below the Add mark on an object. Important: To reduce starting problems, fuel stabilizer to a level surface.
2. Insert the dipstick fury into the oil fi11tube secure17...is cold.
To prevent a static charge from igniting the gasoline, place the container and/or mower directly on the ground before filling, not in an approved fuel container, out of the reach...
Owner's Manual - Page 8
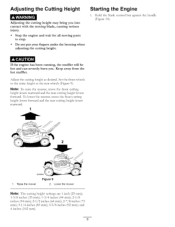
... forward and the rear cutting height levers rearward.
1
2
_r--- _
1.
Raise the mower
Figure 9 2. and
4 inches (102 ram). Adjusting the Cutting Height
Adjusting the cutting height may bring contact with the moving parts to the same height as desired. you . Starting the Engine
1. If the engine has been running, the muffler will be...
Owner's Manual - Page 9

Blade control bar
7
_/_'G009546
Figure 10
, Turn the ignition key (Figure 11) (electric-start models only) or pul the recoil start handle, pull it lightly until you (Figure 13).
1. You can also try reaching just under the personal pace handle to the metal handle and push the mower forward a couple of inches (centimeters) forward to disengage the wheel drive...
Owner's Manual - Page 10

...10
Bagging the Clippings
Use the grass bag when you leave the mower (electric-start models only).
Note: Remove the ignition key when you want to collect grass and leaf clippings from the ...Your mower comes from the lawn.
23
A worn grass bag could allow small stones and other similar debris to be thrown in the operator's or bystander's direction and result in serious personal injury...
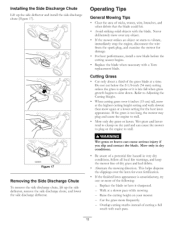
Owner's Manual - Page 11
...
G009582
1. contacting the blade can result in serious personal injury. parts to
The blade is sharp; If the grass bag is on the mower and the bag-on-demand lever is sharp;
Stop... other similar debris to be thrown in the
operator's or bystander's direction and result in serious personal injury.
lever forward until the button on -demand and the surrounding opening (Figure 16) before ...
Owner's Manual - Page 12
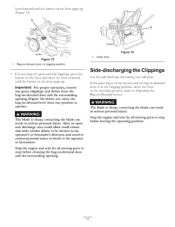
... tall, mow at a slower pace while mowing. - Cut the grass more of the grass blade at a lower setting for the best lawn appearance. Never deliberately mow over the lawn for damage.
• For... If the finished lawn appearance is unsatisfactor B try one or more frequent13: - This helps disperse the clippings over aW object.
• If the mower strikes an object or starts to stall.
&#...
Owner's Manual - Page 14

... to your engine operator's manual. • Refer to remove the fuel. Tipping Gasoline personal
the mower may cause the fuel to the spark plug. Run the engine dry or remove the .... clean it sharpened (more frequently in dusty operating conditions. • Charge the battery for 24 hours (electric-start models only).
• Empty the fuel tank before repairs as directed and before performing...
Owner's Manual - Page 16

then monthly (every 25 starts) or as needed.
Note: When the battery no longer holds a charge, recycle or dispose of the lead-acid battery according to the mower wire harness located below the ignition key (Figure 22). Rear deflector 2. Battery compartment
, Wipe away aW debris in the battery compartment area, and remove the adhesive-backed covering.
, Remove the...
Owner's Manual - Page 17
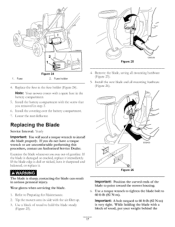
...8226;
Note: Your mower comes with the air filter up. 3. Install the covering over the battery compartment• 7.
... Service Dealer. contacting the blade can result in the battery compartment•
5.
Wear gloves when servicing the blade....Figure 25
G005454
1.
Install the battery compartment you run out of the blade to point toward the mower housing. , Use a torque wrench...
Owner's Manual - Page 18
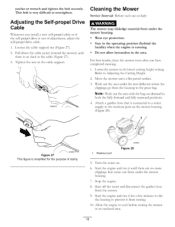
...cable.
, Loosen the cable support nut (Figure 27). 2. Washout port
G009501
Figure 28
, Turn the water on the mower housing (Figure 28).
7
Figure 27 This figure is running. • Do not allow ...Move the mower onto a flat paved surface. 3. Note: Wash out the area vdth the bag-on the cable support. Start the engine and run it from the mower. the garden hose
, Start the engine...
Owner's Manual - Page 19

... the handle. Remove the ignition key (electric-start the engine, it stops. Loosen the handle M_obs until you fold the handle.
Figure 29
G009504
4. Charge the battery for 24 hours, then unplug the
battery charger an store the mower in an unheated area. When you must charge the battery every 90 days (electric-start models only).
2. Remove the spark...
Owner's Manual - Page 20

...
You must pay transportation costs. failure to Start) Power Train**
Battery
Warranty Period 2 - General Conditions
All repairs... Bring the product and your sole remedy under "Lawn Mowers") or access our web site at Toro Warranty...Starting Guarantee
A 3-Year Full Warranty (Not Applicable for Commercial Use)
22 in Recycler ¢
20 in Mulcher/Bagger Walk Power Mowers...
Parts Catalog - Page 2
... thread fine PFH: phillips flat head PPH: phillips pan head PPHTF: phillips pan head thread forming PRH: phillips round head PTH: phillips truss head PTO: power-take-off RH: right hand ROPS: roll-over protection system
RRB: rear roller brush SFH: slotted fillister head SHH: slotted hex head SHWH: slotted hex...
Parts Catalog - Page 3

... Rear Door Assembly 4 Rear Bag Assembly 5 Engine and Blade Assembly 6 Front Wheel and Height-of-Cut Assembly 7 Transmission and Rear Wheel Drive Assembly 8 Handle Assembly 9 Electrical Assembly 10 Attachments and Accessories 11
© 2012-The Toro® Company
Contact us at www.Toro.com.
8111 Lyndale Avenue South Bloomington, MN 55420...
Parts Catalog - Page 10
...-2619
1 Decal-Electric Start
12 104-7953
1 Decal
13 114-1588
1 Charger-Battery
15 614249
3 Tie-Cable
3371-850B
10
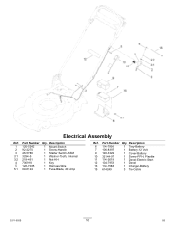
D5 Part Number Qty. Part Number Qty. Electrical Assembly
Ref. Description
1 120-5242
1 Mount-Switch
2 92-2270
1 Screw-Handle
3 46-5780
1 Starter Switch ASM
3:1 3254-5
1 Washer-Tooth, Internal
3:2 218-461
1 Nut-HH
4 700918
1 Key
5 120...
Similar Questions

Owners Manual For Toro 190 Cc Personal Pace Lawn Mower
(Posted by nelsontim1 9 years ago)

Toro Lawn Mower 20334 Electric Start Won't Start
(Posted by brafran 10 years ago)

How To Drain The Oil On A Toro Personal Pace Lawnmower
(Posted by fgyuidal 10 years ago)

Toro Self Propelled Lawn Mower Personal Pace Won't Pull The Mower 20332
(Posted by pksrsc 10 years ago)

Toro Personal Pace With Electric Start
i have a good battery and the starter does not drop the starter wheel gear to go to the fly wheel , ...
i have a good battery and the starter does not drop the starter wheel gear to go to the fly wheel , ...
(Posted by galehogue 11 years ago)