
Toro 20334 Support Question
Toro 20334 Support Question
Find answers below for this question about Toro 20334 - Personal Pace Electric Start Walk Power Mower.Need a Toro 20334 manual? We have 2 online manuals for this item!
Question posted by gignac4428 on May 24th, 2013
How Do I Change The Oil On My Personal Pace Toro Lawn Mower
The person who posted this question about this Toro product did not include a detailed explanation. Please use the "Request More Information" button to the right if more details would help you to answer this question.
Current Answers
Answer #1: Posted by freginold on May 25th, 2013 5:35 AM
freginold

Member since:
December 20th, 2011 Points: 23,253,885

Member since:
December 20th, 2011 Points: 23,253,885
Hi, you can find exact instructions for changing the oil for your mower on page 15 of the owner's manual. If you don't have the manual, you can view or download it from the link below. Thanks for using HelpOwl!
- Toro 20334 Lawn Mower owner's manual
- Toro 20334 Lawn Mower owner's manual
Related Toro 20334 Manual Pages
Owner's Manual - Page 1
... No. 20334--Serial No. 310000001 and Up Model No. 20334C--Serial No. 310000001 and Up Model No. 20352--Serial No. 310000001 and Up
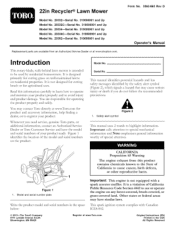
Operator's Manual
Replacement parts are responsible for operating the product properly and safel>
You may contact Toro directly at www.shoptoro.com. Introduction
This rotary-blade, walk-behind lawn mower is a violation...
Owner's Manual - Page 2

.... Poor footing could lose your footing;
If you start to potential personal injury hazards. Safety
This lawn mower meets or exceeds the CPSC blade safety requirements for ... Always wear eye protection when operating machine.
• See manufacturer's instructions for walk-behind before and while moving backward. Never direct discharged material toward the operator. Only...
Owner's Manual - Page 3
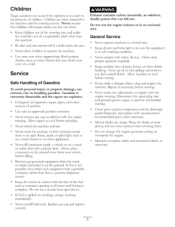
...are explosive. Remove gas-powered equipment from the truck or...'s recommended parts, when necessar):
Mower blades are often attracted to cool...to operate the machine. Do not change clothing immediatel):
Never overfill fuel ...starting . Use extra care when approaching blind corners, shrubs, trees, or other sources of Gasoline
To avoid personal... other debris build-up oil or fuel spillage and remove...
Owner's Manual - Page 4
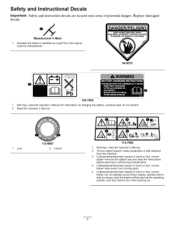
...operating position; Safety and instruction decals are located near areas of hand or foot, mower blade--stay away from moving parts.
5. Warning--read the Operator's Manual. 2. ...original machine manufacturer.
94-8072
0 81
104-7953 1. Cutting/dismemberment hazard of hand or foot, mower blade--do not discard. 2. Replace damaged
Manufacturer's Mark
1. Unlock
114-7982
1. Safety and ...
Owner's Manual - Page 5
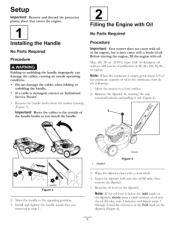
... discard the protective plastic sheet that you install the handle.
[2
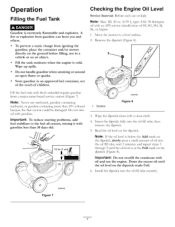
Filling the Engine with Oil
No Parts Required
Procedure
Important: Your mower does not come with an API service classification of SF, SG, SH, SJ, SL, or higher. Before starting the engine, fill the engine with a clean cloth. 4. Install and tighten the handle...
Owner's Manual - Page 6

...Fuel tank cap
11. Grass bag 2. Install the dipstick into the oil fill tube secure1>
Important: Change the engine oil after the first 5 operating hours; Ignition key (electric-start handle
7. Bag-on the dipstick reads Full. Handle knob (2)
6. Recoil start
8. change it yearly thereafter. with oil until
6. Side-discharge deflector
models only)
4. Spark plug
1
G009526
Figure...
Owner's Manual - Page 7
...Install the dipstick into the oil fi11tube secure17
G009498
Figure 7 A fire or explosion from igniting the gasoline, place the container and/or mower directly on the ground ...starting problems, fuel stabilizer to a level surface.
2. Fill the fuel tank with gasoline. add it with oil until the oil level is below the Add mark on the dipstick, slowly pour a small amount of oil into the oil...
Owner's Manual - Page 8
...Keep away from the hot muffler. and
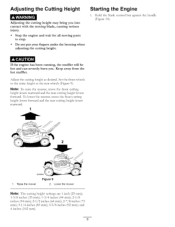
4 inches (102 ram). Starting the Engine
1.
Raise the mower
Figure 9 2. To lower the mower, move the front cutting height levers rearward and the rear cutting height levers... forward. Lower the mower
Note: The cutting height settings are 1 inch (25 ram);
1-3/8 inches (35 ram); 1-3/4...
Owner's Manual - Page 9

... the personal pace handle to the metal handle and push the mower forward a couple of inches (centimeters) forward to the handle slowl>
Figure 13
Note: If the mower does not freely roll backward after several attempts, contact an Authorized Service Dealer.
Blade control bar
7
_/_'G009546
Figure 10
, Turn the ignition key (Figure 11) (electric-start models...
Owner's Manual - Page 10

...in serious personal injury. The blade is damaged, install a new Toro replacement bag. Rear deflector
2. Important: When you leave the mower (electric-start models only). If the grass bag is on the mower and ... bag, reverse the steps above. and contact an Authorized
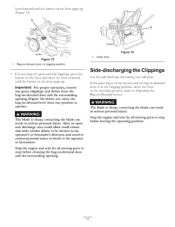
Recycling the Clippings
Your mower comes from the lawn.
23
A worn grass bag could allow small stones and other similar debris to...
Owner's Manual - Page 11
...on -demand another.
parts to the operator or bystanders. If the grass bag is on the mower and the bag-on-demand lever is in bagging position)
For recycling the grass and leaf ...-on the lever pops up . contacting the blade can result in serious personal injury. contacting the blade can result in serious personal injury. Also, an open rear discharge area could allow small stones and ...
Owner's Manual - Page 12
...starts to Adjusting the Cutting Height.
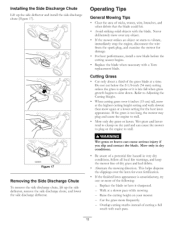
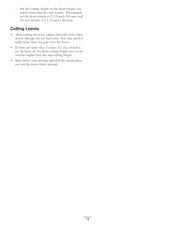
• When cutting grass over the lawn for the best lawn appearance.
Mow only in very dry conditions, follow all local fire warnings, and keep the mower free of the following: - This helps disperse the clippings over 6 inches (15 cm) tall, mow at a slower pace... of cutting a full
swath with a Toro replacement blade. If the grass is late...
Owner's Manual - Page 13
... pass over the leaves.
• If there are more than 5 inches (13 cm) of the lawn shows through the cut the leaves finely enough.
13 For example, set the front cutting height one notch...than the rear cutting height.
• Slow down your mowing speed if the mower does not cut leaf cover.
Set the cutting height on the lawn, set the front wheels at 2-1/8-inch (54 ram) and the rear wheels ...
Owner's Manual - Page 14

...electric-start models only).
• Empty the fuel tank before repairs as directed and before performing any additional yearly maintenance
procedures. Preparing for all moving parts to your engine operator's manual for any maintenance procedure. Always tip the mower....
Tipping Gasoline personal
the mower may cause the...: Before tipping the mower to change
the oil or replace the blade...
Owner's Manual - Page 15
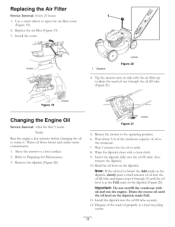
... and carries more contaminants. 1. Important:
Do not overfill the crankcase with a clean cloth. 9. Figure 19
Changing the Engine Oil
Service Interval: After the first 5 hours Yearly
Run the engine a few minutes before changing the oil to settle. 8. Dipstick
Figure 20
, Tip the mower onto its side with the air filter up to drain the used...
Owner's Manual - Page 16

...Note: There is charging the batter):
4
1. Charging the Battery
Service Interval: Every 25 hours
Electric-start models only
If the battery does not charge or the engine does not run with a 40-amp ...• A red light indicates that the battery is fully charged. Connect the charger to the mower wire harness located below the ignition key (Figure 22). Always use the charger in a sheltered ...
Owner's Manual - Page 17
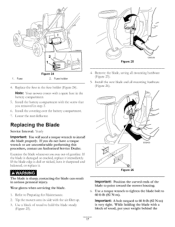
...Install the battery compartment you removed in serious personal injury. G005455
Figure 26 Important: Position the curved ends of gasoline. with the air filter up. 3. Tip the mower onto its side with the screw that
6....the blade can result in step 3. If you run out of the blade to point toward the mower housing. , Use a torque wrench to tighten the blade bolt to hold the blade steady
(...
Owner's Manual - Page 19

..., add 1 oz. (30 ml) of oil
through the spark plug hole, and pull the starter rope slowly several times to distribute oil throughout the cylinder to the outside of the...the battery for 24 hours (electric-start models only). Storage
Folding the Handle
Store the mower in a cool, clean, dry place•
Preparing the Mower for Storage
Gasoline vapors can no longer start the engine, it is ...
Owner's Manual - Page 20

... Warranty (45 Day Limited Warranty for Commercial Use)
The Toro GTS Starting Guarantee
A 3-Year Full Warranty (Not Applicable for Commercial Use)
22 in Recycler ¢
20 in Mulcher/Bagger Walk Power Mowers
Conditions and Products Covered
Items and Conditions Not Covered
The Toro Company and its affiliate, Toro Warranty Company, pursuant to an agreement between them, jointly...
Parts Catalog - Page 1
Original Instructions (EN)
*3371-850* B Form No. 3371-850 Rev B
22in Recycler® Lawn Mower
Model No. 20334-Serial No. 312000001 and Up
Parts Catalog
Register at www.Toro.com.
Similar Questions

Owners Manual For Toro 190 Cc Personal Pace Lawn Mower
(Posted by nelsontim1 9 years ago)

Toro Lawn Mower 20334 Electric Start Won't Start
(Posted by brafran 10 years ago)

How Do You Change Oil On A Toro 22 Inch Personal Pace Lawn Mower
(Posted by ajcacostia 10 years ago)

How To Change Oil In Toro Personal Pace Lawn Mower
(Posted by ozCRaX 10 years ago)