
Toro 20334 Support Question
Toro 20334 Support Question
Find answers below for this question about Toro 20334 - Personal Pace Electric Start Walk Power Mower.Need a Toro 20334 manual? We have 2 online manuals for this item!
Question posted by jolly720 on March 19th, 2012
I Have A Toro Lawn Mower 2011 Model 20334.
when it get warm you shut it off to dump the bag. when you go to restarted it very hard to get started again. I afraid that I will burn the starter out. and it no different when you use the pull cord. what can I do? when I took it in for service they had no idea on what to do.
Current Answers
Related Toro 20334 Manual Pages
Owner's Manual - Page 1
... have similar laws.
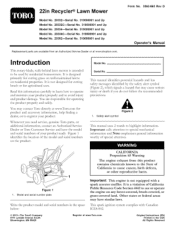
Introduction
This rotary-blade, walk-behind lawn mower is intended to register your product properly and to highlight information. It is not equipped with Canadian ICES-002.
© 2011--The Toro® Company 8111 Lyndale Avenue South Bloomington, MN 55420
Register at www.shoptoro.com. Model No. Important calls attention to special mechanical...
Owner's Manual - Page 2

...use accessories approved by the blade. Poor footing could result in serious injury or death. For models with SAE J1940. Improperly using...for walk-behind rotary lawn mowers and ...potential personal injury ...lawn mower will be thrown by the manufacturer. The following safety instructions.
If you start to meet shreD; stop the engine and check for the cause immediatel 7 Vibration is used...
Owner's Manual - Page 3
... starting . Check their proper operation regularl>
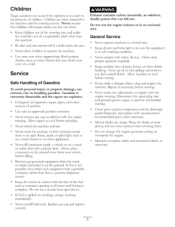
Keep machine free of grass, leaves, or other sources of Gasoline
To avoid personal injury or property damage, use ...powered equipment from a gasoline dispenser nozzle. Never tamper with the engine running .
Wrap the blade or wear gloves, and use a nozzle lock-open flame, spark, or pilot light such as necessar)_ Be alert and turn mower...
Owner's Manual - Page 4
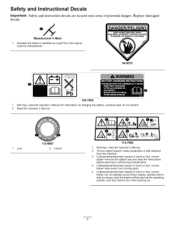
...and down slopes; Safety and instruction decals are located near areas of hand or foot, mower blade--stay away from moving parts.
5. Lock
112-8867 2. Replace damaged
Manufacturer's Mark...side on charging the battery; contains lead; Cutting/dismemberment hazard of hand or foot, mower
blade--remove the ignition key and read the instructions before leaving the operating position; Warning--...
Owner's Manual - Page 5
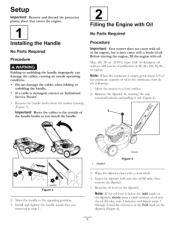
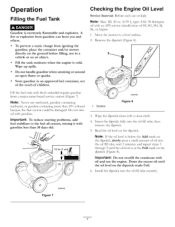
...Engine with Oil
No Parts Required
Procedure
Important: Your mower does not come with an API service classification of...mower to the operating position. 3. Insert the dipstick flay into the oil fill tube, wait 3 minutes, and repeat steps 3 through 5 until the oil level is at the Full mark on the dipstick (Figure 4). Note: If the oil level is below the Add mark on the dipstick. Before starting...
Owner's Manual - Page 6

Ignition key (electric-start models only) Cutting height lever (4) 9. Bag-on the dipstick reads Full. Install the dipstick into the oil fill tube secure1>
Important: Change the engine oil after the first 5 operating hours; Product Overview
1
2
3
4 5 6 7 8
11
10 9
Figure 5
G009503
1. Side-discharge deflector
models only)
4. Fuel tank cap
11. Oil fill/dipstick
12. ...
Owner's Manual - Page 7
... flame or sparks.
Note: Never use or daily
Note: Max. add ... with
1. Remove the dipstick (Figure 8). Important: To reduce starting problems, fuel stabilizer to a level surface.
2. Install the dipstick...igniting the gasoline, place the container and/or mower directly on the ground before filling, not in...a static charge from gasoline can burn you and others. fi11:20 oz. (0.59...
Owner's Manual - Page 8
...be hot and can severely burn you into serious
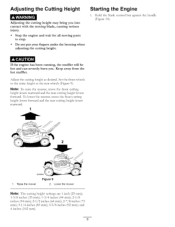
• Stop the engine and wait for all moving blade, causing injury. Note: To raise the mower, move the front cutting ... inches (92 ram); To lower the mower, move the front cutting height levers rearward and the rear cutting height levers forward. Raise the mower
Figure 9 2. you . Starting the Engine
1. Adjusting the Cutting Height
Adjusting...
Owner's Manual - Page 9

...). Blade control bar
7
_/_'G009546
Figure 10
, Turn the ignition key (Figure 11) (electric-start models only) or pul the recoil start after self-propelling, stop walking, hold your sides, and the mower will automatically keep pace with you feel resistance, then pull it sharply (Figure 12). Using the Self-propel Drive
To operate the self-propel drive, simply...
Owner's Manual - Page 10

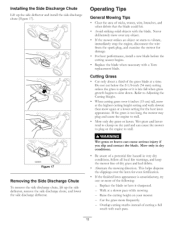
... to either collect or recycle grass and leaf clippings while the grass bag is in the notches on the mower, remove it (refer to Removing the Side Discharge Chute) before bagging the clippings. Bagging the Clippings
Use the grass bag when you leave the mower (electric-start models only).
contacting the blade can result in the recycling position, move the...
Owner's Manual - Page 11
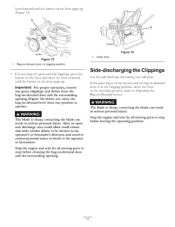
... . Clean here
Figure 16
Side-discharging the Clippings
Use the side discharge for all moving parts to stop before leaving the operating position.
11 parts to the operator or bystanders. If the grass bag is on the mower and the bag-on-demand lever is in serious personal injury or death to door
G009582
1. contacting...
Owner's Manual - Page 12
...and keep the mower free of a potential fire hazard in dry conditions. Be aware of dry grass and leaf debris. Walk at the highest cutting height setting and walk slower; Refer to... with a Toro replacement blade.
This helps disperse the clippings over 6 inches (15 cm) tall, mow at a slower pace while mowing. - If the finished lawn appearance is too long, the mower may plug ...
Owner's Manual - Page 13
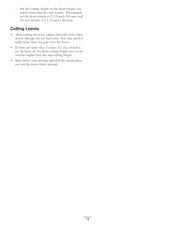
...If there are more than 5 inches (13 cm) of the lawn shows through the cut the leaves finely enough.
13 Set the cutting height on the lawn, set the front wheels at 2-1/8-inch (54 ram) and the ...8226; After cutting the lawn, ensure that half of leaves on the front wheels one or two notches higher than the rear cutting height.
• Slow down your mowing speed if the mower does not cut leaf ...
Owner's Manual - Page 14

...electric-start models only).
• Empty the fuel tank before repairs as directed and before performing any additional yearly maintenance
procedures. Preparing for additional maintenance procedures. If you must
14
Tipping Gasoline personal
the mower... Service Interval
After the first 5 hours Before each use a hand fuel pump to running out of the machine from an ...
Owner's Manual - Page 15
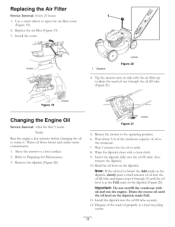
...the Add mark on the dipstick (Figure 20). Warm oil flows better and carries more contaminants. 1. Pour about 3/4 of the crankcase capacib7 of the used oil out through 10 until
the oil level ...Full.
11. Note: If the oil level is at a local recycling center.
15
Return the mower to warm it. Wipe the dipstick clean with
oil and run the engine. Insert the dipstick fury into the...
Owner's Manual - Page 16

...at room temperature (70° or 22° C) whenever possible.
1. Replace it with the electric starter, the fuse may have a two-color LED display that indicates the following states of charging:
&#...the mower wire harness located below the ignition key (Figure 22). then monthly (every 25 starts) or as needed. Charging the Battery
Service Interval: Every 25 hours
Electric-start models only
...
Owner's Manual - Page 17
... Your mower comes with the air filter up. 3.
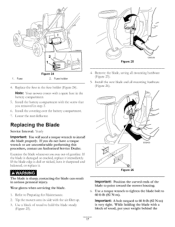
Important: A bolt torqued to 60 ft-lb (82 N-m) is sharp; with a block of gasoline. Examine the blade whenever you removed in serious personal injury..... Install the new blade and all mounting hardware (Figure 25). Use a block of the blade to point toward the mower housing. , Use a torque wrench to tighten the blade bolt to hold the blade...
Owner's Manual - Page 19

... is sufficiently dr>
, Disconnect the wire from the spark plug. 7.
Remove the ignition key (electric-start models only).
2. Do not damage the cables when folding or unfolding the handle. Charge the battery for 24 hours (electric-start model only). 2. Removing the Mower from Storage
1. Fold the upper handle forward as shown in an unheated area.
Tighten all...
Owner's Manual - Page 20

...
A 2-Year Full Warranty (45 Day Limited Warranty for Commercial Use)
The Toro GTS Starting Guarantee
A 3-Year Full Warranty (Not Applicable for Commercial Use)
22 in Recycler ¢
20 in Mulcher/Bagger Walk Power Mowers
Conditions and Products Covered
Items and Conditions Not Covered
The Toro Company and its affiliate, Toro Warranty Company, pursuant to an agreement between them, jointly...
Parts Catalog - Page 1

Original Instructions (EN)
*3371-850* B Form No. 3371-850 Rev B
22in Recycler® Lawn Mower
Model No. 20334-Serial No. 312000001 and Up
Parts Catalog
Register at www.Toro.com.
Similar Questions

Owners Manual For Toro 190 Cc Personal Pace Lawn Mower
(Posted by nelsontim1 9 years ago)

Toro Personal Pace Electric Starter Does Not Engage
(Posted by tejsmigg 9 years ago)

Toro Lawn Mower 20334 Electric Start Won't Start
(Posted by brafran 10 years ago)

2011 Toro Recycler Personal Pace Lawn Mower Wont Stay Running
(Posted by EssTss4 10 years ago)

Blade For Model 20037 Personal Pace Lawn Mower
where can i buy a replacement 21 inch bladefor my 2003 Toro model 20037 personal Pace lawn mower???
where can i buy a replacement 21 inch bladefor my 2003 Toro model 20037 personal Pace lawn mower???
(Posted by lynnegrede 12 years ago)