
Toro 20332 Support Question
Toro 20332 Support Question
Find answers below for this question about Toro 20332 - Recycler 190CC Personal Pace Lawn Mower.Need a Toro 20332 manual? We have 2 online manuals for this item!
Question posted by mcclainjudyk on May 18th, 2012
How Do I Replace Torsion Spring On A Toro Model 20332
The person who posted this question about this Toro product did not include a detailed explanation. Please use the "Request More Information" button to the right if more details would help you to answer this question.
Current Answers
Answer #1: Posted by dprocknow on October 14th, 2012 4:35 PM
dprocknow

Member since:
October 14th, 2012 Points: 50
Member since:
October 14th, 2012 Points: 50
Sit or kneel at end of handle, facing the mower. Move the plastic slide to the end of the handle until it stops. Pry the metal rod that holds the spring out of the plastic slide. It's tight, but it will pop out. Grasp the metal rod in the center and pull down. It will give enough to come free of the handle. Replace the spring and insert the left end of the rod back in place. It may require some assistance holding the handle while you flex the rod enough to insert the right end of the rod into the handle. Snap the rod back into the plastic slide and connect the spring.
Related Toro 20332 Manual Pages
Operation Manual - Page 1

... or death if you need service, genuine Toro parts, or additional information, contact an Authorized Service Dealer or Toro Customer Service and have similar laws.
WARNING
...Recycler® Lawn Mower
Model No. 20332-Serial No. 312000001 and Up Model No. 20334-Serial No. 312000001 and Up Model No. 20352-Serial No. 312000001 and Up
Form No. 3371-667 Rev A
Operator's Manual
Replacement...
Operation Manual - Page 2

... balance.
2 For models with the following safety...lawn mower will be ordered through the engine manufacturer. Stay behind rotary lawn mowers and the B71.1 specifications of the American National Standards Institute in accordance with the instructions, to potential personal injury hazards. walk;
Safety
This lawn mower... machine if anyone . Replacements may ricochet back toward ...
Operation Manual - Page 3

...Keep children out of the mowing area and under the watchful care of Gasoline
To avoid personal injury or property damage, use extreme care in an enclosed area. General Service
•...; Check grass catcher components and the discharge guard frequently and replace with manufacturer's recommended parts, when necessary.
• Mower blades are explosive.
• Extinguish all times until fueling ...
Operation Manual - Page 4

... position; Cutting/dismemberment hazard of hand or foot, mower blade-remove the ignition key and read the Operator's Manual.
2. Replace damaged decals. stop the engine before servicing or performing... Decals
Important: Safety and instruction decals are located near areas of hand or foot, mower blade-stay away from moving parts.
5. Warning-read the Operator's Manual for information ...
Operation Manual - Page 6

...-start handle
7. Handle
8. Bag-on the dipstick reads Full.
6. Oil fill/dipstick
12. Washout port (not shown) 13. Grass bag 2.
Air filter
3. Side-discharge deflector
models only)
4. Drain the excess oil until the oil level on -demand lever
5.
Important: Change the engine oil after the first 5 operating hours; Ignition key (electric...
Operation Manual - Page 8

Set the front wheels to the handle slowly.
1. Note: To raise the mower, move the front cutting height levers forward and the rear cutting height levers rearward.
1. Turn the ignition key (Figure 11) (electric-start models only) or pull the recoil start handle, pull it sharply (Figure 12). and 4 inches (102 mm).
8
Figure...
Operation Manual - Page 9

Note: If the mower does not start models only).
If the bag-on-demand lever is on the mower, remove it (refer to Removing the Side Discharge Chute) before recycling the clippings. contacting the blade can also try reaching just under the personal pace handle to the metal handle and push the mower forward a couple of inches (centimeters...
Operation Manual - Page 12

....
• Avoid striking solid objects with a Toro replacement blade. Operating Tips
General Mowing Tips
• Clear the area of sticks, stones, wire, branches, and other debris that half of the lawn shows through the cut leaf cover.
Replace the blade or have it is too long, the mower may need to clump on your mowing...
Operation Manual - Page 13

...
Disconnect the spark plug wire from under the mower.
• Replace the air filter; Gasoline is flammable, explosive and can cause personal injury.
After performing the maintenance procedure(s), connect the...Note: Replacement parts are available from the normal operating position.
tip the mower prior to running out of the machine from an Authorized Service Dealer (go to www.toro.com...
Operation Manual - Page 14

...cloth. 9.
Note: If the oil level is at a local recycling center.
14
Use a screw driver to the operating position. 6. Tip the mower onto its side with the air filter up to settle. 8. ...until the oil level on the dipstick (Figure 20). Return the mower to open the air filter cover
(Figure 19). 2. Replacing the Air Filter
Service Interval: Every 25 hours 1. Wipe the ...
Operation Manual - Page 15

...lasts only a few minutes until the battery is charging the
battery.
2.
Replacing the Fuse
Electric-start models only
WARNING
CALIFORNIA Proposition 65 Warning Battery posts, terminals, and related accessories... after handling. Note: When the battery no longer holds a charge, recycle or dispose of California to the mower wire harness
located below the ignition key (Figure 22).
• A...
Operation Manual - Page 16

...rear deflector. Install the new blade and all mounting hardware (Figure 25).
5.
Tip the mower onto its side with a spare fuse in step 3. 6.
Wear gloves when servicing the ...balanced, or replace it immediately. Fuse
Figure 24
G017398
2. Fuse holder
4. Replace the fuse in serious personal injury. Important: A bolt torqued to install the blade properly. Replacing the Blade
Service...
Operation Manual - Page 18

... every 90 days (electric-start the engine, it stops. Remove the ignition key (electric-start models only).
2.
Start the engine again.
5. Important: Route the cables to run until it is... dry place. Removing the Mower from the spark plug.
7. Connect the wire to prevent cylinder corrosion during the off-season.
8. Note: Old fuel in your automobile. Recycle it according to cool before...
Operation Manual - Page 20

... Toro Products covered by these warranties, including any period of repairs under "Lawn Mowers") or access our web site at their Toro ... on the same lot as those found in early spring and late autumn
- first time starts after extended ... if you are using Toro-approved replacement parts. if it stops functioning due to the failure of purchase:
Products
22 in Recycler and 20 in Mulcher/...
Parts Catalog - Page 1

Form No. 3371-846 Rev A
22in Recycler® Lawn Mower
Model No. 20332-Serial No. 312000001 and Up
Parts Catalog
Register at www.Toro.com.
Original Instructions (EN)
Parts Catalog - Page 2
... head STD: standard TAP: self tapping TTH: torx truss head
2
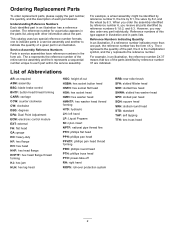
For example, in the form a:b. Understanding Reference Numbers Each identified part in an illustration. Ordering Replacement Parts
To order replacement parts, please supply the part number, the quantity, and the description of each part within the service assembly.
Parts Catalog - Page 3
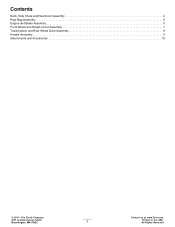
... and Blade Assembly 6 Front Wheel and Height-of-Cut Assembly 7 Transmission and Rear Wheel Drive Assembly 8 Handle Assembly 9 Attachments and Accessories 10
© 2011-The Toro® Company
Contact us at www.Toro.com.
8111 Lyndale Avenue South Bloomington, MN 55420
3
Printed in the USA.
Parts Catalog - Page 4
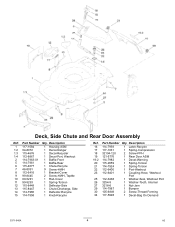
...-Port, Washout
2 114-7963-01 1 Baffle-Front
5 114-7961
1 Baffle-Rear
6 115-4677
1 Chute-Recycle
7 46-8091
9 Screw-HWH
8 112-6416
1 Bracket-Cover
9 99-8445
2 Screw-HWH, Taptite
10 99-5291
1 Rod-Cover
11 99-5293
1 Spring-Torsion
12 115-8449
1 Deflector-Side
13 115-8447
1 Chute-Discharge, Side
14 114-7960
1 Deflector...
Parts Catalog - Page 7

...-03 2 Plate-HOC, Front
2 322-3
4 Screw-HH
3 3296-29
6 Nut-Lock, NI
4 105-1818
2 Bushing-Mount, HOC
5 105-1807
2 Arm-Pivot, Front
6 105-1809
2 Arm-Spring
7 110-0549
2 Knob-HOC
8 105-3048
2 Washer-Flat
9 322-6
2 Screw-HH
10 40-1940
2 Washer
11 614650
2 Bolt-Shoulder
12 115-2894
2 8 Inch Wheel ASM...
Parts Catalog - Page 9
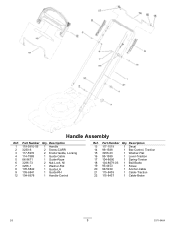
Description
13 117-1019
1 Decal
14 99-1588
1 Bar-Control, Traction
15 3256-23
1 Washer-Flat
16 99-1589
1 Lever-Traction
17 104-8690
1 Spring-Torsion
18 104-8679-03 1 Bail-Brake
19 95-4453
1 Screw
20 99-5239
1 Anchor-Cable
21 115-8435
1 Cable-Traction
22 115-8437
1 Cable-Brake
...
Similar Questions

How Do I Replace Torsion Spring Part 104-8690
(Posted by winniken61 10 years ago)

How Do I Replace Torsion Spring Toro Self Pace Mower
(Posted by Fjoosv 10 years ago)

How To Replace The Torsion Spring On 20332 Mower
(Posted by mahbeto13 10 years ago)

How To Replace Torsion Spring On Toro Personal Pace Mower
(Posted by nirCar 10 years ago)
How To Change Oil On A Toro Recycler (22 ) 190cc Personal Pace Lawn Mower
(Posted by tinaScamp1 10 years ago)