Sony MHC-NX3AV Support Question
Sony MHC-NX3AV Support Question
Find answers below for this question about Sony MHC-NX3AV - Mini Hi-fi Component System.Need a Sony MHC-NX3AV manual? We have 1 online manual for this item!
Question posted by enzs on January 24th, 2021
Hiding Reset
how do I reset hiring to factory settings
Current Answers
Answer #1: Posted by itasklive on October 31st, 2021 8:04 AM
itasklive

Member since:
October 21st, 2021 Points: 257,510

Member since:
October 21st, 2021 Points: 257,510
The Sony MHC-NX3AV can be reset to factory settings by following these steps:
1. Plug the device into a power outlet and connect an HDMI cable to the TV.
2. Press and hold the "OPEN/CLOSE" button on your remote for 5 seconds until you see a message on the screen that says "Reset Factory Settings."
3. Release the button and wait until the message disappears from the screen.
Related Sony MHC-NX3AV Manual Pages
Operating Instructions (primary manual) - Page 1
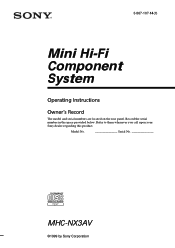
Model No. 3-867-107-14(1)
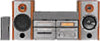
Mini Hi-Fi Component System
Operating Instructions
Owner's Record
The model and serial numbers are located on the rear panel. Record the serial number in the space provided below. Refer to them whenever you call upon your Sony dealer regarding this product. Serial No
MHC-NX3AV
©1999 by Sony Corporation
1
Operating Instructions (primary manual) - Page 2
...WARNING
To prevent fire or shock hazard, do not open the cabinet. The MHC-NX3AV consist of the FCC Rules. Refer servicing to Part 15 of the following ...residential installation. Reorient or relocate the receiving antenna. - CAUTION
You are trademarks of the following components:
-
DOLBY, the double-D symbol a and PRO LOGIC are cautioned that interference will increase ...
Operating Instructions (primary manual) - Page 3
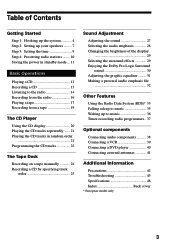
...Getting Started
Step 1: Hooking up the system 4 Step 2: Setting up your speakers ......... 7 Step 3: Setting the time 9 Step 4: Presetting radio stations ........ 10 ...asleep to music 35 Waking up to music 36 Timer-recording radio programmes .. 37
Optional components
Connecting audio components .......... 38 Connecting a VCR 39 Connecting a DVD player 40 Connecting external antennas 41
...
Operating Instructions (primary manual) - Page 6
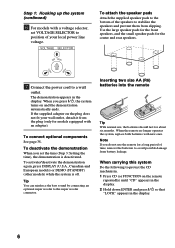
... Hold down ENTER and press 1/u so that "LOCK" appears in the display. To connect optional components See page 38. To deactivate the demonstration When you press 1/u, the system turns on the plug ...should last for a long period of the speakers to avoid possible damage from slipping. When you set VOLTAGE SELECTOR to a wall
outlet. VOLTAGE SELECTOR
230 - 240V
To attach the speaker pads
...
Operating Instructions (primary manual) - Page 11

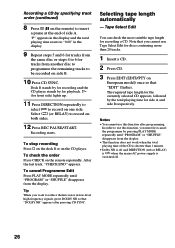
...station with a weak signal Press + or - Select "ALL ERASE" when you want to turn off . To reset the interval, repeat the same procedure. To tune in the display. To cancel the Power Saving Mode Press DISPLAY.
appears.... • 1/u indicator and timer indicator (when the timer is factory set the time in the Power Saving
Mode. • One Touch Play function does not work in some areas)....
Operating Instructions (primary manual) - Page 26
... and DIRECTION (A or RELAY) is ß when the mains AC power supply is switched off.
26 "P" appears in the display and the total playing time resets to "0.00" in low-level high-frequency signals, press DOLBY NR so that you must first cancel the programme by for playback. · (for front...
Operating Instructions (primary manual) - Page 28
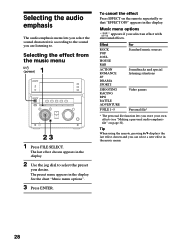
...ENTER. Music menu options
" SUR " appears if you store your own effects (see "Making a personal audio emphasis file" on the remote repeatedly so that "EFFECT OFF" appears in the display.
2 Use the... in the display. The last effect chosen appears in the display.
Selecting the audio emphasis
The audio emphasis menu lets you select the sound characteristic according to the sound you are ...
Operating Instructions (primary manual) - Page 29
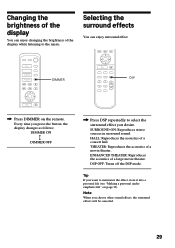
... the display
You can enjoy changing the brightness of the display while listening to memorize the effect, store it into a personal file (see "Making a personal audio emphasis file" on the remote.
Note When you choose other sound effects, the surround effects will be canceled.
29
ENHANCED THEATER: Reproduces the acoustics of...
Operating Instructions (primary manual) - Page 31
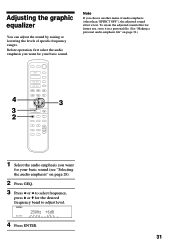
... "EFFECT OFF"), the adjusted sound effect is lost. To retain the adjusted sound effect for future use, store it in a personal file. (See "Making a personal audio emphasis file" on page 28).
2 Press GEQ. 3 Press B or b to adjust level.
1
ALL DISCS
4 Press ENTER.
31 Note
If you want for your basic sound...
Operating Instructions (primary manual) - Page 32
... equalizer and surround effect. (See "Adjusting the graphic equalizer" on page 31, "Selecting the surround effects" on page 29 and "Selecting the audio emphasis" on page 28)
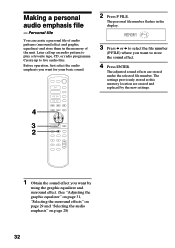
32 Making a personal audio emphasis file
-
The settings previously stored at this memory location are stored under the selected file number. Later call up to five...
Operating Instructions (primary manual) - Page 38
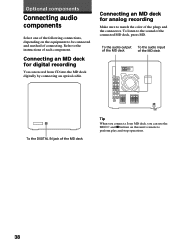
To the audio output To the audio input
of the MD deck
of the MD deck
To the DIGITAL IN jack of the MD deck
Tip
When ...Make sure to match the color of the plugs and the connectors. To listen to the instructions of each component. Optional components
Connecting audio components
Select one of the following connections, depending on this unit's remote to perform play and stop operations.
38
Operating Instructions (primary manual) - Page 39
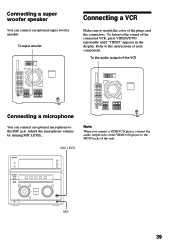
... jacks of this unit. Note
When you connect a VIDEO CD player, connect the audio output jacks of the VIDEO CD player to the sound of the connected VCR, press...VCR
Make sure to the MIC jack.
MIC LEVEL
-
0 ≠
g
+
)
+
-
+
MIC
39 To the audio output of the VCR
Connecting a microphone
You can connect an optional super woofer speaker. Adjust the microphone volume by turning MIC LEVEL...
Operating Instructions (primary manual) - Page 40

...channel surround sound
if you connect a DVD player which has 5.1 channel analog outputs,
connect the LINE OUT (audio) output jacks of the plugs and the connectors. To listen to the sound from the connected DVD player,... 5.1 channel analog outputs
Be sure to match the color of DVD INPUT with the audio connecting cable.
When your DVD player has stereo
analog outputs
Be sure to match the...
Operating Instructions (primary manual) - Page 41

... wire (not supplied)
AM CFMO7A5XIAL
Jack type B Insulated wire (not supplied)
Jack type B
AM
AM FM 75Ω
75-ohm coaxial cable (not supplied)
Note
Set up the AM loop antenna as far as possible from the main unit.
41
Leave the supplied AM loop antenna connected. Connecting external antennas
Connect...
Operating Instructions (primary manual) - Page 42
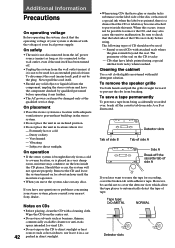
... system is connected to the wall outlet, even if the unit itself .
• Should any solid object or liquid fall into the component, unplug the stereo system and have the component checked by the plug. Very humid - When this occurs, it may also cause this unit to malfunction. Tab of side B
Detector...
Operating Instructions (primary manual) - Page 43
... details, refer to the instructions of the demagnetizing cassette.
The demonstration disappears. The clock setting/radio presetting/timer is canceled.
•The power cord is a power outage lasting longer... is turned off. When the tape heads become damaged. "Step 3: Setting the time" - There is no audio output during timer recording.
43 continued
"Step 4: Presetting radio stations" ...
Operating Instructions (primary manual) - Page 45

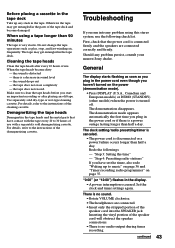
... power cord back in. 3 Press GROOVE and 1/u at the same time. 4 Press 1/u to the factory settings. The tape does not record nor play or there is too weak. Clean them (see "Cleaning the ...
• The record/playback heads are magnetized.
If other troubles not described above occur, reset the system as the preset stations, clock, and timer are magnetized.
Connect
the external antenna...
Operating Instructions (primary manual) - Page 46
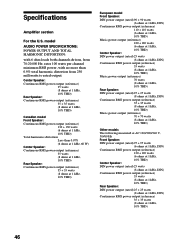
model
AUDIO POWER SPECIFICATIONS: POWER OUTPUT AND TOTAL HARMONIC DISTORTION:
with no more than 0.07% (6 ohms at 1 kHz, 60 W) Center Speaker: Continuous RMS power output (reference) 35 ...
Operating Instructions (primary manual) - Page 47
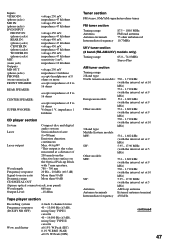
...CD player section
System
Compact disc and digital
audio system
Laser
Semiconductor laser
(λ=780nm)
Emission... jacks) MIC: (mini jack) Outputs MD OUT: (phono jacks) PHONES: (stereo mini jack) FRONT SPEAKER:...set at 9
kHz)
SW:
5.95 - 17.90 MHz
(with the interval set at 5
kHz)
Other models:
MW:
531 - 1,602 kHz
(with the interval set at 9
kHz)
530 - 1,710 kHz
(with the interval set...
Operating Instructions (primary manual) - Page 52
...Dolby Pro Logic Surround
30
E, F Edit 25
G GROOVE 27
H, I, J, K, L, M Hooking up
optional components 38 the aerials 5, 41 the main unit 4 the power 6 the optional speakers 7
N
Normal Play 12
O
... 13 a radio programme 16 timer recording 37 Repeat Play 21 Resetting the system 45
S
Saving recordings 42 Selecting the audio emphasis
28 Setting the time 9 Shuffle Play 21 Sleep Timer 35 Sound adjustment ...
Similar Questions

Sony Mini Hi-fi Component System Mhc-ec98p
I'm looking for subwoofer or connector that clips into the back of stereo for subwoofer I've searche...
I'm looking for subwoofer or connector that clips into the back of stereo for subwoofer I've searche...
(Posted by Jacobknight82 5 years ago)

How To Fix Sony Mini Hi-fi Component System Ec909ip Radio That Says Protect
(Posted by bertale 10 years ago)

Sony Cmt-mx500i - Micro Mini Hi Fi Component System-headphones?
can headphones be plugged into the Sony CMT-MX500i Micro Mini Hi Fi Component Systrm?if so,what size...
can headphones be plugged into the Sony CMT-MX500i Micro Mini Hi Fi Component Systrm?if so,what size...
(Posted by lbarry920 11 years ago)

Sony Mp3 Players Compatible With Sony Mini Hi-fi Component System Mhc-ec691
*what sony mp3 players are compatible with sony mini hi-fi component system mhc-ec691 *(not walkman ...
*what sony mp3 players are compatible with sony mini hi-fi component system mhc-ec691 *(not walkman ...
(Posted by faxol 11 years ago)
