Get support for Singer Futura Quartet SEQS-6700

Singer Futura Quartet SEQS-6700 Support Question

Singer Futura Quartet SEQS-6700 Support Question

Find answers below for this question about Singer Futura Quartet SEQS-6700.
Need a Singer Futura Quartet SEQS-6700 manual? We have 1 online manual for this item!
Question posted by aschultze on March 17th, 2014

Sewing A Pocket On A Backpack & It Powered Off?

I have a Futura Quartet and I was sewing a pocket on a backpack and the machine powered off and won't turn back on. Please help.

Current Answers

There are currently no answers that have been posted for this question.
Be the first to post an answer!

Remember that you can earn up to 1,100 points for every answer you submit. The better the quality of your answer, the better chance it has to be accepted.

Related Singer Futura Quartet SEQS-6700 Manual Pages

Instruction Manual - Page 2

.... 3. Read all instructions before operating machine. Close attention is necessary when this sewing machine is not intended for their safety. Use only attachments recommended by persons (including children) with this manual. Never sew with EEC Directive 2004/108/EC covering the electromagnetic compatibility. The LED lamp maximum power is 0.3w, maximum voltage is DC...
Instruction Manual - Page 3

... stitch, Criss-cross stitch, Fishbone stitch Sewing on a button 27 Buttonholes 28 - 31 Using buttonhole foot, Procedure, Corded buttonholes Buttonholing with FUTURA Multi hoop 48 - 51 Control panel when embroidering 52 Helpful messages when embroidering 53 4. TABLE OF CONTENTS 1.GETTING TO KNOW YOUR MACHINE 2 Accessories 3 Set up your machine 4 Spool pins 4 Winding bobbin 5 Threading...
Instruction Manual - Page 5

... 21 22 23 3 Blind hem foot 14. Auxiliary spool pin 4. Thread spool net (long) 7 18. Bobbins 21. Screwdriver (small) 12. ACCESSORIES FOR SEWING MACHINE Sewing machine accessories are located in the storage compartments of your sewing. 12 The satin foot (14) is another very useful foot and should be used for needle plate 10. Needles 2.
Instruction Manual - Page 6

... by removing the plug from needle plate area POWER LINE CORD/FOOT CONTROL Connect the plug of the power line cord into the machine socket (3), when using sewing machine only. Set power/light switch at "OFF" 4 Pin Machine socket 2 1 3 POWER/LIGHT SWITCH Your machine will not operate until the power/light switch is turned on the spool pin. When servicing the...
Instruction Manual - Page 11

HELPFUL SUGGESTIONS: If the machine is deviated from needle hole, adjust the position of sewing machine oil onto the felt disc. Felt disc 9 If the threading hook is not used frequently, put a drop of the hook using a small screw driver.
Instruction Manual - Page 12

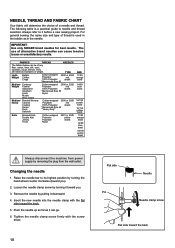
...bar to its highest position by turning it before a new sewing project. Push the needle up as far as in the needle. Loosen the needle clamp screw by turning the hand wheel counter clockwise (toward...14/90 blue band 16/100 purple band Always disconnect the machine from power supply by pulling it can go. 6. For general sewing, the same size and type of any NEEDLES synthetic, rayon...
Instruction Manual - Page 13

...Helpful Hint: A slight adjustment to remove the foot. 2. The tension is recommended to adjust the tension control. Push presser foot release button to a higher number or a lower number may improve sewing...HOLE SEWING For zigzag sewing, satin stitch and decorative stitch functions, thread tension should be less than that the machine is usually only desirable for straight stitch sewing....
Instruction Manual - Page 14

For regular sewing, the LCD display shows the number of the selected stitch, an image of the stitch...creating a stitch program, and page 52 for regular sewing, programming and embroidering. LCD DISPLAY When turning on the display changes for information about programming under 4 and 5 below. 12 The information on the machine without the embroidery unit attached, straight stitch number 00...
Instruction Manual - Page 15

... a time. Press the center of stitches: (buttonholes are underlined. STITCH SETTING/SCROLL AND DELETE PROGRAM DIAL Setting Stitch Width and Stitch Length In sewing mode, stitch width (needle position for each stitch are saved until the machine is turned off. Press the center of the stitch width/ stitch length value number disappears, the...
Instruction Manual - Page 16

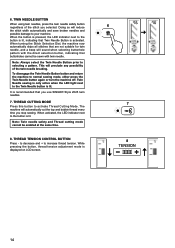
... to normal sewing mode, either press the Twin Needle button again or turn the machine off. Twin Needle sewing is only active when the LED light next to your machine. The machine will reduce ...cannot be sewn with twin needle. THREAD TENSION CONTROL BUTTON Press - When turning the Stitch Selection Dial, the machine now automatically skips all stitches that are not suitable for twin needle, and...
Instruction Manual - Page 17

... when the button is ready to the button is carried out by pushing the reverse stitch button. NEEDLE STOP POSITION SELECTOR BUTTON When the machine is turned on, needle is stopped so tacking stitch will sew 4 stitches in reverse and stop position with upper LED lamp lit. 4. Press Tacking Stitch button when the...
Instruction Manual - Page 22

...lower the presser foot lifter. 5 4. Start/stop the sewing machine. Pull both Metric and Inch Markings as shown. Turn the hand wheel counter clockwise (towards you ) until ... hands. H I . Presser foot lifter H. First turn the hand wheel counter clockwise (toward the left of sewing. SETTINGS Presser foot - Power/light switch F G 2 NOTE: Since a straight ...
Instruction Manual - Page 36

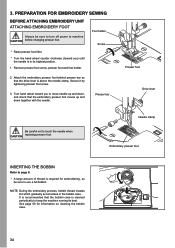
...56 for embroidering, so be sure to turn off power to machine CAUTION before changing presser foot. Foot holder Screw * Raise presser foot lifter. * Turn the hand wheel counter clockwise (toward ...the bobbin case. 34 PREPARATION FOR EMBROIDERY SEWING BEFORE ATTACHING EMBROIDERY UNIT ATTACHING EMBROIDERY FOOT Always be sure to keep the machine running its highest position. 1. NOTE: ...
Instruction Manual - Page 38

on the embroidery unit while attaching or during the embroidering process. REMOVING EMBROIDERY UNIT * Turn off the machine. * Raise the presser foot. * Remove embroidery hoop from machine. (Refer to close for general sewing. 3 Handle 1 Release lever 2 Handle Release lever 36 Holding handle of the embroidery unit and pull it towards the left direction, checking that...
Instruction Manual - Page 43

... manually by -step installation of the software begins with terms given in your PC. It is "D:" Please insert the installation software for your FUTURA sewing & embroidery machine on your FUTURA sewing & embroidery machine comes on Next, and then select the directory where the software should be installed. The software for a CD-ROM drive is highly recommended...
Instruction Manual - Page 44

... towards you are now ready to select and transmit a design to your sewing machine and connect the USB cable between your machine. 42 Next attach the embroidery unit to your computer and sewing machine. 1. Simply click on the hard disk. Turn on the FUTURA icon shortcut your desktop to select the Program Folder where the shortcut for...
Instruction Manual - Page 54

... lines indicate the beginning (bottom line), middle and end (top line) of the lower dial. Turn the upper dial clockwise to step forward, and counterclockwise to a certain part of current color block,...the color blocks. As the block is shown on page 43. 52 Go to your FUTURA sewing and embroidery machine, the display shows number of current color block and total number of the display will...
Instruction Manual - Page 57

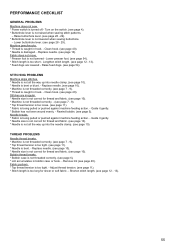
... too long for thread and fabric. (see page 11). * Stitch length is not raised when sewing stitch patterns. - Turn on the switch. (see page 40). Adjust thread tension. (see page 10). PERFORMANCE CHECKLIST GENERAL PROBLEMS Machine does not sew. * Power switch is not lowered - Replace needle. (see page 10). * Needle size is not correct for...
Instruction Manual - Page 58

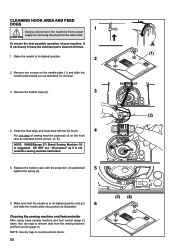
.... Remove two screws on the hook race as illustrated for sewing machine lubrication. 5. Make sure that the needle is necessary to its...sewing machine (optional) oil on the needle plate (1) and slide the needle plate toward you as indicated by removing the plug from the sewing machine and foot control (page 2). CLEANING HOOK AREA AND FEED DOGS 1 Always disconnect the machine from power...
Instruction Manual - Page 65

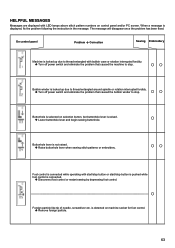
... of needle, screwdriver etc. Raise buttonhole lever when sewing stitch patterns or embroidery. Remove foreign particle. 63 HELPFUL MESSAGES Messages are displayed with LED lamps above stitch pattern numbers on machine socket for foot control. Turn off power switch and eliminate the problem that caused the machine to thread entangled with bobbin case or rotation interrupted...

Similar Questions

Is There Repair Manual To Singer Futura Quartet Seqs 6700,
It's not recognize the hoop, too it has to much thread and knot under fabric and do not make Stitch ...
(Posted by ellierosariod 1 year ago)
Singer Futura Quartet Seqs-6700 Embroidery Carriage Has Stopped Working
My embroidery carriage will not move. The machine gives the error that the hoop is the wrong size an...
(Posted by kpbilleaud 2 years ago)
Singer Futura Quartet Seqs 6700 Sewing Machine
how to set my singer futura quartet seqs 6700 sewing machine to sew. A distance more than one inch a...
(Posted by johour2194 3 years ago)
Why Won't My Machine Sew, Checked Bobbin And Retreaded. Has Power Just Will Not
the machine has power and threade correctly and bobbin is in right. It did freeze on me when sewing....
(Posted by alewis41 7 years ago)
Ask a New Question
Use the box below to post a new question about this Singer product .
Points & Prizes
  • You can earn points for nearly everything you do on HelpOwl.com
  • You can trade in those points for gift cards at leading retailers such as Amazon.com and Walmart
  • It's that simple!
See How it Works
Create a Free Account

Singer Manuals

Find free Singer Futura Quartet SEQS-6700 manuals and user guides available at ManualOwl.com. Try out our unique manual viewer allowing you to interact with manuals from directly within your browser!

Singer Reviews

View thousands of Singer user reviews and customer ratings available at ReviewOwl.com.

Contact Information

Complete Singer customer service contact information including steps to reach representatives, hours of operation, customer support links and more from ContactHelp.com.

Scoreboard Ratings

See detailed Singer customer service rankings, employee comments and much more from our sister site.