Singer Futura Quartet Support Question
Singer Futura Quartet Support Question
Find answers below for this question about Singer Futura Quartet.Need a Singer Futura Quartet manual? We have 1 online manual for this item!
Question posted by achumney2012 on July 13th, 2015
Threading Hook Came Off How Do I Put It Back On
The person who posted this question about this Singer product did not include a detailed explanation. Please use the "Request More Information" button to the right if more details would help you to answer this question.
Current Answers
Related Singer Futura Quartet Manual Pages
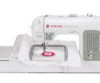
Instruction Manual - Page 1
... - 55
For European version
Sewing machine Dimensions: 567 mm × 240 mm × 317 mm Mass of the equipment: 10.8 kg
Embroidery unit Dimensions: 504 mm × 411 mm × 141 mm Mass of software 37 - 38 Operation switches when embroidery unit is attached 39 Operation switches, Thread tension control Troubleshooting 40 - 43...
Instruction Manual - Page 3
... for more information.
2
3
4
5
6
8
9
10
11
13
14
15
17
18
20
21
22
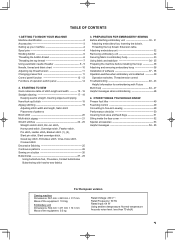
23 3 Thread spool net (long)
18. Thread spool net (short)
The Foot that comes on your
sewing. The Satin Foot (14) is "system" of your
7
Sewing machine is called the
General Purpose Foot and will
be used for the majority of the...
Instruction Manual - Page 4
... oil from needle plate area before using sewing machine only. Set power/light switch at "OFF"
machine socket
2 1
Pin
3
POWER/LIGHT SWITCH
Your machine will not operate until the power/light switch is turned on. Place felt disc over it.
VERTICAL SPOOL PIN for normal thread spool
Place thread spool on the spool pin. Spool
Felt...
Instruction Manual - Page 8

... off from needle hole after hooking the thread through fine needle. Don't lower the threading lever while the machine is in operation or the threading hook may be threaded automatically. NOTE: For smooth threading, it in center needle position) when using the automatic needle threader. Heavy thread cannot be threaded through the thread guide on the needle bar...
Instruction Manual - Page 9
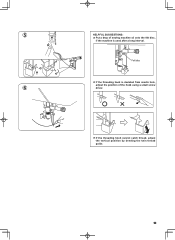
Felt disc
If the threading hook is deviated from needle hole,
adjust the position of sewing machine oil onto the felt disc,
if the machine is used after a long interval. 5
HELPFUL SUGGESTIONS: Put a drop of the hook using a small screw
6
driver.
If the threading hook cannot catch thread, adjust the vertical position by bending the twin thread guide.
9
Instruction Manual - Page 10
... band
11/80 orange band 14/90
blue band 16/100 purple band
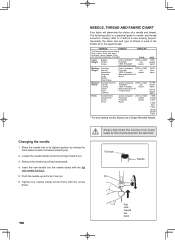
* For best sewing results, always use a Singer Branded Needle. Insert the new needle into the needle clamp ...the needle by turning it can be of a needle and thread. Always disconnect the machine from the wall-outlet. The following table is used in the upper thread.
Tighten the needle clamp screw firmly with the flat side...
Instruction Manual - Page 11
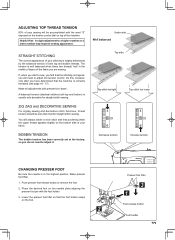
... your fabric. Do this, however, only after you will be less than that the machine is well balanced when these two threads 'lock' in the highest position. ZIG ZAG and DECORATIVE SEWING
For zigzag sewing and decorative stitch functions, thread tension should be accomplished with the word "S" exposed on the tension control dial on the...
Instruction Manual - Page 13
... selected pattern. Width setting for twin needle sewing can be activated, if it is available ...sew at an Auto/Default Stitch Length and Width. When a pattern is activated.
13 LED turns on when twin needle sewing is to your stitching requirements at default settings of the potential adjustments. Stitch length and width/needle position controls
*Auto/Default settings Your sewing machine...
Instruction Manual - Page 14
.... Tacking stitch function for 2 - 3 seconds shows that an incorrect operation was made.
* Continuous flashing indicates that the machine malfunctions.
6. When foot control is pushed once more, the machine stops. The sewing machine makes 4 tiny tacking stitches to start.
Red light indicates machine is ready to tie off of the tacking stitches
will return to...
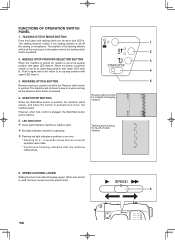
Instruction Manual - Page 17
... on the bottom of the tension may be desired.
1
A B C D E
A. Draw the fabric to change the needle
position. 2. SETTINGS Presser foot - Thread tension control B. Tacking stitch mode button C. Start/stop the sewing machine. Stitch length control I J
4
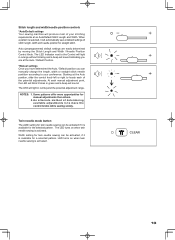
NOTE: Since a straight stitch has no width, the
stitch width control is in its center position. Place the...
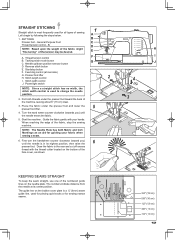
Instruction Manual - Page 28

... the following order.
1
2
3
4
5
6
7
Fabric marking
9. Carefully mark the position of the buttonhole. While holding the top thread, start the machine. Align the buttonhole mark on the fabric with the mark on your garment. 6. 5. Fabric marking
mark
* Sewing will be completed automatically in the center of buttonhole on the buttonhole foot, and then lower...
Instruction Manual - Page 29
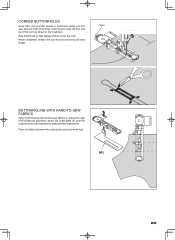
... or along the edge of the cord forward under the foot and tie off extra length. Sew buttonhole so that zigzag stitches cover the cord. CORDED BUTTONHOLES
Hook filler cord (crochet thread or buttonhole twist) over the spur and pull both ends of multi-layered garments, attach the under-plate (A) onto the buttonhole...
Instruction Manual - Page 30
....
30 3. Turn hand wheel toward you to machine CAUTION before changing presser foot. Secure it by tightening presser foot screw.
3. Needle clamp Embroidery presser foot
INSERTING THE BOBBIN
Refer to page 14 - 15.
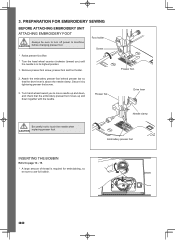
* A large amount of thread is above the needle clamp. PREPARATION FOR EMBROIDERY SEWING
BEFORE ATTACHING EMBROIDERY UNIT ATTACHING EMBROIDERY FOOT...
Instruction Manual - Page 38

... software will finish when it has reached to the given directory on your sewing machine. Now you are prompted to your embroidery unit.
3.
A progress bar will get a "Transmission Pending" error message.
If the installation utility identifies a lack of the FUTURA software files to 100%.
Simply click on "Next" to free some hard disk...
Instruction Manual - Page 41
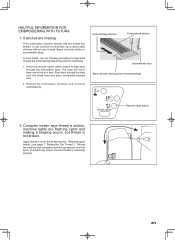
... the thread tension. Upper thread is broken, machine lights are missing
If the embroidery machine detects that is unwinding properly.
41 Step back through the embroidery data.
Embroidering direction
Embroidered section
1357
2468
automatically stop
Blank stitches resulting from thread breakage
Reverse stitch button
2. HELPFUL INFORMATION FOR EMBROIDERING WITH FUTURA
1.
Instruction Manual - Page 44
...Fig. 1
When stitching an embroidery design that have been marked onto the fabric.
and then sews them precisely, matching one section to hoop the fabric as accurately as the design data requires....is a special feature in the Futura QuartetTM software that will allow embroidery data which is larger than a single embroidery hoop to be sent to the machine to stitch out, while making ...
Instruction Manual - Page 50
... sewing stitch patterns.
- STITCHING PROBLEMS Machine skips stitches. * Needle is not all the way up into the needle clamp.(see page 10). * Needle size is being pulled or pushed against machine feeding
action. - Bobbin thread breaks. * Bobbin case is bent or blunt. - Turn on the switch. (see page 6). * Lint accumulates in hook. - Clean hook. (see page 7 - 9). * Thread...
Instruction Manual - Page 51
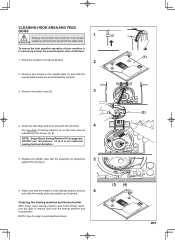
... and put
6
and slide the needle plate into position as it is necessary to remove dust from the wall-outlet. Remove two screws on the hook race as illustrated for sewing machine lubrication.
5. Make sure that the needle is at all purpose" oil as illustrated. DO NOT use "all times.
(1)
1. CLEANING...
Instruction Manual - Page 52
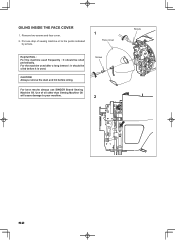
... remove the dust and lint before it is used. Remove two screws and face cover. 2. Screw
2
Screw
52
For the machine used frequently : It should be oiled periodically. Put one drop of oil other than Sewing Machine Oil will cause damage to the points indicated
by arrows.
1
Face cover
Helpful Hints : For the...
Instruction Manual - Page 60
....
"Do not allow to repair or replace at once." 21. "Switch the sewing machine off or unplug the appliance when leaving it unattended, unplug the appliance before carrying out any adjustments in the needle area, such as threading needle, changing
needle, threading bobbin, or changing presser foot, etc." 18. reduce
risk
of
injury,
switch...
Similar Questions

Where Can I Get Replacement Parts For My Futura Quartet 6000 Machine?
(Posted by treasuredjewels2321 7 months ago)

I Was Sewing And All Of The Sudden My Machine Turned Off
(Posted by mari0624 3 years ago)

How To Thread Singer Fashionmate Sewing Machine Twin Needle?
How to thread the singer fashionmate sewing machine with twin needle without inertwining the threads...
How to thread the singer fashionmate sewing machine with twin needle without inertwining the threads...
(Posted by sindssly 9 years ago)

Singer Futura Quartet
Will my Singer Futura Quartet sew a patch on leather, if so, what size needle n foot do I use Ty
Will my Singer Futura Quartet sew a patch on leather, if so, what size needle n foot do I use Ty
(Posted by Lthomas85 9 years ago)
