Singer Fashion Mate 5560 Support Question
Singer Fashion Mate 5560 Support Question
Find answers below for this question about Singer Fashion Mate 5560.Need a Singer Fashion Mate 5560 manual? We have 2 online manuals for this item!
Question posted by jorendamerlinefrancois on November 12th, 2022
What Is Happening If The Lcd Screen Displays E7
The person who posted this question about this Singer product did not include a detailed explanation. Please use the "Request More Information" button to the right if more details would help you to answer this question.
Current Answers
Answer #1: Posted by SonuKumar on November 12th, 2022 9:17 PM
SonuKumar

Member since:
May 9th, 2021 Points: 16,623,780

Member since:
May 9th, 2021 Points: 16,623,780
Troubleshooting ...............................................................28-32
Please respond to my effort to provide you with the best possible solution by using the "Acceptable Solution" and/or the "Helpful" buttons when the answer has proven to be helpful.
Regards,
Sonu
Your search handyman for all e-support needs!!
Related Singer Fashion Mate 5560 Manual Pages
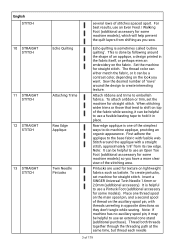
5560 Stitch Applications Guide - Page 1

... a longer eye to 3.5mm. Sew approximately 1/8" from the edge of a garment before sewing the actual seam.
Set the machine for straight stitch. To set the machine for example, when you want to...seam allowances when sewing with a stitch length of the quilt.
English 1 STRAIGHT
STITCH
2 STRAIGHT STITCH
3 STRAIGHT STITCH
4 STRAIGHT STITCH
5 STRAIGHT STITCH
SINGER® 5560
English | ...
5560 Stitch Applications Guide - Page 2

... a removable fabric marking tool, but make sure to create your machine's manual for some machine models). Sew the permanent seam. It can be used to sew decorative designs as the layers are quilted together. To set the machine for thread painting, first disengage or cover the machine's feed teeth (see this video. Move the layers together...
5560 Stitch Applications Guide - Page 3
... around the shape of the stitching area. Sew the desired number of the fabric while sewing, it in opposite directions so they don't tangle while sewing. Attach ribbons and trims to use a fusible basting tape to create interesting texture. To attach aribbon or trim, set machine for texture on top of "rows" around the...
5560 Stitch Applications Guide - Page 5

..., which an Invisible Zipper Foot Iadditional accessory for using the basic Zipper Foot, and this in home decor, fashion and accessory sewing, and more.
See this in front that feeds the fabric while the machines sews a straight stitch to wrap around the cord as well as provide ample seam allowance. There is a demonstration of...
User Manual - Page 2
... instructions.
2. It is important to the SINGER® family and CONGRATULATIONS on purchasing a brand new SINGER® sewing machine! Personal assistance via email: [email protected] 4. The SINGER® brand has stood for quality in sewing for sewists of all . Assistance on -one help from one -on the web at 1-800-474-6437...
User Manual - Page 3
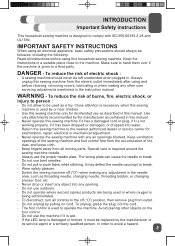
... manual. To unplug, grasp the plug, not the cord. - Never operate this household sewing machine. Always use bent needles. - Do not use the proper needle plate. Do not operate...mentioned in the needle
area, such as a toy. INTRODUCTION
Important Safety Instructions
This household sewing machine is designed to break. - DANGER - It may deflect the needle causing it has ...
User Manual - Page 4
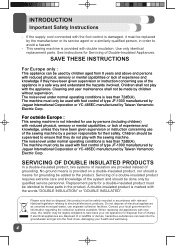
...by children without supervision. Children shall not play with the sewing machine. For outside Europe :
This sewing machine is not intended for information regarding the collection systems available... note that they have been given supervision or instruction concerning use of the sewing machine by a person responsible for their safety. Use only identical replacement parts. Replacement...
User Manual - Page 5

... Machine...10 Winding the Bobbin...11 Inserting the Bobbin...12 Threading the Upper Thread...13 Automatic Needle Threader...14 Drawing Up the Bobbin Thread...15
START SEWING...16-27 Before You Start Sewing...16 Stitch Formation...17 LCD Display and Function Buttons 18 Stitch Selection...19 Sewing a Straight Stitch...20 Sewing a Decorative Stitch...21 Sewing a Stretch Stitch...22 Sewing...
User Manual - Page 6
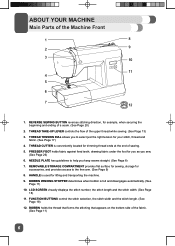
... beginning and ending of the upper thread while sewing. (See Page 13)
3. REMOVABLE STORAGE COMPARTMENT provides flat surface for sewing, storage for lifting and transporting the machine.
9. BOBBIN WINDING STOPPER determines when bobbin is conveniently located for you as you keep seams straight. (See Page 8)
7. LCD SCREEN visually displays the stitch number, the stitch length and...
User Manual - Page 18
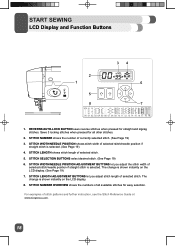
... the numbers of selected stitch/needle position if straight stitch is shown instantly on the LCD display.
8. Sews 3 locking stitches when pressed for easy selection. STITCH LENGTH shows stitch length of stitch... width of currently selected stitch. (See Page 19)
3. REVERSE/AUTO-LOCK BUTTON sews reverse stitches when pressed for straight and zigzag stitches. STITCH NUMBER shows the number ...
User Manual - Page 19
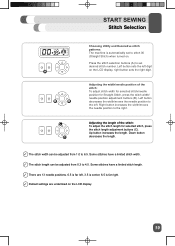
...moves the needle position to stitch 00 (Straight Stitch) when turned on the LCD display, right button sets the right digit.
Right button increases the width/moves the...The stitch width can be adjusted from 0.3 to 4.5. START SEWING
Stitch Selection
A
B
B
C C
Choosing Utility and Decorative stitch patterns: The machine is far right. ✓ Default settings are 13 needle positions...
User Manual - Page 20
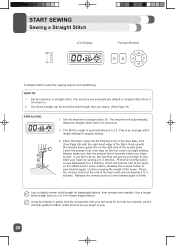
... Stitch Length is automatically set at the end of the seam and sew backwards 2 to straight stitch when it is turned on . 2. 2 START SEWING Sewing a Straight Stitch LCD Display
Function Buttons
A straight stitch is used for lightweight fabrics, finer threads and needles. The machine will automatically default to 3 stitches. Lower the presser foot, then step on...
User Manual - Page 21
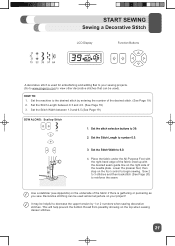
...by 1 or 2 numbers when sewing decorative stitches. Set the Stitch Width between 0.3 and 4.5. (See Page 19) 3. Set the Stitch Width to 39. 2. Set the machine to decrease the upper tension by... of the fabric if there is gathering or puckering as you sew. START SEWING
Sewing a Decorative Stitch
LCD Display
Function Buttons
A decorative stitch is used for embellishing and adding flair to your project!...
User Manual - Page 22
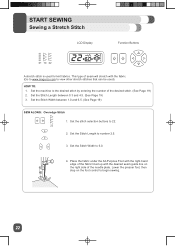
...SEWING Sewing a Stretch Stitch LCD Display
Function Buttons
A stretch stitch is used ). HOW TO:
1. Place the fabric under the All-Purpose Foot with the right-hand edge of the fabric lined up with the fabric. (Go to www.singerco.com to 22.
2. Set the machine to begin sewing...the Stitch Length between 1.0 and 6.5. (See Page 19)
SEW ALONG: Overedge Stitch
1. This type of seam will stretch ...
User Manual - Page 23
...: Buttonhole Stitch
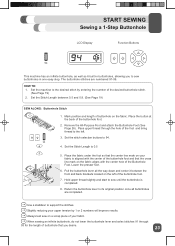
1. Remove the All-Purpose Foot and attach the Buttonhole Foot (See Page 26). Lower the presser foot.
6. START SEWING
Sewing a 1-Step Buttonhole
LCD Display
Function Buttons
This machine has an infinite buttonhole, as well as 6 built-in one easy step. Place the button at the back of the buttonhole foot and that you...
User Manual - Page 24
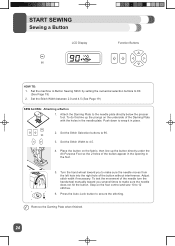
... button to the needle plate directly below the presser foot. 2 START SEWING Sewing a Button LCD Display
Function Buttons
HOW TO: 1. Set the Stitch Width between 2.0 and 4.5 (See Page 19)
SEW ALONG: Attaching a Button 1. To do this line up the button ... sure the needle does not hit the button. Set the machine to Button Sewing Stitch by setting the numerical selection buttons to 4.5.
4.
User Manual - Page 25
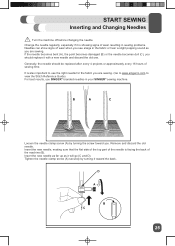
... needle should replace it will go (C and D). Change the needle regularly, especially if it toward you are sewing. Insert the new needle, making sure that the flat side of the top part of the needle is showing signs of wear resulting in your SINGER® sewing machine.
Remove and discard the old needle.
User Manual - Page 27

... switch and eliminate the problem that caused the machine to www.singerco.com for more information on zipper applications. Attach the right side of the zipper foot when sewing the left side of the zipper foot when sewing the right side of the zipper. Helpful LCD Display Messages
If an incorrect operation is not necessary...
User Manual - Page 28
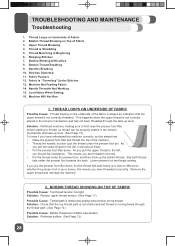
... Under Stitches 13. Needle Threader Not Working 15.
Solution: Rethread machine, making sure to first raise the presser foot lifter before starting ...Page 17)
Possible Cause: Thread path is Shredding 5. This happens when the upper thread is up the bobbin thread. BOBBIN ...tension too tight. Upper Thread Breaking 4. Loud Noise When Sewing 16. As
you pull the upper thread to thread, so...
User Manual - Page 33
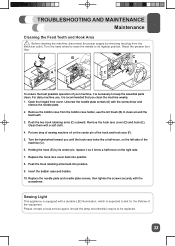
... the screw driver and
remove the needle plate.
2. Replace the hook race cover back into position.
9. Open the hinged front cover. Put one drop of sewing machine oil on the left side of the equipment. Please contact a local service agent, should the lamp nevertheless require to last for the lifetime of the...
Similar Questions

How Do I Set My Singer Fashion Mate Model Number5560 To Do A Zigzag Stitch
(Posted by cupster56 1 year ago)

Sewing With Thick Thread
What setting is best for thick thread and fabrics?
What setting is best for thick thread and fabrics?
(Posted by pegllca79 2 years ago)

Just Got A New 5560 Singer Sewing Machine And I Can't Get It To Sew.
It won't see ,it runs but it won't sew
It won't see ,it runs but it won't sew
(Posted by morrisjudy963 2 years ago)

The Lcd Screen Is Very Dim.
The screen still works, but it is so dim that I can barely read it. The backlighting seems to be bri...
The screen still works, but it is so dim that I can barely read it. The backlighting seems to be bri...
(Posted by brenthenry1991 2 years ago)

Lcd Screen
I cannot get my LCD screen to change the stitch pattern. It will not do anything With the screen but...
I cannot get my LCD screen to change the stitch pattern. It will not do anything With the screen but...
(Posted by Shanncantwell09 10 years ago)