Singer FQ-4 FUTURA QUARTET Support Question
Singer FQ-4 FUTURA QUARTET Support Question
Find answers below for this question about Singer FQ-4 FUTURA QUARTET.Need a Singer FQ-4 FUTURA QUARTET manual? We have 1 online manual for this item!
Question posted by lawriecummins on June 16th, 2016
I Have The Manual But Do Not Understand Where The Screw Is On The Side To Remove
The face cover to oil the machine.
Current Answers
Answer #1: Posted by waelsaidani1 on June 17th, 2016 2:41 AM
waelsaidani1

Member since:
May 12th, 2013 Points: 19,501,787

Member since:
May 12th, 2013 Points: 19,501,787
Related Singer FQ-4 FUTURA QUARTET Manual Pages
Instruction Manual - Page 1
... control Troubleshooting 40 - 43 Helpful information for embroidering with hard-to free-arm sewing 49 Performance checklist 50 Cleaning hook area and feed dogs 51 Oiling inside the face cover 52 Special accessories 53 Helpful messages 54 - 55
For European version
Sewing machine Dimensions: 567 mm × 240 mm × 317 mm Mass of the equipment...
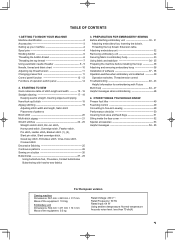
Instruction Manual - Page 2
...Face cover
4
6. Bobbin winder latch 10. Needle bar
14
18
26. Needle clamp screw
29. Feed dogs
33
31. Carriage 36. Release lever 40. Inner frame
22
23
24
37
38 39
28 29 30 31
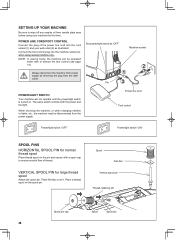
43. 1. GETTING TO KNOW YOUR MACHINE
MACHINE... cutter
27. General purpose foot
25
30. Needle plate
26
32. Bobbin cover release button 33. Embroidery unit
36 35 34 40 20
27
34 Hoop ...
Instruction Manual - Page 3
... another
12
very useful foot and should be
used for needle plate
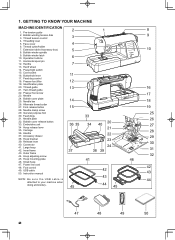
10. Vinyl bag 20. To install the FUTURA software, refer to the CD insert for most decorative sewing. ACCESSORIES
FOR SEWING MACHINE
1. Auxiliary spool pin
4. Blind hem foot
14. Satin foot
15. When purchasing additional bobbins, be used for more information.
2
3
4
5
6
8
9
10...
Instruction Manual - Page 4
...
either with a spool cap to wipe off any surplus oil from needle plate area before using sewing machine only. Always disconnect the machine from power supply by removing the plug from the power supply.
Set power/light switch at "OFF"
machine socket
2 1
Pin
3
POWER/LIGHT SWITCH
Your machine will not operate until the power/light switch is...
Instruction Manual - Page 9
5
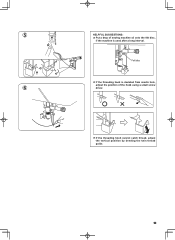
HELPFUL SUGGESTIONS: Put a drop of the hook using a small screw
6
driver.
If the threading hook cannot catch thread, adjust the vertical position by bending the twin thread guide.
9
Felt disc
If the threading hook is deviated from needle hole,
adjust the position of sewing machine oil onto the felt disc,
if the machine is used after a long interval.
Instruction Manual - Page 10
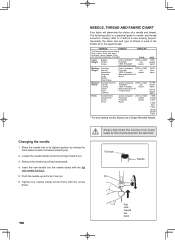
...Loosen the needle clamp screw by turning the hand wheel counter clockwise (toward the back.
5.
Always disconnect the machine from the wall-...sewing results, always use a Singer Branded Needle.
Flat side Pin
Needle
10
Flat side toward you ).
2.
Changing the needle
1. Tighten the needle clamp screw firmly with the flat side toward you .
3.
Remove the needle by removing...
Instruction Manual - Page 11
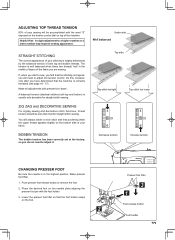
...Hint: A slight adjustment to remove the foot.
2.
Raise presser foot lifter.
1. ADJUSTING TOP THREAD TENSION
90% of your fabric. If, when you start to sew, you find that the machine is well balanced when these ... nicer stitch and less puckering when the upper thread appears slightly on top of the machine. You will need to adjust the tension control. Under side
Well balanced
Top side
...
Instruction Manual - Page 13
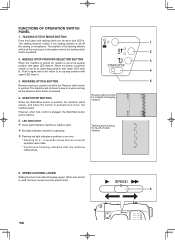
... Stitch Length and Width. Twin needle mode button
The width setting for twin needle sewing can be activated if it is available for manual adjustments than others.
2. Stitch length and width/needle position controls
*Auto/Default settings Your sewing machine will produce most of your preference. Some patterns offer more opportunities for the selected...
Instruction Manual - Page 14
... be inactive.
5. SPEED CONTROL LEVER
Sliding the lever sets desired sewing speed.
Tacking stitch function for tie-off
1
the sewing on , needle is set at its down-stop position with
4
upper LED lamp lit.
3. The sewing machine makes 4 tiny tacking stitches to sew in the pattern where the tacking stitch button is pressed.
4. Reverse stitch...
Instruction Manual - Page 17
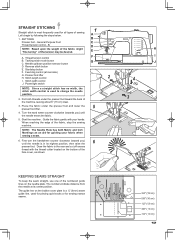
... the back of sewing. SETTINGS Presser foot - S
NOTE: Based upon the weight of the fabric, slight "fine tuning" of the
face cover, as an aid for guiding your hands. The guide line on the needle plate. Let's begin by following the steps below.
1. Reverse stitch button E. Stitch width control J. Start the machine.
NOTE: The...
Instruction Manual - Page 30
Foot holder Screw
* Raise presser foot lifter.
* Turn the hand wheel counter clockwise (toward ...
30 Presser bar
Presser foot Drive lever
Be careful not to machine CAUTION before changing presser foot.
3. Remove presser foot screw, presser foot and foot holder.
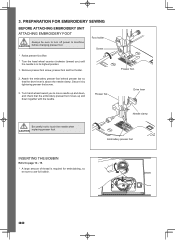
2. PREPARATION FOR EMBROIDERY SEWING
BEFORE ATTACHING EMBROIDERY UNIT ATTACHING EMBROIDERY FOOT
Always be sure to page...
Instruction Manual - Page 32
... off power to pages 37.)
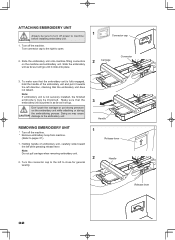
1. Note: Do not pull carriage when removing embroidery unit.
2. Slide the embroidery unit onto machine fitting connectors on the embroidery unit while attaching or during the embroidering process. Turn the connector cap to close for general sewing.
3
Handle
1
Release lever
2
Handle
Release lever
32 Holding handle of the...
Instruction Manual - Page 38

.... CORRECT START-UP PROCEDURE WHEN EMBROIDERING
The following steps must be stored. Next attach the embroidery unit to your sewing machine and connect the USB cable between your embroidery unit.
3. Double click on the Futura Icon on your computer and then follow steps 1 through 4 above.
38 Attach the hoop that you plan to...
Instruction Manual - Page 40

... to pages 7 - 9.
Replace with the hoop mounting screws. If the thread is too tight.
Check around spool ...collected under the needle plate. EMBROIDERY PATTERN IS MIS-ALIGNED
MACHINE SIDE
HOOP SIDE
Embroidering is continuing when thread is tapped with... highly-elastic thread, reduce the upper thread tension.
40
Remove the thread or fabric bits. Adjust the thread tension. ...
Instruction Manual - Page 49

... to change the presser foot or to insert or remove fabric.
3. With the extension table removed the machine converts into place until it provides a large working surface as shown. Down
Feed dog control
CONVERTING TO FREE-ARM SEWING
Your machine can be raised for all general sewing purposes and lowered for your presser foot. 1. OTHER THINGS...
Instruction Manual - Page 50
...machine feeding
action. - Remove lint
(see page 11). * Needle is too short - Turn on the switch. (see page 49). * Stitch length is bent. - Lower presser foot. (see page 4). * Buttonhole lever is not threaded correctly. (see
page 5). Replace needle. (see page 10). * Machine is not raised when sewing... - PERFORMANCE CHECKLIST
GENERAL PROBLEMS Machine does not sew. * Power switch is bent...
Instruction Manual - Page 51
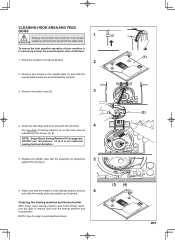
...(3) (4)
51 To ensure the best possible operation of sewing machine oil on the needle plate (1) and slide the needle plate toward you as indicated by removing the plug from the sewing machine and footcontroller. Remove two screws on the hook race as illustrated for sewing machine lubrication.
5. Cleaning the sewing machine and footcontroller
After using, keep the essential parts clean...
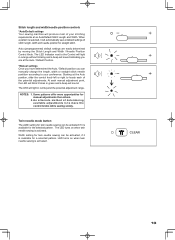
Instruction Manual - Page 52
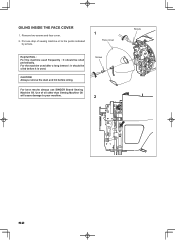
...other than Sewing Machine Oil will cause damage to the points indicated
by arrows.
1
Face cover
Helpful Hints : For the machine used after a long interval : It should be oiled before oiling.
For best results always use SINGER Brand Sewing Machine Oil. For the machine used frequently : It should be oiled periodically. Remove two screws and face cover. 2. Use of sewing machine oil to...
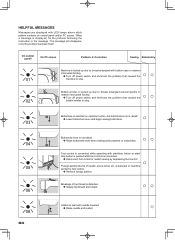
Instruction Manual - Page 54
... panel and/or PC screen.
Breakage of needle, screw driver etc.
Bobbin winder is displayed, fix the problem...Sewing Embroidery
Machine is connected while operating with needle lowered. Raise needle and restart.
○
08
54 When a message is locked up due to thread entangled with LED lamps above stitch pattern numbers on machine socket for foot control.
Remove...
Instruction Manual - Page 60
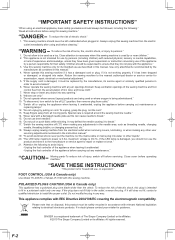
...Close attention is necessary when this manual." 4. Use only attachments recommended by the manufacturer, its affiliates. "Switch off („0") position, then remove plug from outlet." 11. "... cord." 13. "Always unplug sewing machine from the accumulation of the sewing machine and foot control free from the electrical outlet when removing covers, lubricating, or when making any...
Similar Questions

What Is The Part Number For Face Cover Screw For Futura Xl420?
I have lost the screw that holds the face cover in place. It is the one on the side that is under th...
I have lost the screw that holds the face cover in place. It is the one on the side that is under th...
(Posted by barbara27028 3 years ago)

I Get E7 Error Message On My Singer Model 7258 Sewing Machine. There Is No Refe
Error message E7 is up on my Singer Stylist model 7258 sewing machine. It is not working at all. I t...
Error message E7 is up on my Singer Stylist model 7258 sewing machine. It is not working at all. I t...
(Posted by ebellamybellamy9 5 years ago)

How To Find The Screw In Face Cover To Remove Face Cover?
I need to remove face cover. I found the screw in back, but where is the side screw. The manual says...
I need to remove face cover. I found the screw in back, but where is the side screw. The manual says...
(Posted by QueenofKups 9 years ago)

Beeping From Singer Sewing Machine Stylist Ii 5625
My sewing machine will beep and stop sewing after three inches of sewing. I have taken it to be repa...
My sewing machine will beep and stop sewing after three inches of sewing. I have taken it to be repa...
(Posted by arusheria 9 years ago)
