Singer 9960 Quantum Stylist Support Question
Singer 9960 Quantum Stylist Support Question
Find answers below for this question about Singer 9960 Quantum Stylist.Need a Singer 9960 Quantum Stylist manual? We have 2 online manuals for this item!
Question posted by adamscars2478 on May 15th, 2013
Making Auto Button Holes
I am trying to make automatic button holes and getting the C2 message when lever is up or even down when in 94-99 programming. Please help.
Thank you.
Current Answers
Related Singer 9960 Quantum Stylist Manual Pages
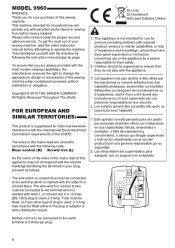
Instruction Manual - Page 2
... the risk of burns, fire, electric shock, or injury to persons: 1. Do not allow to the off (symbol "O") when making any adjustments in this sewing machine only for household use. Never operate the sewing machine with care and avoid dropping it . 17. Do not use bent needles. 13. Special care is a registered Trademark of The...
Instruction Manual - Page 3

... DECORATIVE PATTERN ........ 41
A. PREPARING TO THREAD MACHINE 16 B. Quilting 27 C. TO SEW PATTERN FROM BEGINNING 48
DECORATIVE AND LETTER STITCH CHART 49 ADJUSTING THE FORWARD AND REVERSE STITCHES 49 MAINTENANCE 50 CLEANING 50 HELPFUL HINTS 51 Messages on LCD 52
3 SPEED CONTROL BUTTON 10 E. CURSOR BUTTONS 13 L. BASTING 26
ELASTIC STITCH SEWING 27 QUILTING 27
A.
Instruction Manual - Page 4
...sewing machine.
Blue: neutral (N) Brown: live (L)
As the colors of the wires in accordance with reduced physical, sensory or mental capabilities, or lack of a three-pin plug.
4
To get... the machine. EU only
1. fuse must be fitted either in sewing from light to this sewing machine when considered necessary without notification or obligation. MODEL 9960
PREFACE Thank you for...
Instruction Manual - Page 10
... slow speed. Red Light "ON" Presser foot is released. REVERSE STITCH BUTTON The machine will continue to down by pressing this button is connected, machine will sew in reverse while this button, machine will stop when pressed the second time.
NEEDLE UP-DOWN / SLOW BUTTON Pressing this lever. PRESSER FOOT LIFTER The presser foot is lifed up or down...
Instruction Manual - Page 19
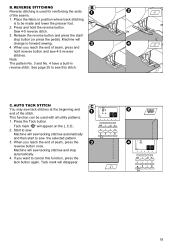
... change to cancel this stitch. See page 25 to sew the selected pattern. 3.
Machine will appear on the L.C.D.. 2. B. Release the reverse button and press the start to sew this function, press the tack button again.
Tack mark will sew tacking stitches and stop button (or press the pedal). Tack mark " " will sew tacking stitches automatically and then start /
stop...
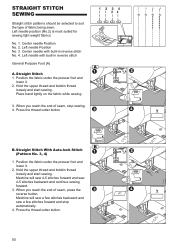
Instruction Manual - Page 25
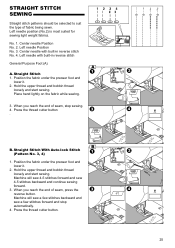
... stitch patterns should be selected to suit the type of seam, press the reverse button. Center needle Position No. 2.
Machine will sew a few stitches backward and sew a few stitches forward and stop sewing. 4. When you reach the end of seam, stop automatically.
4. Center needle with built-in reverse stitch No. 4. Position the fabric under the presser...
Instruction Manual - Page 26

... the seam. 5. Machine will be reduced automatically. 1. Pull the fabric required amount to right so that it on. Repeat this pattern is fitted into the presser bar.
5.
Tighten the presser foot thumb screw. Lower the feed dogs by moving the drop feed lever to the left to the rear and sew one stitch only...
Instruction Manual - Page 35

Machine will sew the buttonhole in the path of ripper. To sew over same buttonhole, raise presser foot to return to remove the fabric. Use a pin as shown and stop automatically after sewing.
8. CAUTION: To prevent accidents.
A. 12 3 4 5 6
1
2
3
4
1
2
3
4
5
1
2
3... a stopper.
b. Note: For sewing buttonholes on hard-to-sew fabrics or along the edge of buttonhole being careful...
Instruction Manual - Page 36

... the fabric.
4. Lower the buttonhole lever and sew buttonhole. (See previous page) Machine will align with the center line mark... patch will sew the buttonhole in the order as shown. a. Press the thread cutter button and raise the...the basting.
5. Right side of each corner as shown and stop automatically after sewing.
3.
Right side of fabric b. Bound Buttonhole
Buttonhole Foot (F)
...
Instruction Manual - Page 39

... remaining about 10 cm to make them together.
8. After sewing, move fabric to back of fabric. Pull thread to permit stitching the other two holes, either independently, or crisscross...lever to hold the button securely.
3. Tie them stand away from the front. Insert a straight pin or sewing machine needle under the center slit of presser foot and lower foot to the left hole of button...
Instruction Manual - Page 47

...-set stitch width and length will return to pre-set . You can make changes by shifting the position of patterns until the machine is highlighted. d.
By pressing the function F3 (AUTO) button, thread tension will be deleted. By pressing the return button (F1), machine will retain the combination of the cursor.
G.TO RECALL THE SELECTED PATTERNS...
Instruction Manual - Page 48
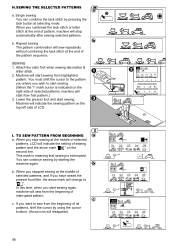
... selected patterns, machine will start sewing. (When the "I . SEWING 1. b. Machine will indicate the sewing pattern on the right side of LCD. You can combine the tack stitch by using the cursor buttons. (Arrow icon will sew from first pattern.) 3. If you wish to " ", In this time, when you stop automatically after sewing selected patterns. When you stopped sewing at the...
Instruction Manual 2 - Page 2
... damaged, or dropped into any air openings blocked. Switch the sewing machine off position (symbol "O"), then remove plug from all instructions before cleaning. Always unplug sewing machine from the electrical outlet when removing covers, lubricating, or when making any other user servicing adjustments mentioned in this machine from the accumulation of lint, dust, and loose cloth...
Instruction Manual 2 - Page 3

... 74 AUTOMATIC BAR-TACK AND DARNING ....... 76 SEWING ON BUTTONS 78
A. ATTACHING THE EVEN-FEED FOOT 82 B. SEWING 82
DARNING/FREE-HAND EMBROIDERY .......... 84
A. TO CHECK SELECTED PATTERNS 90 D. TO SEW PATTERN FROM BEGINNING 96
DECORATIVE AND LETTER STITCH CHART 98 ADJUSTING THE FORWARD AND REVERSE STITCHES 98 MAINTENANCE 100 CLEANING 100 Messages on LCD 102 HELPFUL...
Instruction Manual 2 - Page 8
To get the most modern sewing capabilities, the manufacturer reserves the right to change the appearance, design or accessories of this sewing machine when considered ...9960
PREFACE Thank you for your purchase of this appliance may not correspond with the colored markings identifying the terminals in your sewing machine, read the entire instruction manual before attempting to operate the machine...
Instruction Manual 2 - Page 20

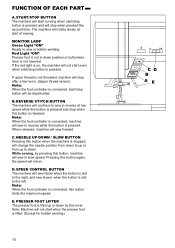
... OF EACH PART
A. While sewing, by this button limits the maximum speed.
MONITOR LAMP Green Light "ON" Ready to the right, and sew slower when the button is lifted. (Except for bobbin winding)
20 Note: When the foot controller is connected, this lever. Note: When the foot controller is connected, machine will sew in down position or...
Instruction Manual 2 - Page 38

...with all utility patterns. 1. AUTO TACK STITCH You may sew tack stitches at the beginning and end of seam, press the reverse button once. Press and hold reverse button and sew 4-5 reverse stitches.
Machine will sew tacking stitches and stop button (or press the pedal). Machine will sew tacking stitches automatically and then start /
stop automatically. 4. Sew 4-5 reverse stitch...
Instruction Manual 2 - Page 50
... cutter button. When you reach the end of seam, stop automatically.
4.
Center needle Position No. 2. Hold the upper thread and bobbin thread loosely and start sewing. When you reach the end of fabric being sewn. Straight Stitch With Auto-lock Stitch (Pattern No. 3, 4)
1. Position the fabric under the presser foot and
lower it .
2. Machine will sew...
Instruction Manual 2 - Page 78
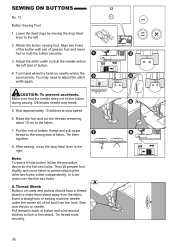
... the stitch width again. Note: To sew a 4-hole button, follow the procedure above for the first two holes. Insert a straight pin or sewing machine needle under the center slit of bobbin thread and pull upper thread to make them together.
8. Turn hand wheel by moving the drop feed lever to the left hole of presser foot and lower foot...
Instruction Manual 2 - Page 94

... width and length of patterns until the machine is highlighted. By pressing EDIT button, machine will be deleted. For longer length, press function button F5 (+). Setting the stitch width and length Machine will indicate the tension mode. By pressing the function F3 (AUTO) button, thread tension will return to utility stitch, machine will retain the combination of other...
Similar Questions

Why Is My Singer Quantum Stylist 9960 Stuck In Reverse Sewing
(Posted by kelsydan1 11 months ago)

Quantum 9960, Thread Balls Up
thread balls up under plate. Have to tear fabric to get it out. Also the bar that goes across the bo...
thread balls up under plate. Have to tear fabric to get it out. Also the bar that goes across the bo...
(Posted by Sisbankssb 3 years ago)

I Get E7 Error Message On My Singer Model 7258 Sewing Machine. There Is No Refe
Error message E7 is up on my Singer Stylist model 7258 sewing machine. It is not working at all. I t...
Error message E7 is up on my Singer Stylist model 7258 sewing machine. It is not working at all. I t...
(Posted by ebellamybellamy9 5 years ago)

Bobbin Case On Singer 9960 Quantum Stylist Noisey
when I sew I hear a clicking sound and some rattling of the bobbin occurs. more so when I sew on the...
when I sew I hear a clicking sound and some rattling of the bobbin occurs. more so when I sew on the...
(Posted by sdshowen 8 years ago)

I Need An Extnesion Table For My Sewing Machine Singer 7258 Stylist
(Posted by loucksd 10 years ago)