Singer 9960 Quantum Stylist Support Question
Singer 9960 Quantum Stylist Support Question
Find answers below for this question about Singer 9960 Quantum Stylist.Need a Singer 9960 Quantum Stylist manual? We have 2 online manuals for this item!
Question posted by cism1955 on August 14th, 2022
Foot Pedal Unplugged Message When It Is In Use.
My Singer Quantum Stylist 9960 keeps giving me a visual message that the foot pedal is unplugged. It is not unplugged, I am using it at the time. It stops the machine, I wait a few seconds and it sews again. Every couple of minutes it repeats. My attempts to fix are below.So, I have taken the bottom off and tightened the foot pedal plug receptacle as well as cleaned out any dust etc.I opened the foot pedal and cleaned it out as well.Everything looks good. No hanging wires or burnt stuff.I really need a service manual for this machine. Anybody have a clue?
Current Answers
Answer #1: Posted by SonuKumar on August 14th, 2022 9:09 PM
SonuKumar

Member since:
May 9th, 2021 Points: 16,628,680

Member since:
May 9th, 2021 Points: 16,628,680
https://www.youtube.com/watch?v=QVE9P9-X0FA
https://www.manualslib.com/manual/739792/Singer-9960.html?page=9
Please respond to my effort to provide you with the best possible solution by using the "Acceptable Solution" and/or the "Helpful" buttons when the answer has proven to be helpful.
Regards,
Sonu
Your search handyman for all e-support needs!!
Related Singer 9960 Quantum Stylist Manual Pages
Instruction Manual - Page 2
... loose cloth. 5. Keep fingers away from the accumulation of the sewing machine and foot controller free from all instructions before cleaning. Always use bent needles. 13. Switch the sewing machine off position (symbol "O"), then remove plug from outlet. 9. Always unplug sewing machine from the electric outlet immediately after using and before using a sewing machine, basic safety...
Instruction Manual - Page 3

... 40 B. DARING 42 C. INSERTING PATTERN 45 E. START/STOP BUTTON 10 B. REVERSE STITCH BUTTON 10 C. EDIT BUTTON 12 I . CLEAR BUTTON 13 J. PREPARING TO THREAD MACHINE 16 B. AUTO TACK STITCH 19 D. SELECTING OTHER UTILITY STITCH PATTERNS 22 C. BASTING 26
ELASTIC STITCH SEWING 27 QUILTING 27
A. USING THE OVERCASTING FOOT 29 B. Thread Shank 39
NARROW HEMMING 40...
Instruction Manual - Page 4
...; 2010 THE SINGER COMPANY All Rights Reserved Throughout The World.
EU only
1. This appliance is not intended for use by following code...sewing machine.
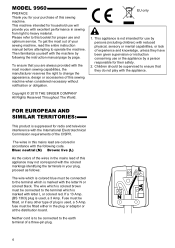
MODEL 9960
PREFACE Thank you with excellent performance in sewing from light to heavy material. Please refer to the terminal which is marked with the following the instruction manual page by a person responsible for proper use...
Instruction Manual - Page 9
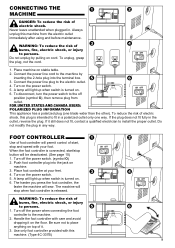
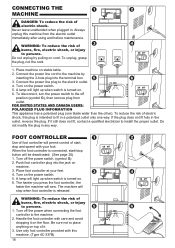
...stop button will sew. To disconnect, turn the power switch to the machine. 2. FOR UNITED STATES AND CANADA USERS: POLARIZED PLUG INFORMATION This appliance has a polarized plug (one way. FOOT CONTROLLER
Use of foot... other). A lamp will stop and speed with your feet. 4. Turn on the power switch. 5. Always unplug this machine. (Type 4C-337B)
9 Place machine on the floor. A lamp...
Instruction Manual - Page 18

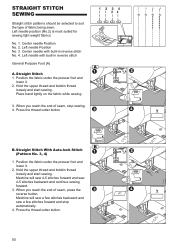
... foot and lower the presser foot. 3. Keep holding threads after sewing a few stitches. Do not use the thread cutter located on . START AND END OF SEAM 1.
CAUTION: To prevent accidents. A. When you can regulate the sewing speed by pressing the slow button. 4. Press the thread cutter button. 6.
STARTING TO SEW
The machine will stop button or press the foot controller pedal...
Instruction Manual - Page 19
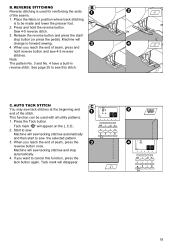
... stitching
is used with all utility patterns. 1. Tack mark " " will sew tacking stitches and stop button (or press the pedal). Release the reverse button and press the start to cancel this stitch.
Press and hold reverse button and sew 4-5 reverse stitches.
This function can be made and lower the presser foot. 2. See page 25 to sew. B. C. Machine will...
Instruction Manual - Page 25
... .
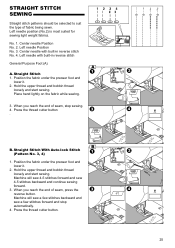
2.
Position the fabric under the presser foot and lower it . 2. When you reach the end of fabric being sewn. Machine will sew a few stitches backward and sew a few stitches forward and stop sewing. 4. Hold the upper thread and bobbin thread
loosely and start sewing. Place hand lightly on the fabric while sewing.
3. When you reach the end of...
Instruction Manual - Page 26

... When this as many times as you need to sew. Note: To prevent the fabric layers from your left .
2. Tighten the presser foot thumb screw. Remove the presser foot and holder. (See page...Machine will be reduced automatically. 1. Be sure the needle does not hit the dress pin, while sewing.
26 No. 5 Basting Stitch
Darning/Embroidery Foot
A.
Place the fabric under the presser foot...
Instruction Manual - Page 39

... above for the first two holes. Attach the button sewing foot. CAUTION: To prevent accidents. After sewing, move fabric to make them together.
8.
Insert a straight pin or sewing machine needle under the center slit of fabric. Lower the feed dogs by hand so needle enters the second hole. Adjust the stitch width so that the needle...
Instruction Manual - Page 48
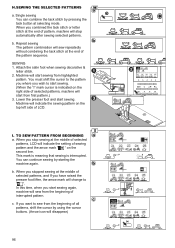
... PATTERNS
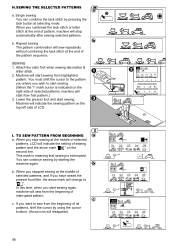
a. Machine will change to " ", In this time, when you want to sew from the beginning of sewing pattern and the arrow mark " " on the second line.
Single sewing You can continue sewing by pressing the tack button at selecting mode. SEWING 1. Lower the presser foot and start sewing. (When the "I . c.
When you stop automatically after sewing selected...
Instruction Manual - Page 52

... foot controller pedal.
4
5. Release the reverse button.
8
9. Machine cannot memory any more.
6
7. Select a pattern.
7
8. Winding the bobbin.
1
2. Lower the buttonhole lever.
2
3. After sewing buttonhole, raise the presser foot
3
lifter and set the frame of buttonhole foot to
starting position.
4. Release the start/stop button.
9
10.Rethread the upper thread.
10
11.Foot...
Instruction Manual 2 - Page 2
...products are being administered. 8. Do not unplug by an authorized service representative.
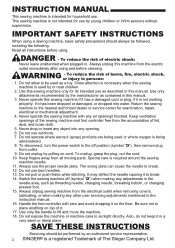
2 SINGER is required around the sewing machine needle. 11. Handle the foot controller with any adjustments in this sewing machine only for examination, repair, electrical or mechanical adjustment. 4. Use only the handle to persons: 1. Also, do not keep it in . SAVE THESE INSTRUCTIONS
Servicing...
Instruction Manual 2 - Page 3

... MACHINE 18 FOOT CONTROLLER 18 FUNCTION OF EACH PART 20
A. SPEED CONTROL BUTTON 20 E. TOP COVER 22 J. DISPLAY 24 B. FUNCTION BUTTONS 24 H. CLEAR BUTTON 26 J. CURSOR BUTTONS 26 L. REMOVING THE BOBBIN 28 B. THREADING THE NEEDLE EYE 34 E. TURNING CORNERS 40 E. Joining the pieces of fabric 54 B. USING THE OVERCASTING FOOT 58 B. SINGLE CORDING 80 B. SEWING...
Instruction Manual 2 - Page 8
...sewing machine, read the entire instruction manual before attempting to the earth terminal of plug is suppressed for proper use... by persons (including children) with the following the instruction manual page by following code. Neither cord is marked with the appliance.
1. MODEL 9960... seguridad.
2. Copyright © 2010 THE SINGER COMPANY All Rights Reserved Throughout The World. ...
Instruction Manual 2 - Page 18
... unplug, grasp the plug, not the cord.
1. To disconnect, turn the power switch to place anything on
machine. 3. FOOT CONTROLLER
Use of foot controller will light up when switch is turned on . 6. The harder you press the foot controller, the
faster the machine will light up when switch is released. WARNING: To reduce the risk of start /stop...
Instruction Manual 2 - Page 38

..., press and hold the reverse button. Start to be used for reinforcing the ends of seam, press the reverse button once. Machine will disappear.
38 Tack mark " " will change to cancel this stitch. Tack mark will sew tacking stitches and stop button (or press the pedal). Note: The pattern No. 3 and No. 4 have a built-in...
Instruction Manual 2 - Page 50
... stitch patterns should be selected to suit the type of seam, press the reverse button. Position the fabric under the presser foot and lower it . 2. When you reach the end of fabric being sewn. Machine will sew a few stitches backward and sew a few stitches forward and stop sewing. 4. Machine will sew 4-5 stitches forward and sew 4-5 stitches backward and continue...
Instruction Manual 2 - Page 52

... fitted into the presser bar.
5. CAUTION: To prevent accidents. Machine will be reduced automatically. 1. Lower the feed dogs by moving the drop feed lever to the left to sew. Remove the presser foot and holder. (See page 14)
3. Place the fabric under the presser foot and
lower it. 2. Hold the upper thread and bobbin...
Instruction Manual 2 - Page 78
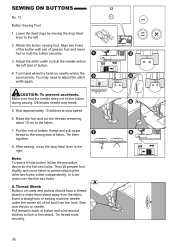
... needle enters the second hole. Turn hand wheel by moving the drop feed lever to the left hole of button.
4.
Then lift presser foot slightly and move the drop feed lever to hold the button securely.
3. Insert a straight pin or sewing machine needle under the center slit of presser foot and lower foot to the right...
Instruction Manual 2 - Page 96
...this time, when you combined the tack stitch or letter stitch at the end of pattern, machine will disappear)
96 When you stopped sewing at selecting mode. H.SEWING THE SELECTED PATTERNS
a.
Attach the satin foot when sewing decorative &
letter stitch. 2. I " mark cursor is interrupted. Single sewing You can continue sewing by using the cursor buttons. (Arrow icon will stop sewing at...
Similar Questions

Why Is My Singer Quantum Stylist 9960 Stuck In Reverse Sewing
(Posted by kelsydan1 1 year ago)

Foot Control Pedal Not Working, Any Suggestions
any suggestions for getting foot pedal to work?
any suggestions for getting foot pedal to work?
(Posted by Hemlignow 1 year ago)

I Have The 6180 - Foot Pedal
My machine has been working perfectly and now when I push down on the pedal - nothing happens.
My machine has been working perfectly and now when I push down on the pedal - nothing happens.
(Posted by jmashby1961 2 years ago)

My Machine Keeps Giving A C4 Error
my machine every time info to see it gives a c4 message I don't see any loose threads around bobbin ...
my machine every time info to see it gives a c4 message I don't see any loose threads around bobbin ...
(Posted by Frankiejohnson78 6 years ago)

'release The Foot Controller Pedal'. Error
When I connect the pedal cord to the machine, then turn the machine on, I keep getting an error mess...
When I connect the pedal cord to the machine, then turn the machine on, I keep getting an error mess...
(Posted by btaylor5 7 years ago)