Singer 9340 SIGNATURE Support Question
Singer 9340 SIGNATURE Support Question
Find answers below for this question about Singer 9340 SIGNATURE.Need a Singer 9340 SIGNATURE manual? We have 2 online manuals for this item!
Question posted by Tjfetterman4 on January 15th, 2018
Error On Singer 9340
singer 9340 every time I start to sew it will stitch for a few seconds then beeps 3 times the code come up as thread tension I have spent 2 days with it can't figure it out what do I do
Current Answers
Answer #1: Posted by waelsaidani1 on January 17th, 2018 8:08 PM
waelsaidani1

Member since:
May 12th, 2013 Points: 19,501,797

Member since:
May 12th, 2013 Points: 19,501,797
1.Loosen the thread tension. here is video guide https://www.youtube.com/watch?v=9ekWAnJDt5I
Related Singer 9340 SIGNATURE Manual Pages
Instruction Manual - Page 1
9340 Instruction Manual
Instruction Manual - Page 3

....
Keep ventilation openings of the sewing machine and foot controller free from outlet. 15. Do not use only. Do not pull or push fabric while stitching. Do not operate where aerosol ...19. Do not use as
threading needle, changing needle, threading bobbin, changing presser foot or changing the light. 10. Switch the sewing machine off or unplug the machine if it has been dropped...
Instruction Manual - Page 4

... the machine 9 WINDING THE BOBBIN 10-11 Bobbin winding 10-11 INSERTING THE BOBBIN 12 THREADING THE UPPER THREAD 13-14 USING THE NEEDLE THREADER 15 DRAWING UP THE LOWER THREAD 16 CUTTING THE THREAD 16 TWO-STEP PRESSER FOOT LIFTER 17 ADJUSTING PRESSER FOOT PRESSURE 17 STARTING SEWING 18 Start/stop button 18 Foot control 18 THREAD TENSION 19...
Instruction Manual - Page 5

... 72 Recalling and sewing the memorized pattern 73 WARNING FUNCTIONS 74-75 Warning animation message display 74 Instruction animation message display 74 Warning beeping sound 75 BUZZER SOUND 76 MAINTENANCE 77-78 Cleaning the screen 77 Cleaning the sewing machine surface 77 Cleaning the hook 77-78 TROUBLE SHOOTING GUIDE 79-80 STITCH ADJUSTMENT REFERENCE...
Instruction Manual - Page 6

PRINCIPAL PARTS OF THE MACHINE
Stitch pattern plate Tension dial Presser foot pressure Face plate Operation buttons A Thread cutter Buttonhole lever Auto needle threader Needle plate cover
Sewing table and accessory box
Hole for Auxiliary spool pin
Handwheel
Main power switch Power cord socket Foot controller connector
Bobbin winder spindle Bobbin winder stopper
...
Instruction Manual - Page 7

.../30)
6. Needle up or down this button to start or stop in reverse or sew reinforcement stitches at the end of the zigzag stitch.
2 Reverse button Hold down position button Press this button to stop the machine.
2. Function buttons (see page 25/26/27)
1. Needle will trim the threads.
3. Mode selection button Press this button to...
Instruction Manual - Page 8
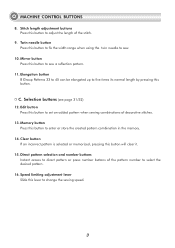
...button. Speed limiting adjustment lever Slide this lever to five times its normal length by pressing this button to sew a reflection pattern.
11. C. Elongation button B Group ...Stitch length adjustment buttons Press this button to adjust the length of decorative stitches.
13. Edit button Press this button to set an added pattern when sewing combinations of the stitch.
9. MACHINE...
Instruction Manual - Page 24

... is "4". Surface
44 Normal thread tension for straight stitch sewing. Proper setting of your fabric. There is no single tension setting appropriate for all sewing will always obtain a nicer stitch and less fabric puckering when the upper thread appears on the bottom side of tension is too loose for straight stitch
sewing.
THREAD TENSION
- Basic thread tension setting is too tight...
Instruction Manual - Page 44

... the needle
goes cleanly into the left and right holes of the button and sew.
6 For buttons with 4 holes, sew through the
front two holes first, push work under the foot.
Change the presser foot to get the button sewing stitch.
BUTTON SEWING
B-31 H
2.5~4.5
1
2.5~4.5
3
2
4
5
1 Select the pattern 31 from the Group
Patterns "B" to the button...
Instruction Manual - Page 59

...automatically cause the fabric to gather.
Note: Sew slow to medium speed for adjustments to achieve the amount of stitching. Adjust the upper thread tension dial to achieve desired fullness, work with.... Note: When testing machine for better fabric control.
54 Place top layer of the fabric, trims or elastic. The longer the stitch length setting is, the more tension will result in one ...
Instruction Manual - Page 60
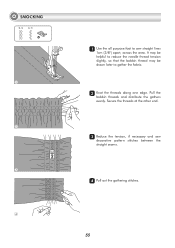
... one edge. It may be helpful to reduce the needle thread tension slightly, so that the bobbin thread may be drawn later to sew straight lines
1cm (3/8") apart, across the area. Secure the threads at the other end.
33 Reduce the tension, if necessary and sew
decorative pattern stitches between the straight seams.
44 Pull out the gathering...
Instruction Manual - Page 66

...close the zipper. Select desired stitch. 2. Continue sewing until the presser foot reaches the zipper's slider, backstitching at the end. 9. Finish the seam by sewing towards the inserted zipper. ...and baste in place, ensuring that the teeth of the zipper opening. 2. Continue sewing the second seam until the presser foot reaches the zipper's slider, backstitching at the creased edge...
Instruction Manual - Page 67

... upper thread tension slightly. 6. Place stabilizer under the foot, making sure it is an optional accessory. Depending on the fabric being sewn, it when finished sewing.
62 BEADING FOOT
57
5.0~7.0 2.0~4.5
* The beading foot is centered in the groove on the underside
of the foot. Place the beading foot onto the presser foot holder. 2. Stitch...
Instruction Manual - Page 71

SCALLOP STITCH Scallop hem
C-35 T
Wrong side of 3mm (1/8 inch) for seaming. Sew
along the folded edge, as illustrated.
22 Cut the fabric along the seam leaving an
allowance of fabric
1
2... over and push out the curved
seam to the surface and press it.
3
Scallop edging
C-34
B-36
T
A
11 Sew on hem line.
22 Trim the fabric close to the stitching taking
care not to cut the thread.
1
2
66
Instruction Manual - Page 74

...thread the twin needle are sewn parallel to sew. Please Note: Make sure that the two threads...start to
each needle separately.
Please Note: When sewing with
the accessories) into the hole on the top of the same weight.
Except the
5
Direct patterns " " and B Group patterns
17-32, C Group patterns 08, 27, 63, the
other type of stitching are of
the machine. Attention: Use a SINGER...
Instruction Manual - Page 80

... the memory is twisted or jammed and the hand wheel axle can 't sew: 3-short beeps
It means that the thread is full 20 units of pattern: 3-short beeps - In order to restart the sewing machine, you will have to be sounded. WARNING FUNCTIONS Warning beeping sound
- Return bobbin winder shaft to left (disengaged) to allow the buttons...
Instruction Manual - Page 84

... persists, contact Singer at www.singer.com
Problem
Cause
Correction
Reference
1.The machine is wrong.
2.Thread the bobbin case as illustrated.
3.The needle size must suit the fabric and thread.
4.Correct the thread tension.
Loose stitches
2.The bobbin case is not correctly threaded.
3.Needle/fabric/thread combination is wrong.
4.Thread tension is not threaded correctly. 1.Rethread...
Instruction Manual - Page 85

...Patterns are distorted
The machine jams
The machine is noisy
Uneven stitches, uneven feed
The sewing machine doesn't operate
1.The correct presser foot is not used.
1.Select the correct foot.
2.The needle thread tension is too tight. 2.Loosen the thread tension.
3.The stitch length is damaged.
2.Replace the needle.
3.Slight humming sound coming from 3.Normal. fabric.
4.Stitch length is too...
Instruction Manual - Page 87

... 27 stitches 28
Darning 29
stitches 30
Button sewing stitch
31
Bar tack stitch
32
33
34
35
36
37
38
Satin stitches 39
40
41
42
43
44
45
46
47
Decorative 48 satin stitches 49
50
Width (mm) Length (mm) Presser
Functions
Auto
Auto
Foot
Reverse
Auto-lock
Elongation
Mirror/ Presser foot
Twin
needle
Memory
Thread...
Instruction Manual - Page 91

or its Affiliates. All rights reserved.
021H7A0103( ) Apr/12 SINGER 9340(H76A)/B5 If in accordance with relevant National legislation relating to electrical/electronic products. or its Affiliates. ©2012 The Singer Company Limited S.à.r.l.
SINGER is the exclusive trademark of The Singer Company Limited S.à.r.l. Please note that on disposal, this product must be safely...
Similar Questions

How Do I Change The Light Bulb In My 9340 Sewing Machine?
(Posted by keistuff 2 years ago)

C6 Error Continues. Re-threaded The Machine Multiple Times Ensuring The Thread W
have rethreaded the machine sooooo many times following the video to ensure the thread was "under th...
have rethreaded the machine sooooo many times following the video to ensure the thread was "under th...
(Posted by Kblakey11 7 years ago)

How To Remove The Face Plate On The Singer 9340?
(Posted by cldownar 8 years ago)


My Machine Jammed, Then Beeped And Now The Bobbin Thread Will Not Pick Up.
(Posted by Tbodifamily 11 years ago)