Singer 8768 HERITAGE Support Question
Singer 8768 HERITAGE Support Question
Find answers below for this question about Singer 8768 HERITAGE.Need a Singer 8768 HERITAGE manual? We have 1 online manual for this item!
Question posted by justshea on February 26th, 2015
Heritage 8768
my new machine will only do straight stitches
Current Answers
Answer #1: Posted by TommyKervz on February 26th, 2015 3:50 PM
TommyKervz

Member since:
January 10th, 2013 Points: 17,776,813

Member since:
January 10th, 2013 Points: 17,776,813
Please refer to the instructions manual here
Related Singer 8768 HERITAGE Manual Pages
Instruction Manual - Page 2

..., unless they do not play with the appliance." 3. "Do not pull or push fabric while stitching. "The LED lamp maximum power is 0.3W, maximum voltage is DC 5V, if the LED lamp is required around the sewing machine needle." 14. "CAUTION--
"Never drop or insert any adjustments in any other liquids." 20. Moving...
Instruction Manual - Page 5

... ambient temperature: Normal temperature Acoustic noise level: less than 70 db(A)
3 OTHER INFORMATION Satin stitch foot 52 - 53 Twin needle 52 - 53
Threading the twin needle Straight stitch needle position 52 - 53
5. KNOWING YOUR SEWING MACHINE Machine identification 6 - 7 Accessories 8 - 9 Setting up your machine 10 - 11 Spool pins 12 - 13 Presser foot lifter, Feed dog control 12 - 13...
Instruction Manual - Page 8

... plate
25. Pre-tension guide
2
2. Power/light switch
15. Identification plate
17. Foot release button
28. Bobbin cover release button
33. KNOWING YOUR SEWING MACHINE
MACHINE IDENTIFICATION
1. Face cover
4
6. Reverse stitch button
11. Handle 13. Thread guide
22. Needle plate
32. Needle
24. Alternate thread cutter
14
27. Foot control
35. Extension table...
Instruction Manual - Page 10

ACCESSORIES
1. Bobbins 3. Spool pin cap (medium) 7. Screwdriver for the majority of your sewing. Blindhem stitch foot 13. Buttonhole foot
The foot that comes on your sewing machine is another very useful foot and should be sure they are Class I5 J.
8
1
2
3
4
5
6
7
8
9
10
11
12
13 The satin foot (11) is called the general ...
Instruction Manual - Page 12
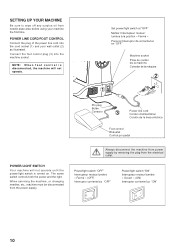
... position « Fermé » Poner el Interruptor de corriente/luz en "OFF"
Machine socket Prise du cordon de la machine Conector de la máquina
2
1
Pin plug Butée Conector
3
Power line cord... Ouvert » (ON) Interruptor corriente/luz "ON"
10
SETTING UP YOUR MACHINE
Be sure to wipe off any surplus oil from needle plate area before using your wall outlet (2) as...
Instruction Manual - Page 14
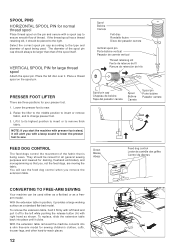
... that of thread. Down Basse Abajo
Feed dog control Levier de contrôle des griffes Control de dientes
CONVERTING TO FREE-ARM SEWING
Your machine can be placed to sew.
2. With the extension table in position, it off to the left while pushing the release button (A) with a beep sound to lower the...
Instruction Manual - Page 16
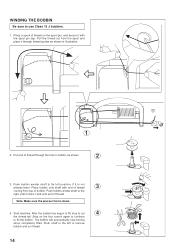
... down.
4. Push bobbin winder shaft to the
right until it with end of bobbin. The bobbin will automatically stop to use Class 15 J bobbins.
1. Start machine. Hold onto end of thread on the foot control again to continue
to remove
bobbin and cut
4
the thread tail. WINDING THE BOBBIN
Be sure...
Instruction Manual - Page 26

....
Place the desired foot on top of the machine. Lower the presser foot lifter so that the foot holder snaps
on the bottom side of your stitching is largely determined by the balanced tension of both top and bottom) is usually only desireable for straight stitch sewing.
Do this, however, only after you will need...
Instruction Manual - Page 28

...ón de puntada
Pattern selection buttons
Turn on the power switch and the LED indicator on the straight stitch pattern will continue until you power off the machine. Stitch length and width/needle position controls
Your sewing machine will automatically sew at default settings of your preference. Auto (preprogrammed) default settings are contained in yellow.
The setting...
Instruction Manual - Page 30
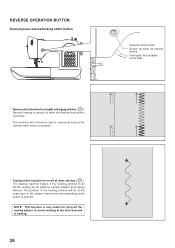
... to tie off of other stitches ( ) The sewing machine makes 4 tiny tacking stitches to avoid raveling at the exact spot in reverse as long as the reverse stitch button is pressed.
* Tacking stitch function for straight and zigzag stitches ( ) Reverse sewing is carried out while the reverse stitch button is pushed. The position of sewing.
28
The machine will be at the...
Instruction Manual - Page 34

... "fine tuning" of the fabric, stop the sewing machine. Place the fabric under the presser foot toward the back of face cover as shown. First turn the handwheel counter clockwise until the needle enters the fabric.
5. General purpose foot
E
Thread tension control - Stitch length control E. A. STRAIGHT STITCHING
Straight stitch is used for piecing quilt blocks and also...
Instruction Manual - Page 36

... the zipper foot to the foot holder so that
matches your fabric. Thread bobbin with a bias strip of fabric.
HAND-LOOK QUILT STITCH
This stitch is designed to sew. Thread machine with invisible or lightweight thread that the needle passes through the opening on the left side of zipper foot to presser foot holder...
Instruction Manual - Page 38

... the auto/default value set manually. SATIN STITCH
This is a closely spaced zig zag stitch used . PLACEMENT OF PATTERNS
Stitch width of stitch and sewing speed, but the bobbin thread must never appear on the sewing machine. If bobbin thread is pulling to the top or you are actual sewing lengths and widths and do not correspond to...
Instruction Manual - Page 40
... side
Under side
Envers
Envers
Reverso
Reverso
3. Turn the handwheel counter clockwise by hand until the needle swings fully to sew blind hems. Always make a sewing test first.
4
Top side Endroit Cara
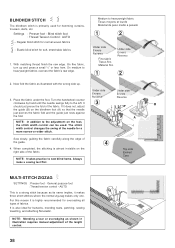
MULTI-STITCH ZIGZAG
SETTINGS :Presser foot - It
3
B
should just pierce the fold of the guide.
4. General purpose foot :Thread tension control...
Instruction Manual - Page 42
... strain. Make several rows of
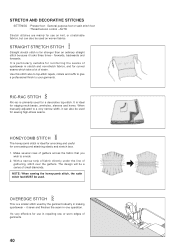
gathering, stitch over the gathers. OVEREDGE STITCH
This is far stronger than an ordinary straight stitch because it locks three times - it can also be used on knit, or stretchable fabrics, but can also be used for sewing high-stress seams.
HONEYCOMB STITCH
The honeycomb stitch is primarily used . It is ideal...
Instruction Manual - Page 48
... marking Marque du tissu Marca de material
mark Marque Marca
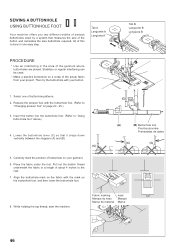
46 SEWING A BUTTONHOLE
USING BUTTONHOLE FOOT
Your machine offers you two different widths of bartack buttonholes sewn by a ...the buttonhole with the mark on your garment. 6. While holding the top thread, start the machine. Align the buttonhole mark on the fabric with your project. Stabilizer or regular interfacing can ...
Instruction Manual - Page 52

....
50
(3)
(4)
NOTE: Use dry rags to remove dust from the electrical
CAUTION outlet. Cleaning the sewing machine and foot controller
After using, keep the essential parts clean at its highest position.
2
2. Raise the needle to keep sewing machine and foot controller clean. Remove two screws on the hook race as it is not suited...
Instruction Manual - Page 54

... preclude any possibility of thread. Thread the two threads as for pin tucks, double top stitching and decorative sewing. Helpful hints: 1. Turning off the machine returns the machine to the general purpose foot when sewing stretch stitches. 4. Use of the needle when sewing straight stitch may be set beyond a twin needle mark, regardless of sizes.
It is recommended.
Slightly...
Instruction Manual - Page 56

... starting seam. - Clean hook (see page 16 - 17). * Lint accumulates in hook. - Guide it gently. * Bobbin has not been wound evenly. - Machine jams/knocks. * Thread is not raised when sewing stitch patterns.
- 5. Turn on the switch. * Buttonhole lever is caught in hook.- Raise buttonhole lever. * Buttonhole lever is not threaded correctly (see page...
Instruction Manual - Page 58
... incorrect position for the foot control. Remove foreign particle from machine and rethread.
1. The stitch pattern selected, does not operate when the reverse/tacking stitch is displayed, you have selected. Position the bobbin winder shaft to the left position for sewing and to the right position for details.
1.
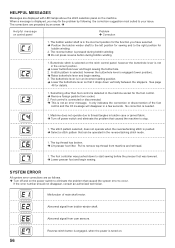
SYSTEM ERROR
All system...
Similar Questions

The Heritage 8768 Handwheel Is Completely Different How Do You Put Back On?
It's not like other singers
It's not like other singers
(Posted by kathyshepstone 10 months ago)

I Get E7 Error Message On My Singer Model 7258 Sewing Machine. There Is No Refe
Error message E7 is up on my Singer Stylist model 7258 sewing machine. It is not working at all. I t...
Error message E7 is up on my Singer Stylist model 7258 sewing machine. It is not working at all. I t...
(Posted by ebellamybellamy9 5 years ago)

The Only Stitch That My New Machine Will Do Is A Straight Stitch
(Posted by justshea 9 years ago)

Beeping From Singer Sewing Machine Stylist Ii 5625
My sewing machine will beep and stop sewing after three inches of sewing. I have taken it to be repa...
My sewing machine will beep and stop sewing after three inches of sewing. I have taken it to be repa...
(Posted by arusheria 9 years ago)

Pin Popped Out On The Auto Threader ! Singer 8768
A pin popped out on my three month old singer heritage sewing machine. the pin is from theauto threa...
A pin popped out on my three month old singer heritage sewing machine. the pin is from theauto threa...
(Posted by skeyc78 10 years ago)