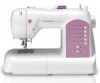
Singer 8763 Curvy Support Question
Singer 8763 Curvy Support Question
Find answers below for this question about Singer 8763 Curvy.Need a Singer 8763 Curvy manual? We have 1 online manual for this item!
Question posted by christinebarker7 on August 8th, 2015
Not Sewing
My CURVY 8763 has stopped sewing power is on and all the stitch selector lights are on
Current Answers


Related Singer 8763 Curvy Manual Pages
Instruction Manual - Page 3
..., Ladder stitch, Slant pin stitch, Slant overedge stitch, Greek key stitch, Entredeux stitch, Double overlock stitch, Criss-cross stitch, Crossed stitch Decorative embroidery designs 50 - 51 Ideas on design stitching Continuous patterns 52 - 53 Sewing on a button 52 - 53 Sewing a buttonhole 54 - 59
Using buttonhole foot, Procedure, Corded buttonholes
3. KNOWING YOUR SEWING MACHINE Machine...
Instruction Manual - Page 6
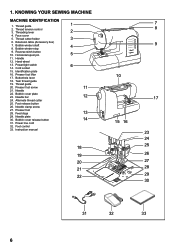
Thread guide
1
2. Bobbin winder stop
4
9. Identification plate
16. Buttonhole lever
18. Needle
22. Alternate thread .... KNOWING YOUR SEWING MACHINE
MACHINE IDENTIFICATION
1. Thread tension control 3. Face cover
5. Thread cutter/holder
3
6. Bobbin winder shaft 8. Reverse stitch button 10. Horizontal spool pin
5
11. Handle
12. Hand wheel
13. Power/light switch 14....
Instruction Manual - Page 8
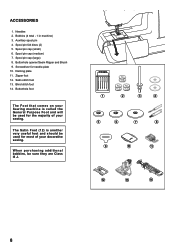
... foot
The Foot that comes on your Sewing machine is another very useful foot and should be used for the majority of your sewing. Bobbins (4 total - 1 in machine) 3. Spool pin cap (medium) 7. Spool pin cap (large) 8.
When purchasing additional bobbins, be used for needle plate 10. Blind stitch foot 14. Spool pin felt discs (2) 5. Buttonhole...
Instruction Manual - Page 10
... la linea eléctrica
Foot control Rhéostat Control por pedal
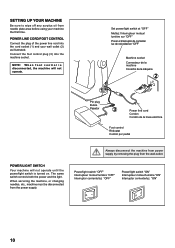
POWER/LIGHT SWITCH
Your machine will not operate. The same switch controls both the power and the light. Power/light switch "OFF" Interrupteur moteur/lumière "OFF" Interruptor corriente/luz "OFF"
Power/light switch "ON" Interrupteur moteur/lumière "ON" Interruptor corriente/luz "ON...
Instruction Manual - Page 12
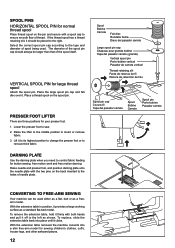
... del pasador carrete
Spool Bobine Carrete
Spool pin Porte-bobine Pasador carrete
DARNING PLATE
Use the darning plate when you need to sew. 2. With the extension table removed the machine converts into place until it to its highest position to change the presser foot or to insert or remove
fabric. 3. If the...
Instruction Manual - Page 20
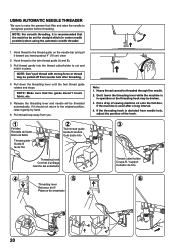
...: 1.
Pull thread loop away from needle hole,
adjust the position of sewing machine oil onto the felt disc,
if the machine is
in operation or the threading hook may be broken. 3. If the...Pull down the threading lever until the twin thread guide rotates and stops. NOTE: Make sure that the machine be set for straight stitch (in place. USING AUTOMATIC NEEDLE THREADER
*Be sure to raise the...
Instruction Manual - Page 22
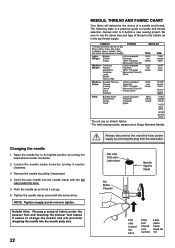
... the same size and type of weight. Loosen the needle clamp screw by turning it before a new sewing project. Insert the new needle into the needle plate slot.
22
Always disconnect the machine from power supply by removing the plug from the wall-outlet.
NEEDLE, THREAD AND FABRIC CHART
Your fabric will preclude...
Instruction Manual - Page 24
...
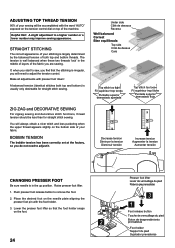
ZIG ZAG and DECORATIVE SEWING
For zigzag sewing and decorative stitch functions, thread tension should be accomplished with the word "AUTO" exposed on the tension control dial on top of both top and bottom) is irregular, you are sewing.
The tension is largely determined by the balanced tension of the machine.
Push presser foot release...
Instruction Manual - Page 26
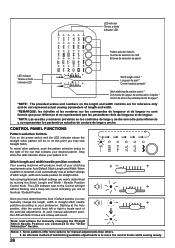
... method of the potential adjustments.
Stop when the LED indicator above the straight stitch pattern will automatically sew at default settings of your stitching requirements at an Auto/Default Stitch Length and Width.
At this point you are contained in the "Other Information" Section.
Stitch length and width/needle position controls
Your sewing machine will sound.
When a pattern...
Instruction Manual - Page 28
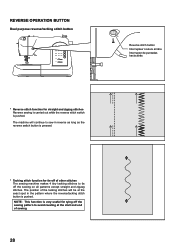
... pushed. NOTE: This function is very useful for straight and zigzag stitches Reverse sewing is carried out while the reverse stitch switch is pushed.
The machine will be at the start and end of other stitches The sewing machine makes 4 tiny tacking stitches to tie off the sewing pattern to avoid raveling at the exact spot in reverse as...
Instruction Manual - Page 32
...
AUTO
E
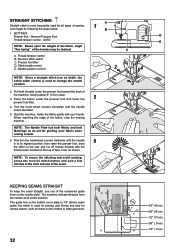
NOTE: Based upon the weight of the fabric, slight
"fine tuning" of sewing. Stitch length control E. Turn the hand wheel counter clockwise until the needle is at its center ... your hands. KEEPING SEAMS STRAIGHT
To keep the seam straight, use one of the fabric, stop the sewing machine. Let's begin by following the steps below.
1
B
1.
Pull both Metric and Inch ...
Instruction Manual - Page 34
... through the opening on the right side of the foot. When
sewing the machine will pull this thread to the cording.
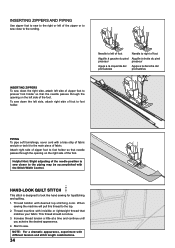
PIPING To pipe soft furnishings, cover cord with desired top stitching color.
INSERTING ZIPPERS AND PIPING
Use zipper foot to sew to the right or left of zipper foot to foot holder so...
Instruction Manual - Page 36
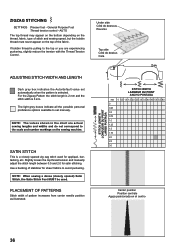
...STITCH WIDTH AND LENGTH
Dark grey box indicates the Auto/default value set manualy. The light grey boxes indicate all the possible personal preference options available to the top or you are actual sewing... bottom depending on the thread, fabric, type of stitch and sewing speed, but the bobbin thread must never appear on the sewing machine.
NOTE: The values shown in the chart are ...
Instruction Manual - Page 50
... fabric from your project.
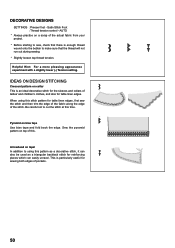
* Before starting to using this pattern as a triangular backtack stitch for sewing both edges of the stitch. IDEAS ON DESIGN STITCHING
Crescent pattern on lapel In addition to sew, check that the thread will not run out during sewing.
* Slightly loosen top thread tension. Helpful Hint: For a more pleasing appearance experiment with...
Instruction Manual - Page 52
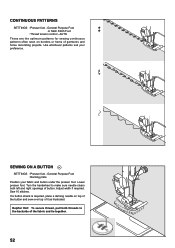
...Presser foot -
General Purpose Foot :Darning plate
Position your preference. Adjust width if required. SEWING ON A BUTTON
SETTINGS :Presser foot -
Use whichever patterns suit your fabric and button ...are the optimum patterns for sewing continuous patterns often seen on top of the button and sew over top of garments and home decorating projects. Sew 10 stitches. If a button shank ...
Instruction Manual - Page 54

SEWING A BUTTONHOLE USING BUTTONHOLE FOOT
Your machine offers you two different widths of bartack buttonholes sewn by a system that it drops down vertically between the stoppers (A) and (B).
(C)
54
(C)
(A)
(B)
Buttonhole foot Pied boutonni&#...
Instruction Manual - Page 56
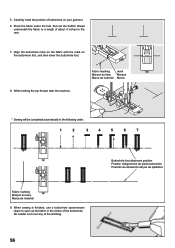
...Marque du tissu Marca de material
9.
While holding the top thread, start the machine. When sewing is finished, use a buttonhole opener/seam ripper to the rear.
7. Fabric marking Marque du tissu Marca...fabric with the mark on your garment.
6. Carefully mark the position of the stitching.
56
Buttonhole foot alignment position Position d'alignement du pied boutonnière Posició...
Instruction Manual - Page 60
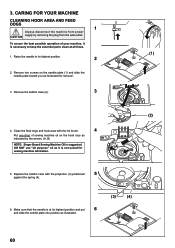
...clean at its highest position.
2
2. To ensure the best possible operation of sewing machine oil on the needle plate (1) and slide the needle plate toward you as....
(3)
(4)
60 CARING FOR YOUR MACHINE
CLEANING HOOK AREA AND FEED DOGS
1
Always disconnect the machine from power CAUTION supply by the arrows. (A, B)
NOTE: Singer Brand Sewing Machine Oil is suggested. Make sure that the...
Instruction Manual - Page 62
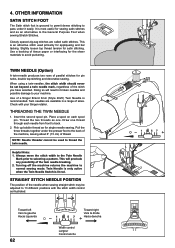
... an alternative to your Singer retailer.
This will result in a range of the needle when sewing straight stitch may be adjusted to 13 different positions with your machine. STRAIGHT STITCH NEEDLE POSITION
The position of sizes. Closely spaced zig-zag stitches are available in broken needles and possible damage to the General Purpose Foot when...
Instruction Manual - Page 64
...
Machine does not sew. * Power switch... is not threaded correctly. - Lower buttonhole lever. * Bobbin winder is caught in bobbin case or hook. - Disengage bobbin winder (see page 60 - 61). Machine jams/knocks. * Thread is engaged. - Clean hook (see page 24 - 25). * Stitch length is too tight. - Fabric does not move. * Presser foot is damaged.- Lengthen stitch...
Similar Questions

Not Sewing Any Stitch, I Have 7256 Fashion Mate Model
(Posted by maryannsandoval 3 years ago)

How And Where Exactly Do I Oil The Upper Section Of My Singer Curvy 8763?
Re: Singer Curvy 8763. I've already removed, cleaned and oiled the bobbin case, but I'd like to know...
Re: Singer Curvy 8763. I've already removed, cleaned and oiled the bobbin case, but I'd like to know...
(Posted by nancy3262 8 years ago)

Singer Sewing Machine 8763 Bobbin Thread Does Not Sew After Material Jam
(Posted by Anonymous-151081 9 years ago)

Not Sewing Basting Stitches
what am I doiing wrong I need to do some basting stitches. my machine is only 1 month old and I am n...
what am I doiing wrong I need to do some basting stitches. my machine is only 1 month old and I am n...
(Posted by sharflem1 9 years ago)

My Curvy 8763 Wont Sew. Reverse Button Seems To Be Stuck In On Position.
lights flashing wont sew reverse button stuck in on position
lights flashing wont sew reverse button stuck in on position
(Posted by sandygregson 11 years ago)