Singer 8500Q MODERN QUILTER Support Question
Singer 8500Q MODERN QUILTER Support Question
Find answers below for this question about Singer 8500Q MODERN QUILTER.Need a Singer 8500Q MODERN QUILTER manual? We have 1 online manual for this item!
Question posted by Deniharrison on February 24th, 2015
Error Message 16. Manual Does Not Say What Caused This, Just To Turn Off. Reaso
receiving error message 16. What has caused this? Manual says to just turn off and turn back on, should I look for the cause of this error. I'm quilting a quilt top
Current Answers
Answer #1: Posted by TechSupport101 on February 25th, 2015 5:08 AM
TechSupport101

Member since:
May 24th, 2013 Points: 12,171,305

Member since:
May 24th, 2013 Points: 12,171,305
Hi. What is normally the case is that if what is suggested to be a corrective measure of clearing an error code as per the manual does not work, then one is then looking at a hardware failure requiring service sadly.
Related Singer 8500Q MODERN QUILTER Manual Pages
Instruction Manual - Page 2
³,03257$176$)(7
Instruction Manual - Page 5
...look quilt stitch 38 - 39 Straight stitch with hard-to free-arm sewing 64 - 65 Performance checklist 66 - 67 Cleaning hook area and feed dogs 68 - 69 Oiling inside the face cover 70 - 71 Special accessories 72 - 81 Helpful messages 82 - 83 Programming the memory 84 - 89
For European version
Sewing machine...- 65 Converting to -sew fabrics, Manual buttonhole Decorative sewing 60 - 61 Tips...
Instruction Manual - Page 8

... box)
4
7. Horizontal spool pin 11. Buttonhole lever
10
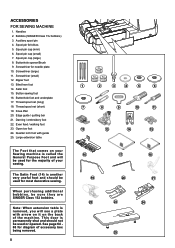
16. GETTING TO KNOW YOUR MACHINE
MACHINE IDENTIFICATION
2
1
1. Face cover
3
5. Thread guide
12
20.... Cord socket 15. Feed dog control
17. Presser foot release button
14
27. Instruction manual
20
21
22
23
7 8
9
15 16...
Instruction Manual - Page 10
... are SINGER Class 15J bobbins. ACCESSORIES FOR SEWING MACHINE
1. Satin foot 15.
This door is removed, you will see a plate with guide 25. Large extension table
The Foot that comes on the back of accessory box being removed.
8
1
2
3
4
5
6
7
8
9
10
11
12
13
14
15
16
17
18
19
20
21
22
23
24...
Instruction Manual - Page 18

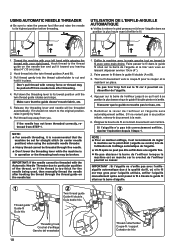
... eye of the needle (5) from front to back. (See following page for instructions on operation of the machine. Always be obtained.)
B. Turn the hand wheel counter clockwise (toward you) until the needle is in its highest position.
&7KUHDGWKH...as illustrated. * Guide the thread through thread guides (1 & 2), and then pull it .
16 Raise the presser foot lifter. THREADING THE TOP THREAD
A.
Instruction Manual - Page 20
...et à lever l'aiguille dans sa SRVLWLRQODSOXVKDXWHDYDQWG
HQ¿OHUOH¿O
1. Thread the machine with your right hand.
If the needle has not been threaded correctly, rethread from you leaving about 4" (10 cm...191;QHQHHGOH º Don't lower the threading lever while the machine is too thick for the needle being used, then manually thread the needle after threading.
4.
Instruction Manual - Page 22
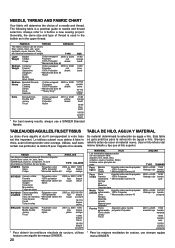
...80 orange band
14/90 blue band
16/100 purple band
18/110 yellow band
11/80 orange band
14/90 blue band
16/100 purple band
* For best sewing results, always use siempre agujas marca ...Tricot
Polyester-coton Polyester Nylon
2001 ou 2045 11/80 tige bague jaune orange
14/90 bague bleue
16/100 bague pourpre
MATERIAL
HILO
Los materiales abajos pueden VHUGHFXDOTXLHU¿EUD
algodón, lino...
Instruction Manual - Page 24
...sewing.
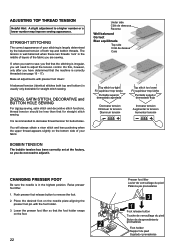
ZIGZAG, SATIN STITCH, DECORATIVE and BUTTON HOLE SEWING
For zigzag sewing, satin stitch and decorative stitch functions, thread tension should be less than that the machine is recommended to adjust it. It is correctly threaded (see page 16...foot release button to a higher number or a lower number may improve sewing appearance. Place the desired foot on the foot.
2
22
Presser foot...
Instruction Manual - Page 32
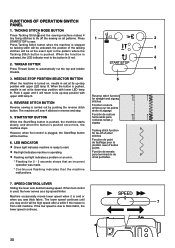
...machine is turned on, needle is set at the exact spot in reverse and stop.
5. When the button is pushed, needle is set at its down-stop position with upper LED lamp lit. REVERSE STITCH BUTTON
Reverse sewing is
7
from cold machine...or an error.
* Flashing for 2 - 3 seconds shows that an incorrect operation was made.
* Continuous flashing indicates that the machine malfunctions.
...
Instruction Manual - Page 38
... 00
Straight stitch is used to the rear and cut off excess
6
thread with your fabric when sewing a seam.
6. SETTINGS Presser foot - Start/stop the sewing machine. Presser foot lifter H. Pull both Metric and Inch Markings as shown. Turn the hand wheel counter clockwise (towards you )
until
the needle enters the fabric.
5. Start the...
Instruction Manual - Page 40
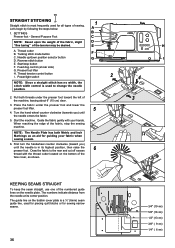
... adjusting of the needle position to sew closer to sew. HAND-LOOK QUILT STITCH 02
This stitch is released.
2. Press the foot control and the machine will sew 4 stitches in reverse and then 4 stitches in reverse and continue to look like hand sewing for the piping. STRAIGHT STITCH WITH AUTO
TIE-OFF FUNCTION
16
1. Increase thread tension toward 6 or...
Instruction Manual - Page 42
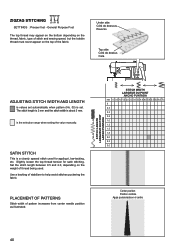
... values set . is set automatically when pattern (No. 03) is the selection range when setting the value manually. Use a backing of pattern increases from center needle position as illustrated.
PLACEMENT OF PATTERNS
Stitch width of stabilizer... on the bottom depending on the thread, fabric, type of stitch and sewing speed, but the bobbin thread must never appear on the weight of the fabric.
Instruction Manual - Page 44

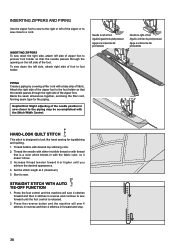
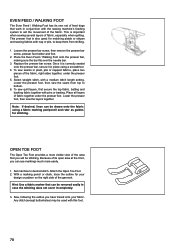
...Sew slowly, guiding the fabric carefully along the edge of the fabric. Blind Hem Foot
- Now fold the fabric as its name implies, it on the Blind hem Foot (A) so that
the needle just pierces the fabric fold and the guide just...narrower or wider blind hem, first manually adjust the length and width controls... ZIGZAG 07 SETTINGS :Presser foot - Turn the handwheel counter
3
clockwise (toward ...
Instruction Manual - Page 46
...lapels, collars and cuffs to applique a quilt.
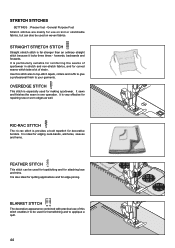
44 STRETCH STITCHES
SETTINGS :Presser foot - RIC-RAC STITCH 18
The ric-rac stitch is also ideal for quilting applications and for use of strain. ... a bold topstitch for making sportswear. Use this stitch enables it locks three times -
It sews DQG¿QLVKHVWKHVHDPLQRQHRSHUDWLRQ,WLVYHU\HIIHFWLYHIRU repairing raw or worn ...
Instruction Manual - Page 60
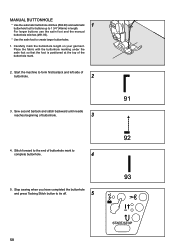
... the buttonhole mark.
6WDUWWKHPDFKLQHWRIRUP¿UVWEDUWDFNDQGOHIWVLGHRI
buttonhole.
2
3. Stop sewing when you have completed the buttonhole
and press Tacking Stitch button to create larger buttonholes.
1. MANUAL BUTTONHOLE
* Use the automatic buttonhole stitches (#94-99) and automatic
1
buttonhole foot for buttons up to
complete buttonhole...
Instruction Manual - Page 72
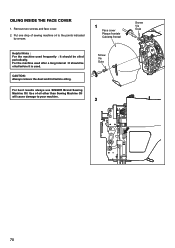
.... Screw Vis Guia
2
Screw Vis Guia
70
OILING INSIDE THE FACE COVER
1. Put one drop of oil other than Sewing Machine Oil will cause damage to the points indicated
by arrows.
1
Face cover Plaque frontale Cubierta frontal
Helpful Hints : For the machine used after a long interval : It should be oiled before oiling. Use of...
Instruction Manual - Page 76
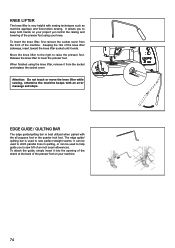
... using your machine.
74
Attention: Do not touch or move the knee lifter while sewing, otherwise the machine beeps with the all purpose foot or the quarter inch foot. Release the knee lifter to keep both hands on your knee. KNEE LIFTER
The knee lifter is best utilized when paired with an error message and...
Instruction Manual - Page 78
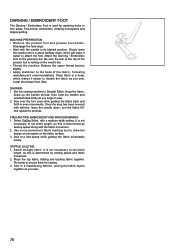
.... 3. MACHINE PREPARATION ‡ 5 H P R Y H W K H S U H V V H U I R R W D Q G S U H V V H U I R R W K R O G H U
Disengage the feed dogs. ‡ 6WDUW ZLWK WKH QHHGOH LQ LWV KLJKHVW SRVLWLRQ 6ORZO\ ORZHU
the needle until it is about halfway down , turn the fabric 90° and repeat the process. Attach the Darning / Embroidery Foot to attach the foot. Sew over the torn area...
Instruction Manual - Page 80
... WKH WRS IDEULF EDWWLQJ DQG backing fabric together with the sewing machine's feeding system to desired stitch. Replace the presser bar screw. Lower the presser foot, then sew the seam from shifting.
1. Once it is important when sewing several layers of fabric, especially when quilting.
Any stitch (except buttonholes) may be drawn onto the fabric...
Instruction Manual - Page 82
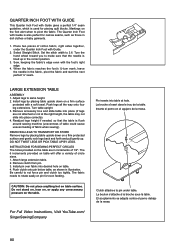
...apply any unnecessary pressure on pin for piecing quilt blocks. Remove accessory box and slide table into...Turn table upright. 3. La broche s'insert dans le trou de la table. Sew, keeping the fabric's edge even with the foot's right edge.
4. LARGE EXTENSION TABLE
ASSEMBLY 1. The fabric needs to make sure that the table is flush around sewing machine (unevenness of table could cause...
Similar Questions

I Get E7 Error Message On My Singer Model 7258 Sewing Machine. There Is No Refe
Error message E7 is up on my Singer Stylist model 7258 sewing machine. It is not working at all. I t...
Error message E7 is up on my Singer Stylist model 7258 sewing machine. It is not working at all. I t...
(Posted by ebellamybellamy9 5 years ago)

Error Code 16
Received my Singer 8500Q last Thursday. Gave it a test run for various stitches all was good. Sewed ...
Received my Singer 8500Q last Thursday. Gave it a test run for various stitches all was good. Sewed ...
(Posted by my3sons84 7 years ago)

Error Message 06 (top Thread Breaking)
My machine keeps giving me an error that the top thread is breaking. However, the thread is still in...
My machine keeps giving me an error that the top thread is breaking. However, the thread is still in...
(Posted by dmcmill78 8 years ago)

Keep Getting Error Messages That Thread Is Broken When It Is Not
And also get message that bobbin is jammed and to clean. When I retread and clean the bobbin area st...
And also get message that bobbin is jammed and to clean. When I retread and clean the bobbin area st...
(Posted by Anonymous-148126 9 years ago)

How To Resolve Error Message C4 From Singer Sew Mate 5400 Sewing Machine
(Posted by Rollsharr 9 years ago)