Singer 7469Q Confidence Quilter Support Question
Singer 7469Q Confidence Quilter Support Question
Find answers below for this question about Singer 7469Q Confidence Quilter.Need a Singer 7469Q Confidence Quilter manual? We have 1 online manual for this item!
Question posted by laurie1109 on January 7th, 2013
Thread Take Up Is Jammed With Thread Wound Up Underneath.
Is this a known issue? The thread has wound itself around the shaft that moves the thread take up part and pushed it out so it is jammed up and can't move. My machine is less than a year old!
Current Answers
Related Singer 7469Q Confidence Quilter Manual Pages
Instruction Manual - Page 3
... buttonhole
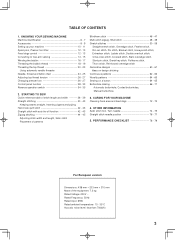
3. TABLE OF CONTENTS
1. KNOWING YOUR SEWING MACHINE Machine identification 6 - 7 Accessories 8 - 9 Setting up your machine 10 - 11 Spool pins, Presser foot lifter 12 - 13 Feed dogs control 12 - 13 Converting to free-arm sewing 14 - 15 Winding the bobbin 16 - 17 Threading the bobbin thread 18 - 19 Threading the top thread 20 - 23 Using automatic needle threader Needle...
Instruction Manual - Page 6
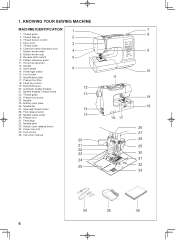
... plate 33. Bobbin winder shaft 8. Power/light switch 15. Foot release button 29. Feed dogs 32. Foot control 36. Handle 13. Hand wheel 14. Cord socket 16. Presser foot lifter 18. Buttonhole lever 20. Thread guide 23. Needle clamp screw 30. KNOWING YOUR SEWING MACHINE
MACHINE IDENTIFICATION
1. Thread take-up 3. Thread tension control 4. Thread cutter 6. Feed dog control...
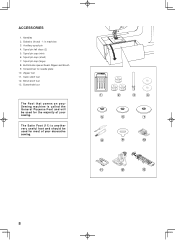
Instruction Manual - Page 8
...
12
13
Spool pin cap (mini) 6. The Satin Foot (11) is called the General Purpose Foot and will be used for the majority of your Sewing machine is another very useful foot and should be used for needle plate 10. Needles 2. Auxiliary spool pin 4. Spool pin cap (small) 7. Zipper foot 11. Blind...
Instruction Manual - Page 12
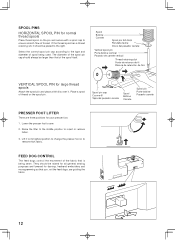
... foot.
1.
Lower the presser foot to insert or remove fabric.
3. Raise the lifter to the middle position to sew.
2. Lift it should be placed to remove thick fabric. If the thread spool has a thread retaining slit, it to its highest position to change the presser foot or to the right. Spool Bobine Carrete...
Instruction Manual - Page 16
..., if it through the hole in illustration.
1
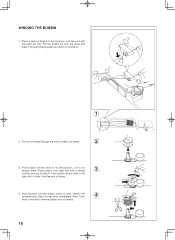
2. WINDING THE BOBBIN
1. Push
4
shaft to remove bobbin and cut thread.
16 Pull the thread out from top of bobbin. Push bobbin winder shaft to wind. Hold the end of thread through thread guides as shown in bobbin as shown.
2
3. Start machine and the bobbin starts to the
right until it with...
Instruction Manual - Page 18
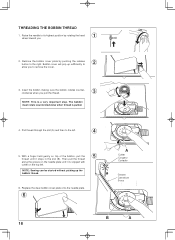
... by pushing the release button to the left . Bobbin cover will pop up the bobbin thread.
6. With a finger held gently on top of the bobbin, pull the
5
thread until ...
wheel toward you to
2
allow you .
2. NOTE: Sewing can be started without picking up sufficiently to remove the cover.
3. THREADING THE BOBBIN THREAD
1. Replace the clear bobbin cover plate onto the needle plate...
Instruction Manual - Page 24
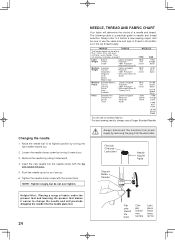
.... NOTE: Tighten snugly, but do not over tighten. Always disconnect the machine from power supply by pulling it downward.
4. Corduroy Weight Flannel
Gabardine Gingham...Polyester 100% Polyester * Mercerized Size 50 Nylon
Medium- Push the needle up as far as in the bobbin as it...sewing project. Raise the needle bar to needle and thread selection. They are listed as examples of a needle...
Instruction Manual - Page 26
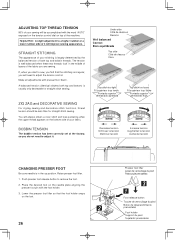
... that the foot holder snaps
on top of the machine. Place the desired foot on the bottom side of your fabric. If, when you start to sew, you do not need to adjust the tension control. A balanced tension (identical stitches both top and bobbin threads.
Push presser foot release button to adjust it.
You...
Instruction Manual - Page 30
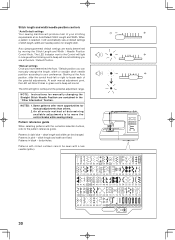
...the LED will blink 3 times in the "Other Information" Section. stitch length and width are easily determined by moving the Stitch Length and Width / Needle Position Control Knob.
NOTES: 1. Pattern reference guide
When selecting patterns with... length and width/needle position controls
*Auto/Default settings Your sewing machine will produce most of your preference. Patterns in pink -
Instruction Manual - Page 34
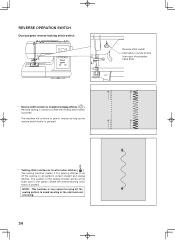
... reverse stitch switch is pushed.
REVERSE OPERATION SWITCH
Dual purpose reverse/tacking stitch switch
Reverse stitch switch
Interrupteur couture arrière interruptor de puntadas hacia atrás
* Reverse stitch function for tie-off of other stitches ( ) The sewing machine makes 4 tiny tacking stitches to tie off the sewing pattern to sew in the pattern...
Instruction Manual - Page 40
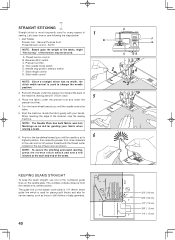
STRAIGHT STITCHING
A
Straight stitch is most frequently used for guiding your hands. Thread tension control B. Guide the fabric gently with the thread cutter
located on the top of
1
sewing.
General Purpose Foot
G
Thread tension control - Needle stop the sewing machine. Start the machine. First turn the handwheel toward you until the needle is used for piecing ...
Instruction Manual - Page 42
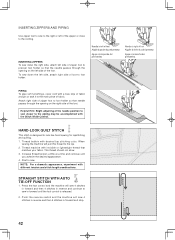
... the piping may be accomplished with desired top stitching color. Thread bobbin with the Stitch Width Control.
INSERTING ZIPPERS To sew down the left of the needle position to sew closer to the cording. This thread should not show. 3. Push the reverse switch and the machine will sew 4 stitches in forward and then 4 stitches in forward until...
Instruction Manual - Page 44
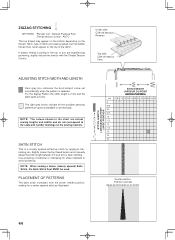
... :Thread tension control - NOTE: The values shown in the chart are experiencing puckering, slightly reduce the tension with the Thread Tension Control.
ZIGZAG STITCHING
SETTINGS :Presser foot - AUTO
The top thread may appear on the bottom depending on the thread, fabric, type of stitch and sewing speed, but the bobbin thread must never appear on the sewing machine.
Instruction Manual - Page 60
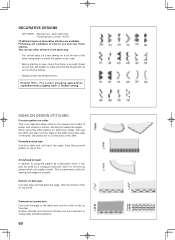
... to be used as a decorative stitch, it can also be used. * Before starting to sew, check that the thread will not run out during sewing. * Slightly loosen top thread tension. You can easily unravel. Diamond on collar This is enough thread
wound onto the bobbin to tidy up the edge. When using this stitch to make...
Instruction Manual - Page 68
... with the mark on your garment.
6. When sewing is finished, use a buttonhole opener/seam
ripper to...Sewing will be completed automatically in the center of buttonhole on the buttonhole foot, and then lower the buttonhole foot.
8. Pull out the bobbin thread underneath the fabric to the rear.
7. Carefully mark the position of the buttonhole. While holding the top thread, start the machine...
Instruction Manual - Page 70
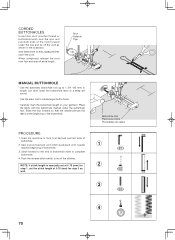
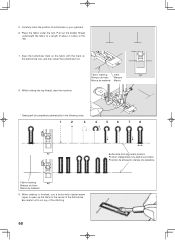
...the cord. CORDED BUTTONHOLES
Hook filler cord (crochet thread or buttonhole twist) over the spur and pull both...1
2
3
4
70 Stitch forward to tie off extra length. Push the reverse stitch switch to the end of the buttonhole. NOTE: If...bartack and left side of buttonhole.
3. Start the machine to complete buttonhole.
4.
Sew second bartack and stitch backward until needle reaches beginning ...
Instruction Manual - Page 72
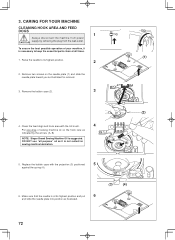
... its highest position.
2
2. Clean the feed dogs and hook area with the projection (3) positioned
5
against the spring (4).
6. CAUTION
To ensure the best possible operation of sewing machine oil on the needle plate (1) and slide the needle plate toward you as illustrated.
(3)
(4)
72 3. CARING FOR YOUR...
Instruction Manual - Page 74
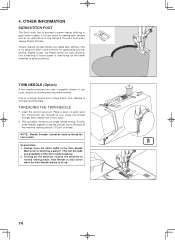
...the twin needle breaking. 2.
Always move the stitch width to the Twin Needle
Mark prior to normal sewing mode. Turning off the machine returns the machine to selecting a pattern. OTHER ...the General Purpose Foot when sewing Stretch Stitches. This is lit red.
74
Helpful Hints: 1. Insert the second spool pin. Thread the two threads as one thread through each spool pin. TWIN...
Instruction Manual - Page 78
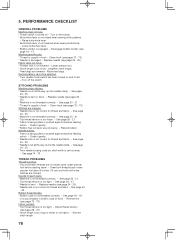
.... * Needle size is not raised when sewing stitch patterns.
- See page 20 - 21. * Top thread tension is not threaded correctly. - See page 26 - 27. * Fabric is being used but stitch width is being pulled or pushed against machine feeding
action. - Rewind bobbin. Guide it gently. * Bobbin has not been wound evenly. - See page
24 - 25. * Twin...
Instruction Manual - Page 82
...
"IMPORTANT SAFETY INSTRUCTIONS"
"When using this sewing machine." Use only attachments recommended by the
manufacturer as threading needle, changing needle, threading bobbin, or changing presser foot, etc."..."Do not pull or push fabric while stitching. This equipment is required around the sewing machine needle." 11. Keep ventilation openings of the sewing machine and foot control free ...
Similar Questions

Timing
Hello, the timing was out I have sorted I think it is ok when bobbin plate is off but when put back ...
Hello, the timing was out I have sorted I think it is ok when bobbin plate is off but when put back ...
(Posted by cathyuk38 2 years ago)

I Get E7 Error Message On My Singer Model 7258 Sewing Machine. There Is No Refe
Error message E7 is up on my Singer Stylist model 7258 sewing machine. It is not working at all. I t...
Error message E7 is up on my Singer Stylist model 7258 sewing machine. It is not working at all. I t...
(Posted by ebellamybellamy9 5 years ago)

Singer Model 7469q Quilter Sewing Machine Disassembly
After pulling the screws all out from the plastic case . how do you split the cases?please no addres...
After pulling the screws all out from the plastic case . how do you split the cases?please no addres...
(Posted by sdeiter544 9 years ago)
Singer # 7469q Sewing Machine
After pulling the screws all out from the plastic case . how do you split the cases?
After pulling the screws all out from the plastic case . how do you split the cases?
(Posted by sdeiter544 9 years ago)

Beeping From Singer Sewing Machine Stylist Ii 5625
My sewing machine will beep and stop sewing after three inches of sewing. I have taken it to be repa...
My sewing machine will beep and stop sewing after three inches of sewing. I have taken it to be repa...
(Posted by arusheria 9 years ago)