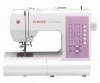
Singer 7463 Confidence Support Question
Singer 7463 Confidence Support Question
Find answers below for this question about Singer 7463 Confidence.Need a Singer 7463 Confidence manual? We have 1 online manual for this item!
Question posted by Rhys63 on May 13th, 2022
How Do You Adjust Timing
The person who posted this question about this Singer product did not include a detailed explanation. Please use the "Request More Information" button to the right if more details would help you to answer this question.
Current Answers
Answer #1: Posted by SonuKumar on May 13th, 2022 9:26 PM
SonuKumar

Member since:
May 9th, 2021 Points: 16,627,790

Member since:
May 9th, 2021 Points: 16,627,790
https://www.youtube.com/watch?v=w8DQxsOZimY
https://www.youtube.com/watch?v=MXa5RfdlztM
How do I reset the timing on my sewing machine?
To adjusting your sewing machine's timing, start by loosening the needlebar and sliding it up or down to align the top timing mark just below the bottom of the timing bar bushing. If your needlebar doesn't have timing marks, lower the needle completely using the hand wheel, then raise it 2.4 millimeters.
follow content - below link, if above information can't help you
https://www.manualslib.com/manual/364664/Singer-Confidence-7463.html?page=58
Please respond to my effort to provide you with the best possible solution by using the "Acceptable Solution" and/or the "Helpful" buttons when the answer has proven to be helpful.
Regards,
Sonu
Your search handyman for all e-support needs!!
Related Singer 7463 Confidence Manual Pages
Instruction Manual - Page 3
... your machine 10 - 11 Spool pins 12 - 13 Presser foot lifter, Darning plate 12 - 13 Converting to free-arm sewing 12 - 13 Winding the bobbin 14 - 15 Threading the bobbin thread 16 - 17 Threading the top thread 18 - 19 Using automatic needle threader 20 - 21 Needle, thread and fabric chart 22 - 23 Adjusting...
Instruction Manual - Page 6

... box) 7. Alternate Thread Cutter 26. Presser foot lifter 17. Thread guide 21. Thread guide 2. Bobbin cover plate 24. Presser foot 29. KNOWING YOUR SEWING MACHINE
MACHINE IDENTIFICATION
1. Handle 12. Power/light switch 14. Automatic needle threader 19. Needle 23. Power line cord 33. Face cover 5. Bobbin winder shaft 8. Needle threader...
Instruction Manual - Page 8
... Foot and will be used for the majority of your sewing. Auxiliary spool pin 4. Spool pin cap (large) 8. Screwdriver for most of your decorative sewing.
1
2
3
4
5
6
7
8
9
10
11
12
13
14
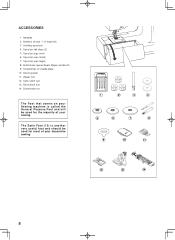
ACCESSORIES
1. Darning plate 11. Buttonhole foot
The Foot that comes on your Sewing machine is another very useful foot and should be used for...
Instruction Manual - Page 10

... moteur/lumière "ON" Interruptor corriente/luz "ON"
10
NOTE: W h e n f o o t c o n t r o l i s disconnected, the machine will not operate until the power/light switch is turned on.
Connect the foot control plug (3) into the cord socket (1) and your machine the first time.
Power line cord/FOOT CONTROL
Connect the plug of the power line cord...
Instruction Manual - Page 12
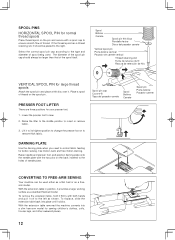
...a flat- With the extension table in position, it clicks. With the extension table removed the machine converts into place until it provides a large working surface as a freearm model. Select the correct... a spool of spool being used either as shown. Lift it .
CONVERTING TO FREE-ARM SEWING
Your machine can be larger than that of the spool pin cap should be placed to the right.
...
Instruction Manual - Page 18

.... Turn the hand wheel toward you until it reaches the eye of plate (2). Thread the machine with your right hand in its highest position.
If you do this simple check:
1.) With... the presser foot raised, pull the thread towards the the back
of the machine. This time you have miss-threaded the
machine and need to re-thread it into the pre-tension guide (2).
* Pull...
Instruction Manual - Page 22
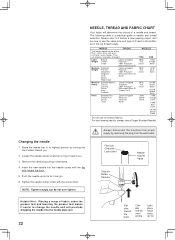
...Raise the needle bar to its highest position by turning it downward. 4. Always disconnect the machine from the wall-outlet. Light- Remove the needle by removing the plug from power supply by... be of fabric under the presser foot and lowering the presser foot makes it before a new sewing project. Batiste Weight Chiffon
Crepe
Medium- The following table is a practical guide to it easier ...
Instruction Manual - Page 24

... largely determined by the balanced tension of both top and bottom) is usually only desireable for straight stitch sewing. Make all adjustments with the foot holder. 3. Place the desired foot on top of the machine. A balanced tension (identical stitches both top and bobbin threads. Push presser foot release button to a higher number or...
Instruction Manual - Page 26
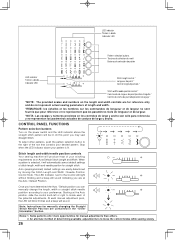
..." Section. Stitch length and width/needle position controls
Your sewing machine will sound. To select other patterns, push the pattern selection button to your pattern is to locate each manual adjustment point, the LED will blink 3 times and a beep will produce most of determining available adjustments is lit. An alternate method of your desired pattern...
Instruction Manual - Page 28
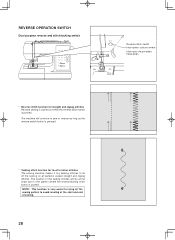
... The sewing machine makes 4 tiny tacking stitches to sew in the pattern where the reverse/tacking stitch button is pushed. The position of the tacking stitches will continue to tie off of sewing.
28...232;re
interruptor de puntadas hacia atrás
* Reverse stitch function for tying off the sewing pattern to avoid raveling at the exact spot in reverse as long as the reverse switch button...
Instruction Manual - Page 32
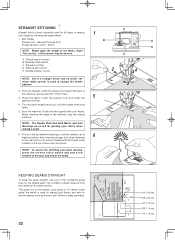
... needle at its center position. NOTE: To secure the stitching and avoid raveling, press the reverse stitch switch and sew a few stitches at the start and end of the material, stop the sewing machine. STRAIGHT STITCHING
A
Straight stitch is most frequently used for guiding your hands. Pull both Metric and Inch Markings as...
Instruction Manual - Page 34
...Helpful Hint: Slight adjusting of the foot. Thread machine with invisible or lightweight thread that needle passes through the opening on the left side of the needle position to sew closer to the ... top. 2. Increase thread tension a little at a time and continue until
you acheive the desired appearance. 4.
When
sewing the machine will pull this thread to the cording. This thread should not show....
Instruction Manual - Page 36
...the bottom depending on the thread, fabric, type of stitch and sewing speed, but the bobbin thread must never appear on the sewing machine.
For the Zigzag Pattern the stitch length is 2 mm and ...fabric. Under side Côté de dessous Reverso
Top side Côté de dessus Cara
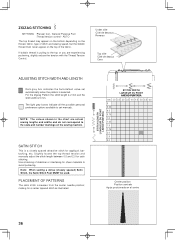
ADJUSTING STITCH WIDTH AND LENGTH
Dark grey box indicates the Auto/default value set manualy. NOTE: The...
Instruction Manual - Page 38
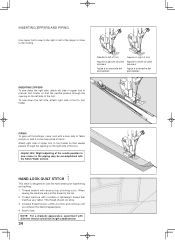
...a small ½" or less hem. It should just pierce the fold of the guide. Sew slowly, guiding the fabric carefully along the edge of the fabric.
Elastic blind stitch for normal.... On fine fabric turn up .
1
2
Medium to sew blind hems. Always make a sewing test first.
4
Top side Cara Endroit
38 B A
4. If it does not,
adjust the guide (B) on the right side of the needle for...
Instruction Manual - Page 40
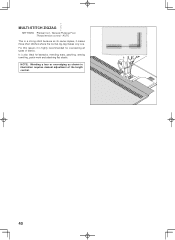
... short stitches where the normal zig-zag makes only one. MULTI-STITCH ZIGZAG
SETTINGS :Presser foot - It is highly recommended for bartacks, mending tears, patching, sewing towelling, patch-work and attaching flat elastic. AUTO
This is a strong stitch because as shown in illustration requires manual...
Instruction Manual - Page 42
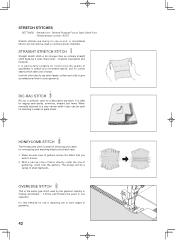
... forms and finishes the seam in stretch and non-stretch fabrics, and for edging neck-bands, armholes, sleeves and hems. When manually adjusted to a very narrow width it locks three times - It is the same type stitch used for a decorative top-stitch. With a narrow strip of fabric directly under the line of...
Instruction Manual - Page 60
... at all purpose" oil as illustrated.
(3)
(4)
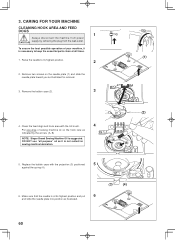
60 CAUTION
To ensure the best possible operation of sewing machine oil on the needle plate (1) and slide the needle plate toward you as illustrated for sewing machine lubrication.
(2)
(A) (B)
5. DO NOT use "all times.
(1)
1. Remove the bobbin case (2).
3
4. Remove two screws on the hook race as indicated by removing...
Instruction Manual - Page 62
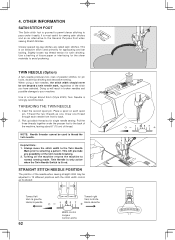
... stitch you have selected. When using a twin-needles, the stitch width should never be adjusted to pass under the presser foot to avoid puckering. Helpful Hints: 1. STRAIGHT STITCH NEEDLE ...backing of the needle when sewing straight stitch may be set beyond a twin needle mark, regardless of parallel stitches for the sheer materials to the back of the machine, leaving about 6" (15 ...
Instruction Manual - Page 64
...too short - Needle thread breaks. * Machine is engaged. - See page 22 - 23. Adjust thread tension (see page 22 -
23). * Machine is being pulled or pushed against machine feeding
action. - Shorten stitch length....60 - 61). * Needle is not raised when sewing stitch patterns.
- See page 18 - 19. * Top thread tension is caught in hook.- Machine jams/knocks. * Thread is too tight. - ...
Instruction Manual - Page 68
...other ).
This appliance complies with the recycling symbol. Replace bulb with this sewing machine only for examination, repair, electrical or mechanical adjustment." 4. "Use this sewing machine. "Do not operate where aerosol (spray) products are being administered." 8. Keep ventilation openings of the sewing machine and foot control free from the electrical outlet when removing covers...
Similar Questions

Singer Confidence 7463 Support - Flashing Lights After All Checks.
When starting to sew, a beep sounds and all the lights begin flashing. I have done all the following...
When starting to sew, a beep sounds and all the lights begin flashing. I have done all the following...
(Posted by RobinMom12 1 year ago)

I Get E7 Error Message On My Singer Model 7258 Sewing Machine. There Is No Refe
Error message E7 is up on my Singer Stylist model 7258 sewing machine. It is not working at all. I t...
Error message E7 is up on my Singer Stylist model 7258 sewing machine. It is not working at all. I t...
(Posted by ebellamybellamy9 5 years ago)

Bobbin Not Winding - 7463 Confidence
I have a brand new machine and following the instructions I have been trying to wind a bobbin, but t...
I have a brand new machine and following the instructions I have been trying to wind a bobbin, but t...
(Posted by advirasp 9 years ago)

On A Singer Confidence Quilting Machine How Do You Attach The Vertical Spool Pin
(Posted by deniseswanton2 9 years ago)

Beeping From Singer Sewing Machine Stylist Ii 5625
My sewing machine will beep and stop sewing after three inches of sewing. I have taken it to be repa...
My sewing machine will beep and stop sewing after three inches of sewing. I have taken it to be repa...
(Posted by arusheria 9 years ago)