Singer 7285Q Patchwork Support Question
Singer 7285Q Patchwork Support Question
Find answers below for this question about Singer 7285Q Patchwork.Need a Singer 7285Q Patchwork manual? We have 1 online manual for this item!
Question posted by irenemusket on May 4th, 2018
Machine Was Working Fine Suddenly Started Going In Reverse,i Cleaned It Oiled
it did manage to get it going but it happened again
Current Answers


Related Singer 7285Q Patchwork Manual Pages
Instruction Manual - Page 2
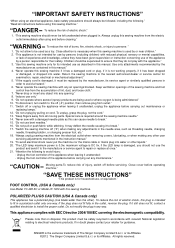
"Read all instructions before cleaning." "WARNING- 7RUHGXFHWKHULVNRI...sewing machine is used by a person responsible for use by persons (including children) with reduced physical, sensory or mental capabilities, or lack of experience and knowledge, unless they do not play with a damaged needle plate as a toy. "To disconnect, turn switch to be used or where oxygen is not working...
Instruction Manual - Page 5
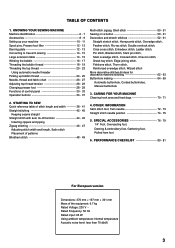
..., Twin needle 72 - 73 Straight stitch needle position 74 - 75
5. CARING FOR YOUR MACHINE Cleaning hook area and feed dogs 70 - 71
4. SPECIAL ACCESSORIES 76 - 79 1/4" Foot, Overcasting foot,
'DUQLQJ HPEURLGHU\IRRW*DWKHULQJIRRW Rolled hem foot
6. STARTING TO SEW Quick reference table of stitch length and width ---------- 38 - 41 Straight stitching 42 - 45...
Instruction Manual - Page 8
... speed control
5
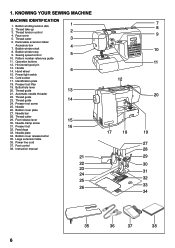
10. Foot release lever
15
30. Power line cord
37. Thread cutter
3
6. Presser foot screw
25. Thread cutter
29. 1. KNOWING YOUR SEWING MACHINE
MACHINE IDENTIFICATION
1. Thread tension control
2
4. Pattern number reference guide
11. Presser foot lifter
19. Buttonhole lever 20. Automatic needle threader
22. Thread guide 23. Needle
26...
Instruction Manual - Page 10
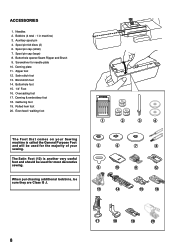
.... 1/4" Foot 16.
When purchasing additional bobbins, be used for the majority of your sewing. Buttonhole opener/Seam Ripper and Brush 9. Zipper foot 12. Rolled hem foot 20.
... 4. ACCESSORIES
1. Needles 2. Blind stitch foot 14. Even feed / walking foot
The Foot that comes on your Sewing machine is another very useful foot and should be sure they are Class I5 J.
1
2
3
4
5
6
7...
Instruction Manual - Page 12
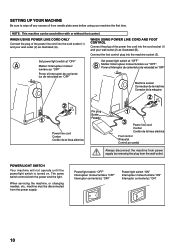
...sur "OFF"
Poner el Interruptor de corriente/ luz de velocidad en "OFF"
0achine socket Connecteur de la machine Conector de la máquina
2
2 1
Pin plug Butée Pasador
Power line cord Cordon Cord...de la linea eléctrica
Foot control Rhéostat Control por pedal
Always disconnect the machine from power supply by removing the plug from the power supply. Power/light switch "OFF" ...
Instruction Manual - Page 14

...be larger than that of needle plate.
12
Raise the lifter to the middle position to insert or remove fabric, and to sew.
2.
Lift it . Place a spool of spool being used. Select the correct spool pin cap according to the type ... Carrete
Spool pin Porte-bobine Pasador carrete
PRESSER FOOT LIFTER
There are three positions for button sewing, free motion work and free motion darning.
Instruction Manual - Page 16
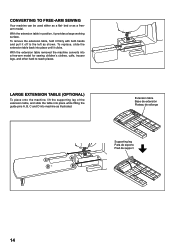
CONVERTING TO FREE-ARM SEWING
Instruction Manual - Page 18
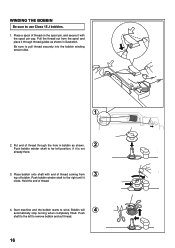
WINDING THE BOBBIN
Be sure to the right until it
clicks. Push bobbin winder shaft to use Class 15 J bobbins.
1. Put end of thread.
4. Start machine and the bobbin starts to pull thread securely into the bobbin winding tension disk.
1
2. Bobbin will
4
automatically stop turning when completely filled. Be sure to wind. Hold the...
Instruction Manual - Page 26
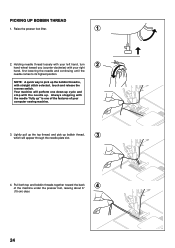
...comes to pick up bobbin thread,
3
which will perform one of the features of the machine under the presser foot, leaving about 6"
4
(15 cm) clear.
24 PICKING UP ...and stop with your computer sewing machine.
3. Your machine will appear through the needle plate slot.
4. Always stopping with straight stitch selected, touch and release the reverse switch. Raise the presser foot...
Instruction Manual - Page 28
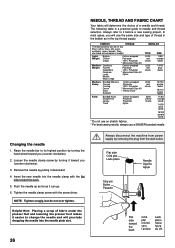
... use on stretch fabrics. * For best sewing results, always use the same size and type of a needle and thread.
FABRICS
THREAD
The fabrics below can go. 6.
Raise the needle bar to it ...Changing the needle
1. Insert the new needle into the needle plate slot.
26
Always disconnect the machine from power supply by turning the hand wheel toward the back
Côté plat orienté...
Instruction Manual - Page 34
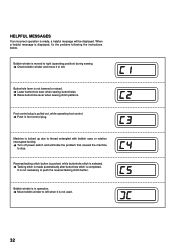
... position) during sewing. ÎCheck bobbin winder and move it to left. It is in foot control plug.
0DFKLQH LV ORFNHG XS GXH WR WKUHDG HQWDQJOHG ZLWK EREELQ FDVH RU URWDWLRQ interrupted forcibly. ÎTurn off power switch and eliminate the problem that caused the machine
to push the reverse/tacking stitch button...
Instruction Manual - Page 36
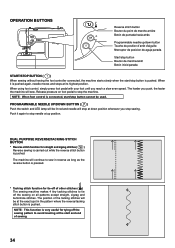
... button Bouton de marche/arrêt Botón inicio/parada
START/STOP BUTTON ( )
When sewing without having the foot controller connected, the machine starts slowly when the start and end of the tacking stitches will stop at the exact spot in reverse as long as the reverse button is pushed. NOTE: This function is pushed again, needle...
Instruction Manual - Page 44
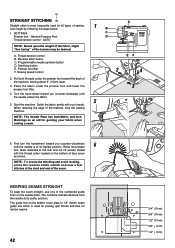
Start/stop the sewing machine. Start the machine.
NOTE: T o secure the stitching and avoid raveling, press the reverse stitch switch and sew a few stitches at the start and end of the seam.
.((3,1*6($06675$,*+7
To keep the seam straight, use one of the tension may be desired. A. Presser foot lifter F. Turn the ...
Instruction Manual - Page 46
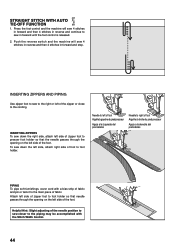
Push the reverse switch and the machine will sew 4 stitches in forward and then 4 stitches in reverse and continue to sew in forward and stop.
INSERTING ZIPPERS To sew down the left side of the zipper or close to left of the foot. Press the foot control and the machine will sew 4 stitches in reverse and then 4 stitches in forward...
Instruction Manual - Page 64
...MACHINE STITCHING
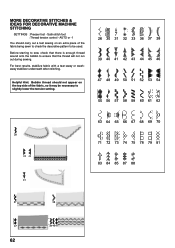
SETTINGS :Presser foot - Satin stitch foot :Thread tension control -
For best results, stabilize fabric with a tear-away or washaway stabilizer underneath when stitching. Helpful Hint: Bobbin thread should carry out a test sewing... out during sewing. AUTO or -1
You should not appear on an extra piece of the fabric, so it may be used. Before starting to sew, check that...
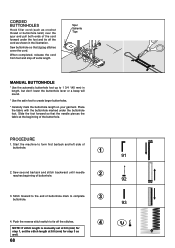
Instruction Manual - Page 68
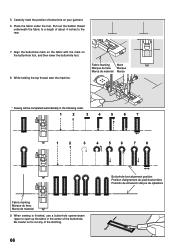
...open up the fabric in the following order.
1
2
3
4
5
6
7
1
2
3
4
5
6
7
8
Fabric marking 0DUTXHGXWLVVX 0DUFDGHPDWHULDO 9.
While holding the top thread, start the machine. Place the fabric under the foot. When sewing is finished, use a buttonhole opener/seam
ripper to a length of the stitching.
66
Buttonhole foot alignment position Position d'alignement du pied...
Instruction Manual - Page 70
Push the reverse stitch switch to complete buttonhole.
3
4.
Slide the foot forward so that zigzag stitches cover the cord. Sew second bartack and stitch backward until needle reaches ...) over the spur and pull both ends of the cord forward under the buttonhole foot. Start the machine to create larger buttonholes.
* Carefully mark the buttonhole length on your garment. Place the ...
Instruction Manual - Page 72

... spring (4). NOTE: Use dry rags to its highest position. 2. Use dry rags to keep sewing machine and footcontroller clean. 3. CARING FOR YOUR MACHINE
CLEANING HOOK AREA AND FEED DOGS
1
Always disconnect the machine from power supply by the arrows. (A, B)
NOTE: SINGER Brand Sewing Machine Oil is suggested. Replace the bobbin case with the lint brush.
4
Put one drop of...
Instruction Manual - Page 78

...Machine Preparation ‡)RU IUHH PRWLRQ HPEURLGHU\ DQG PRQRJUDPV
6HW PDFKLQH
for Zigzag Stitch in the width you are working with. The 1/4-Inch Foot is also perfect for SLHFLQJ TXLOW EORFNV 0DUNLQJV RQ WKH IRRW DOHUW ZKHQ WR SLYRW the fabric. Sewing...6WUDLJKW Stitch. Sew, keeping the fabric's edge even with its edge against the edge guide and start the next ...
Instruction Manual - Page 82
... thread (see page
26 - 27). * Twin needle is being pulled or pushed against machine feeding
action. - Lengthen stitch length. Clean hook (see page 70 - 71). Needle breaks. * Fabric is not raised when sewing stitch patterns.
- Remove lint (see page 70 - 71). Clean hook (see page 28 - 29). * Fabric is damaged.- Stitches are irregular. * Needle...
Similar Questions

Machine Will Not Sew
What does E 7 mean? I do not see this in the manual. My machine will not program.
What does E 7 mean? I do not see this in the manual. My machine will not program.
(Posted by mccourtneyl1791 8 years ago)
Why Won't My Machine Work?
I have to manually force the machine to start sewing with the side wheel. I can have the foot pedal ...
I have to manually force the machine to start sewing with the side wheel. I can have the foot pedal ...
(Posted by Rosepulido 9 years ago)

Zig Zag Stitch.
The maching won't give me a zig zag stitch at all. i've been using it for like 6 months now, and it ...
The maching won't give me a zig zag stitch at all. i've been using it for like 6 months now, and it ...
(Posted by helenaselendrile 9 years ago)

Gives Me A C4 On Machine Went Threw All The Steps To Clear The C4 Nothing Works
(Posted by jaimettesimbeck 9 years ago)

What Else Can Be Done If Ur Machine Keeps Stopping And You Have Already Cleaned
my machine keeps stopping . i have cleaned bobbin carraiage .
my machine keeps stopping . i have cleaned bobbin carraiage .
(Posted by keithgutter 11 years ago)