Singer 7285Q Patchwork Support Question
Singer 7285Q Patchwork Support Question
Find answers below for this question about Singer 7285Q Patchwork.Need a Singer 7285Q Patchwork manual? We have 1 online manual for this item!
Question posted by alicekayball on November 5th, 2014
What Walking Foot Do I Buy For This Machine?
The person who posted this question about this Singer product did not include a detailed explanation. Please use the "Request More Information" button to the right if more details would help you to answer this question.
Current Answers
Answer #1: Posted by TommyKervz on January 25th, 2015 8:37 PM
TommyKervz

Member since:
January 10th, 2013 Points: 17,776,813

Member since:
January 10th, 2013 Points: 17,776,813
See below
http://www.sewingpartsonline.com/singer-7285q-patchwork-parts.aspx
another option is to buy it from an authorised singer dealer
http://webservices.us.vsmgroup.com/DealerLocator.aspx?Brand=Singer&CountryCode=CA
Related Singer 7285Q Patchwork Manual Pages
Instruction Manual - Page 2
... I ¿OLDWHV$OOULJKWVUHVHUYHG "Never drop or insert any maintenance." "To avoid electrical shock never put the machine nor the mains cable or mains plug into water or other ). Unplug the foot controller of the sewing machine and foot
control free from the electrical outlet when removing covers, lubricating, or when making any opening...
Instruction Manual - Page 5
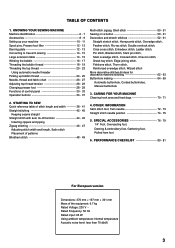
...LGHQWL¿FDWLRQ 6 - 7 Accessories 8 - 9 Setting up your machine 10 - 11 Spool pins, Presser foot lifter 12 - 13 Darning plate 12 - 13 Converting to free-arm sewing 14 - 15 Large extension table 14 - 15 Winding the bobbin 16 - 17 Threading the bobbin thread 18 - 19 Threading the top thread 20 - 23
Using ...
Instruction Manual - Page 8
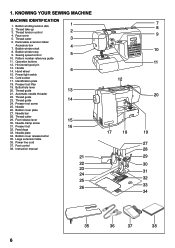
... cutter
29. Needle clamp screw
31. Thread take-up 3. Pattern number reference guide
11. Hand wheel
6
15. Presser foot screw
25. Bobbin winding tension disk
1
2. Cord socket ,GHQWL¿FDWLRQSODWH
18. KNOWING YOUR SEWING MACHINE
MACHINE IDENTIFICATION
1. Thread tension control
2
4. Operation buttons
12. Bobbin winder stop 9. Face cover
5. Feed dogs
33.
Instruction Manual - Page 10
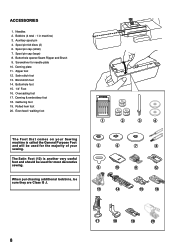
... 2. Bobbins (4 total - 1 in machine) 3. Spool pin felt discs (2) 6. Buttonhole foot 15. 1/4" Foot 16.
Satin stitch foot 13. Overcasting foot 'DUQLQJ HPEURLGHU\IRRW 18. Screwdriver for most decorative sewing. When purchasing additional bobbins, be used for needle plate 10. Even feed / walking foot
The Foot that comes on your sewing.
Auxiliary spool pin 4. Blind...
Instruction Manual - Page 20
...out of the machine under
the presser foot. Replace the ...bobbin cover plate onto the needle plate.
6
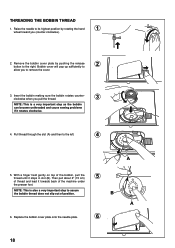
18 THREADING THE BOBBIN THREAD
1. Remove the bobbin cover plate by rotating the hand
1
wheel toward you (counter-clockwise).
2.
Raise the needle to the left.
4
A
5. NOTE: This is a very important step as the bobbin can become unthreaded and cause sewing...
Instruction Manual - Page 26
... is one down-up cycle and stop with the needle up " is , with your computer sewing machine.
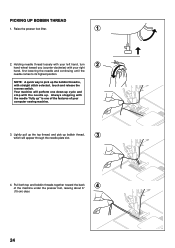
3. Pull both top and bobbin threads together toward you (counter-clockwise) with straight stitch selected...BOBBIN THREAD
1. Holding needle thread loosely with the needle "fully up . Raise the presser foot lifter.
1
2.
Always stopping with your left hand, turn
2
hand wheel toward the back...
Instruction Manual - Page 28
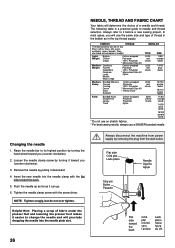
...you will determine the choice of fabric under the presser foot and lowering the presser foot makes it easier to it downward. 4. FABRICS
THREAD
... guide to its highest position by pulling it before a new sewing project. They are listed as in the bobbin as examples of...needle into the needle plate slot.
26
Always disconnect the machine from power supply by turning it can be of weight....
Instruction Manual - Page 30
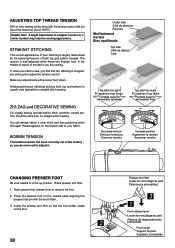
... usually only desirable for straight stitch sewing. ZIG ZAG and DECORATIVE SEWING
For zigzag sewing and decorative stitch functions, thread tension should be done with the foot holder. 3. Place the desired foot on the needle plate aligning the
presser foot pin with the tension control dial (on top of the machine) set at "AUTO" . Lower the presser...
Instruction Manual - Page 34
... interrupted forcibly. ÎTurn off power switch and eliminate the problem that caused the machine
to push the reverse/tacking stitch button. Bobbin winder is not necessary to stop. Foot control plug is moved to right (operating position) during sewing. ÎCheck bobbin winder and move it to left.
Bobbin winder is pulled...
Instruction Manual - Page 36
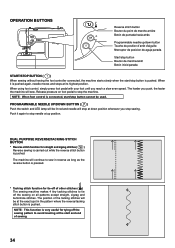
... red and needle will continue to stop the machine. The position of other stitches ( ) The sewing machine makes 4 tiny tacking stitches to tie off of the tacking stitches will sew.
DUAL PURPOSE REVERSE/TACKING STITCH BUTTON
* Reverse stitch function for tie-off the sewing on foot pedal to sew in the pattern where the reverse/tacking stitch...
Instruction Manual - Page 38
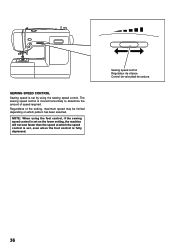
... may be limited depending on the lower setting, the machine will not sew faster than the speed at which pattern has been selected. Regardless of speed required. NOTE: When using the foot control, if the sewing speed control is set by using the sewing speed control.
Sewing speed control Régulateur de vitesse Control de velocidad...
Instruction Manual - Page 44
... and avoid raveling, press the reverse stitch switch and sew a few stitches at its highest position. A. Reverse stitch button C. Presser foot lifter F. Sewing speed control
EF
2
4
2. Turn the hand wheel toward you (counter-clockwise) until the needle is at its center position. Start the machine. When reaching the edge of the tension may be...
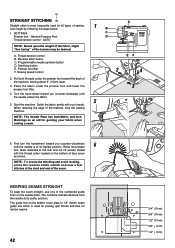
Instruction Manual - Page 46
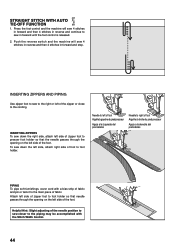
... with the Stitch Width Control.
44
Needle to foot holder.
To sew down the right side, attach left side of zipper foot to sew in forward and stop. INSERTING ZIPPERS To sew down the left side of foot to left of fabric. Press the foot control and the machine will sew 4 stitches in reverse and then 4 stitches in forward...
Instruction Manual - Page 64
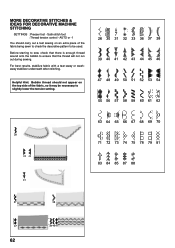
MORE DECORATIVE STITCHES & IDEAS FOR DECORATIVE MACHINE STITCHING
SETTINGS :Presser foot -
For best results, stabilize fabric with a tear-away or washaway stabilizer underneath when stitching. Satin stitch foot :Thread tension control - Before starting to sew, check that there is enough thread wound onto the bobbin to slightly lower the tension setting.
62 AUTO or -1
You...
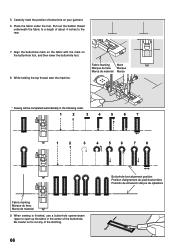
Instruction Manual - Page 66
... A Languette A Lengüeta A
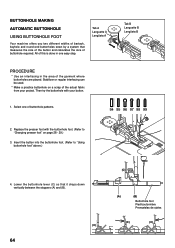
PROCEDURE
* Use an interfacing in one of buttonhole patterns. Tab B Languette B Lengüeta B
2. BUTTONHOLE MAKING
AUTOMATIC BUTTONHOLE
USING BUTTONHOLE FOOT
Your machine offers you two different widths of bartack, keyhole and round end buttonholes sewn by a system that it drops down vertically between the stoppers (A) and (B).
(C)
64...
Instruction Manual - Page 68
... to a length of buttonhole on the buttonhole foot, and then lower the buttonhole foot.
8. While holding the top thread, start the machine. Fabric marking 0DUTXHGXWLVVX 0DUFDGHPDWHULDO
0DUN 0DUTXH 0DUFD
* Sewing will be completed automatically in the center of the stitching.
66
Buttonhole foot alignment position Position d'alignement du pied boutonniè...
Instruction Manual - Page 70
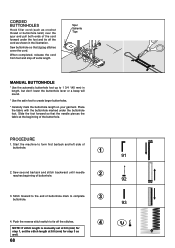
...both ends of the cord forward under the buttonhole foot. Sew second bartack and stitch backward until needle reaches beginning of
buttonhole.
1
2.
...foot to 1 3/4 "(45 mm) in the illustration. Slide the foot forward so that zigzag stitches cover the cord. Start the machine to complete buttonhole.
3
4. Spur Saliente Tige
MANUAL BUTTONHOLE
* Use the automatic buttonhole foot...
Instruction Manual - Page 74
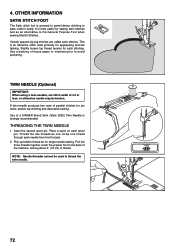
...twin needle.
72 Use a backing of parallel stitches for to pass under the presser foot to the back of the machine, leaving about 6" (15 cm) of a SINGER Brand 3mm (Style 2025) ...most useful for single needle sewing. Thread the two threads as for sewing satin stitches and as an alternative to back.
2.
OTHER INFORMATION
SATIN STITCH FOOT
The Satin stitch foot is strongly recommended. Use...
Instruction Manual - Page 78

... fabric following your fabric under presser foot. 3. 5. Machine Preparation ‡)RU IUHH PRWLRQ HPEURLGHU\ DQG PRQRJUDPV
6HW PDFKLQH
for SLHFLQJ TXLOW EORFNV 0DUNLQJV RQ WKH IRRW DOHUW ZKHQ WR SLYRW the fabric. Do not forget to guide fabric when overcasting. NOTE: For better control when free motion sewing, it is lined up in...
Instruction Manual - Page 80
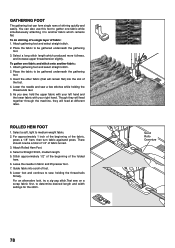
... 1/2" of the beginning of fabric: 1. Lower foot and continue to sew, holding the
thread ends taut. 5. You can form single rows of foot. 8. Place the fabric to determine desired length and width settings for the stitch.
78
Scroll Rollo Ouverture Though they will feed together through the machine, they will feed at different rates...
Similar Questions

Machine Will Not Sew
What does E 7 mean? I do not see this in the manual. My machine will not program.
What does E 7 mean? I do not see this in the manual. My machine will not program.
(Posted by mccourtneyl1791 8 years ago)

Walking Foot
please can you tell me if a walking foot can be used on this machine. im thinking of upgrading and d...
please can you tell me if a walking foot can be used on this machine. im thinking of upgrading and d...
(Posted by ashboxannie 9 years ago)

Walking Foot Problems When Installing
My walking foot seems to be causing me to break needles. I have broken three since I installed it. T...
My walking foot seems to be causing me to break needles. I have broken three since I installed it. T...
(Posted by Lynstunes 9 years ago)

7285q Machine
I have an E7 flashing and machine is frozen what do I do?
I have an E7 flashing and machine is frozen what do I do?
(Posted by Anonymous-134785 10 years ago)
