Singer 7285Q Patchwork Support Question
Singer 7285Q Patchwork Support Question
Find answers below for this question about Singer 7285Q Patchwork.Need a Singer 7285Q Patchwork manual? We have 1 online manual for this item!
Question posted by Anonymous-134785 on April 20th, 2014
7285q Machine
I have an E7 flashing and machine is frozen what do I do?
Current Answers
Related Singer 7285Q Patchwork Manual Pages
Instruction Manual - Page 2
... pulling on cord. To reduce the risk of electric shock, this manual. "This sewing machine should always be followed, including the following to the off („0") position, then ...when making any object into water. "Never operate the sewing machine with this manual." 4. Keep ventilation openings of the sewing machine and foot
control free from the electric outlet immediately after...
Instruction Manual - Page 5
... stitch needle position 74 - 75
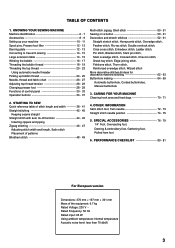
5. TABLE OF CONTENTS
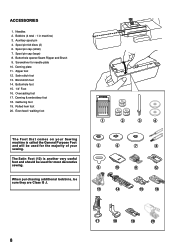
1. SPECIAL ACCESSORIES 76 - 79 1/4" Foot, Overcasting foot,
'DUQLQJ HPEURLGHU\IRRW*DWKHULQJIRRW Rolled hem foot
6. KNOWING YOUR SEWING MACHINE 0DFKLQHLGHQWL¿FDWLRQ 6 - 7 Accessories 8 - 9 Setting up your machine 10 - 11 Spool pins, Presser foot lifter 12 - 13 Darning plate 12 - 13 Converting to free-arm...
Instruction Manual - Page 8
... control
5
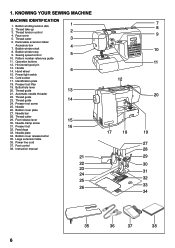
10. Horizontal spool pin
13. Bobbin cover plate
27. Bobbin cover release button
35. Thread guide
13
21. KNOWING YOUR SEWING MACHINE
MACHINE IDENTIFICATION
1. Bobbin winder shaft
8. Handle 14. Face cover
5. Instruction manual
21 22 23 24 25
26
12
17
18
7 8 9
10 11
20
19 27 28 ...
Instruction Manual - Page 10
...) 8. Darning plate 11. Gathering foot 19. The Satin Foot (12) is called the General Purpose Foot and will be used for the majority of your Sewing machine is another very useful foot and should be sure they are Class I5 J.
1
2
3
4
5
6
7
8
9
10
11
12
13
14
15
16
17
18
19
20
8 Spool...
Instruction Manual - Page 16
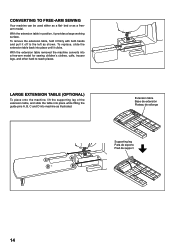
CONVERTING TO FREE-ARM SEWING
Instruction Manual - Page 20
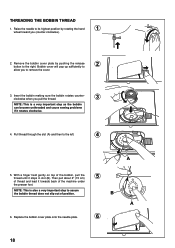
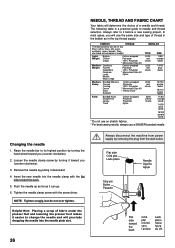
NOTE: This is a very important step as the bobbin can become unthreaded and cause sewing problems if it rotates clockwise.
4.
THREADING THE BOBBIN THREAD
1. Remove the bobbin cover plate by rotating the hand
1
wheel toward you (counter-clockwise).... to assure the bobbin thread does not slip out of the bobbin, pull the thread until it towards back of the machine under
the presser foot.
Instruction Manual - Page 26
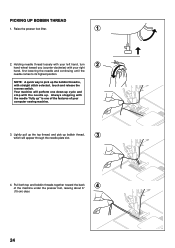
... top and bobbin threads together toward you (counter-clockwise) with the needle "fully up bobbin thread,
3
which will perform one of the features of the machine under the presser foot, leaving about 6"
4
(15 cm) clear.
24 PICKING UP BOBBIN THREAD
1. Your...
Instruction Manual - Page 28
...the screw driver.
Insert the new needle into the needle plate slot.
26
Always disconnect the machine from power supply by removing the plug from the wall-outlet. Helpful Hint: Placing a scrap... the needle clamp screw by turning it easier to its highest position by pulling it before a new sewing project. Tighten the needle clamp screw with the ÀDW
side toward you will use a SINGER...
Instruction Manual - Page 30
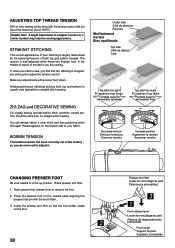
...balanced when these two threads 'lock' in the up position. ZIG ZAG and DECORATIVE SEWING
For zigzag sewing and decorative stitch functions, thread tension should be done with the foot holder. 3. ...on top of the machine) set at "AUTO" .
Raise presser foot lifter. 1. ADJUSTING TOP THREAD TENSION
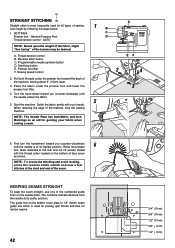
90% of your sewing will be less than for straight stitch sewing. STRAIGHT STITCHING
The correct...
Instruction Manual - Page 32
...del número de puntada
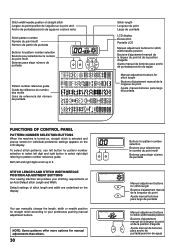
FUNCTIONS OF CONTROL PANEL
PATTERN NUMBER SELECTION BUTTONS
When the machine is turned on, straight stitch is selected and pop-up to 9. Default settings of... on the LCD display.
STITCH LENGTH AND STITCH WIDTH/NEEDLE POSITION ADJUSTMENT BUTTONS
Your sewing machine will produce your preference pushing manual adjustment buttons. Stitch width/needle position of stitch ...
Instruction Manual - Page 34
...LWLVQRWXVHG
32 When a helpful message is moved to right (operating position) during sewing. ÎCheck bobbin winder and move it to left. Foot control plug is in foot ... URWDWLRQ interrupted forcibly. ÎTurn off power switch and eliminate the problem that caused the machine
to push the reverse/tacking stitch button.
Bobbin winder is displayed, fix the problem following the ...
Instruction Manual - Page 36
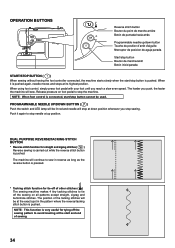
... de marche/arrêt Botón inicio/parada
START/STOP BUTTON ( )
When sewing without having the foot controller connected, the machine starts slowly when the start and end of other stitches ( ) The sewing machine makes 4 tiny tacking stitches to tie off the sewing pattern to avoid raveling at up /down position whenever you reach a slow...
Instruction Manual - Page 38
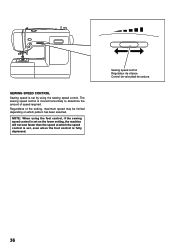
... the foot control, if the sewing speed control is set , even when the foot control is moved horizontally to determine the amount of the setting, maximum speed may be limited depending on which the speed control is set on the lower setting, the machine will not sew faster than the speed at which...
Instruction Manual - Page 44
... the presser foot and lower the
3
presser foot lifter.
4.
SETTINGS
C
Presser foot - General Purpose Foot
D
Thread tension control - Reverse stitch button C. Start the machine. When reaching the edge of sewing.
Let's begin by following the steps below.
1
B
1. Thread tension control B. NOTE: T o secure the stitching and avoid raveling, press the reverse stitch switch...
Instruction Manual - Page 46
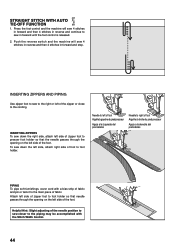
...
Needle to the main piece of the zipper or close to the cording.
Attach left side of the foot. Press the foot control and the machine will sew 4 stitches in reverse and then 4 stitches in forward until the foot control is released.
2.
Instruction Manual - Page 56
...
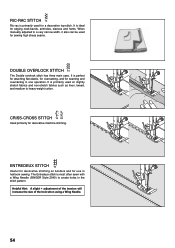
DOUBLE OVERLOCK STITCH
The Double overlock stitch has three main uses. It is primarily used on borders and for use in heirloom sewing. ENTREDEUX STITCH
Useful for edging neck-bands, armholes, sleeves and hems. When manually adjusted to create holes in one operation.... sewn with a Wing Needle (SINGER Style 2040) to a very narrow width, it also can be used for decorative machine stitching.
Instruction Manual - Page 64
...tension control -
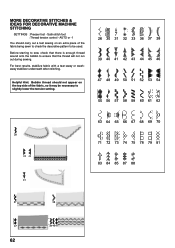
MORE DECORATIVE STITCHES & IDEAS FOR DECORATIVE MACHINE STITCHING
SETTINGS :Presser foot - Helpful Hint: Bobbin thread should carry out a test sewing on the top side of the fabric being sewn ...check the decorative pattern to ensure that the thread will not run out during sewing. Before starting to sew, check that there is enough thread wound onto the bobbin to be necessary...
Instruction Manual - Page 68
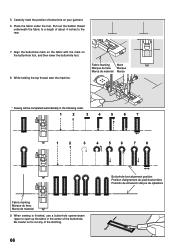
... del pie de ojaladora Fabric marking 0DUTXHGXWLVVX 0DUFDGHPDWHULDO
0DUN 0DUTXH 0DUFD
* Sewing will be completed automatically in the center of about 4 inches to cut any of buttonhole ...rear.
7. Align the buttonhole mark on the fabric with the mark on your garment.
6. 5. When sewing is finished, use a buttonhole opener/seam
ripper to a length of the buttonhole. Pull out the bobbin...
Instruction Manual - Page 70
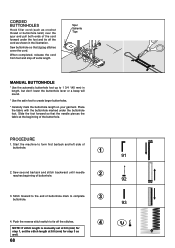
... reaches beginning of buttonhole.
2
3.
Sew buttonhole so that the needle pierces the fabric at 0.8 (mm) for step 3 as shown in length, but don't lower the buttonhole lever or a beep will sound.
* Use the satin foot to form first bartack and left side of
buttonhole.
1
2. Start the machine to create larger buttonholes.
* Carefully...
Instruction Manual - Page 72

... to its highest position. 2. Replace the bobbin case with the lint brush.
4
Put one drop of your machine, it is necessary to remove dust from the wall-outlet. Replace the needle plate.
5
Cleaning the sewing machine and footcontroller
After using, keep the essential parts clean at all purpose" oil as
indicated by removing...
Similar Questions

Where Is The Feed Dog Control On Singer Patchwork 7285q
(Posted by dmssohre 7 months ago)

Problem With My Singer Patchwork 7285q
My machine continues sewing after I have released the foot peddle. Not just for a few stitches but r...
My machine continues sewing after I have released the foot peddle. Not just for a few stitches but r...
(Posted by runner2be 9 years ago)

I Have A Singer Sew Mate What Does Error Message E7 Mean
(Posted by Shehmi 9 years ago)
7285q Patchwork Does Not Pick Up The Bobbin Thread, How Can I Fix?
It worked when I bought it, only used it 2 times, and now I can not get it to pick up the bobbin thr...
It worked when I bought it, only used it 2 times, and now I can not get it to pick up the bobbin thr...
(Posted by dwhiting45 9 years ago)
