Singer 7258 Stylist Support Question
Singer 7258 Stylist Support Question
Find answers below for this question about Singer 7258 Stylist.Need a Singer 7258 Stylist manual? We have 1 online manual for this item!
Question posted by Corriecolter on April 26th, 2016
E4 Error??
I get an E4 error as soon as I turn my machine in. I think something is stuck as the last stitch was decorative. I have taken it apart and cleaned it but nothing is helping!!!
Current Answers
Answer #1: Posted by waelsaidani1 on April 26th, 2016 10:57 PM
waelsaidani1

Member since:
May 12th, 2013 Points: 19,501,797

Member since:
May 12th, 2013 Points: 19,501,797
E4 error.its the bobbin shaft error.first try to clean the bobbin case then turn the machine on for some minutes then turn on and check out.if still the same error then
Check the bobbin winder shaft. If it is pushed over when you try to run the machine you may get the error.adjust it properly.and check out.
if still the same problem the bobbin shaft needs to be replaced.as its slipping out.
Check the bobbin winder shaft. If it is pushed over when you try to run the machine you may get the error.adjust it properly.and check out.
if still the same problem the bobbin shaft needs to be replaced.as its slipping out.
Answer #2: Posted by hermit75 on August 14th, 2020 10:40 AM
hermit75

Member since:
August 14th, 2020 Points: 0
Member since:
August 14th, 2020 Points: 0
I have a Singer Patchwork 7285Q. I bought it several years ago and have only used it once for a couple of hours when I first purchased it. Now, when I turned it on, I got an E4 error code. I did everything I could think of: reinserted the needle, cleaned out the bobbin case and reinserted the bobbin, rethreaded the top thread, turned the machine off and on, etc. Nothing made the E4 error code go away. I put the machine back in its box and fumed for a week, debating whether it was even worth paying for the repair, assuming it would be costly.
I got the machine out of its box again today. When I first turn the machine on, the computer screen looks normal for a second, then reverts to the E4 code. When I manually moved the needle up and down, I noticed there was a bit of a clicking sound. I laid the machine on its back to have better access to the needle. I removed the needle, reinserted it, and pushed the needle around manually several times. I turned it on and the error code is gone! To be sure, I turned it off again, turned it back on and sewed a seam. No more error code. Try this before you pay for a repair
I got the machine out of its box again today. When I first turn the machine on, the computer screen looks normal for a second, then reverts to the E4 code. When I manually moved the needle up and down, I noticed there was a bit of a clicking sound. I laid the machine on its back to have better access to the needle. I removed the needle, reinserted it, and pushed the needle around manually several times. I turned it on and the error code is gone! To be sure, I turned it off again, turned it back on and sewed a seam. No more error code. Try this before you pay for a repair
Related Singer 7258 Stylist Manual Pages
Instruction Manual - Page 3
... YOUR MACHINE Cleaning hook area and feed dogs 70 - 71
4. PERFORMANCE CHECKLIST 80 - 81
For European version
Dimensions: 376 mm × 197 mm × 301 mm Mass of patterns Blindhem stitch 48 - 49
Multi-stitch zigzag, Shell stitch 50 - 51 Sewing on a button 50 - 51 Decorative and stretch stitches 52 - 61
Straight stretch stitch, Honeycomb stitch, Overedge stitch, Feather stitch, Ric...
Instruction Manual - Page 6
...15. Presser foot screw
25. Needle clamp screw
31. Automatic needle threader
22. Thread guide
14
24. Bobbin cover plate
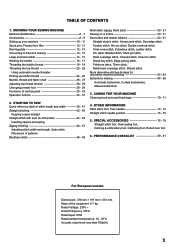
27. Handle 14. 1. KNOWING YOUR SEWING MACHINE
MACHINE IDENTIFICATION
1. Bobbin winding tension disk
1
2. Thread tension control
2
4. Face cover 5. Removable extension table/
Accessory box
4
7. Pattern number reference guide
11. Horizontal spool pin
13...
Instruction Manual - Page 8
...
16
17
18
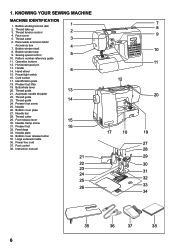
8 When purchasing additional bobbins, be used for needle plate 10. Satin stitch foot 13. Zipper foot 12. Spool pin cap (large) 8. ACCESSORIES
1. Auxiliary spool pin 4. Spool pin cap (small) 7. The Satin Foot (12) is called the General Purpose Foot and will be used for most decorative sewing.
Bobbins (4 total - 1 in machine) 3.
Instruction Manual - Page 14
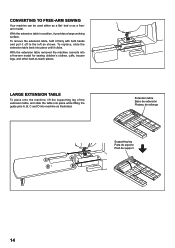
... supporting leg of the extension table, and slide the table into place while fitting the guide pins A, B, C and D into machine as a freearm model. bed or as illustrated. CONVERTING TO FREE-ARM SEWING
Your machine can be used either as shown.
To remove the extension table, hold it firmly with both hands and pull...
Instruction Manual - Page 18
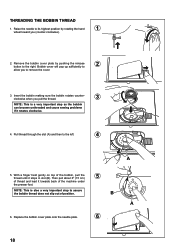
NOTE: This is a very important step as the bobbin can become unthreaded and cause sewing problems if it stops in slot (B). Replace the bobbin cover plate onto the needle plate.
6
18 Raise the needle to its... of position. Pull thread through the slot (A) and then to assure the bobbin thread does not slip out of the machine under
the presser foot.
THREADING THE BOBBIN THREAD
1.
Instruction Manual - Page 22
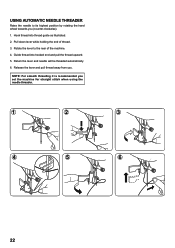
... end and pull the thread upward.
5. Guide thread into thread guide as illustrated.
2. Release the lever and pull thread away from you set the machine for straight stitch when using the needle threader.
1
2
3
4
5
6
22 Rotate the lever to its highest position by rotating the hand wheel towards you (counter-clockwise).
1. Pull down...
Instruction Manual - Page 24

Always stopping with your computer sewing machine.
3. Holding needle thread loosely with your left hand, turn
2
hand wheel toward the back of your ...stitch selected, touch and release the reverse switch. Raise the presser foot lifter.
1
2.
Pull both top and bobbin threads together toward you (counter-clockwise) with the needle "fully up" is , with the needle up. Your machine ...
Instruction Manual - Page 26
...into the needle plate slot.
26
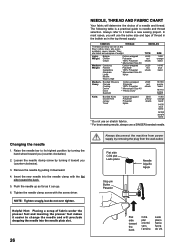
Always disconnect the machine from the wall-outlet. NOTE: Tighten snugly, but... the needle clamp with the screw driver.
Helpful Hint: Placing a scrap of weight. Flat... clamp screw by pulling it before a new sewing project. They are listed as in the bobbin...removing the plug from power supply by turning the hand wheel toward you (counter-clockwise...
Instruction Manual - Page 28
...when you start to sew, you find that the foot holder snaps
on top of the machine) set at "AUTO" . You will always obtain a nicer stitch and less puckering when... need to adjust the tension control. ZIG ZAG and DECORATIVE SEWING
For zigzag sewing and decorative stitch functions, thread tension should be done with presser foot 'down'.
Helpful Hint: A slight adjustment to remove the foot. ...
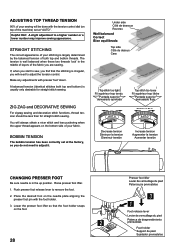
Instruction Manual - Page 30
...
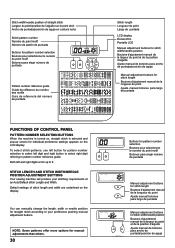
PATTERN NUMBER SELECTION BUTTONS
When the machine is turned on, straight stitch is selected and pop-up to pattern number reference guide. You can manually change the length, width or needle position for individual preference settings appears on the display. STITCH LENGTH AND STITCH WIDTH/NEEDLE POSITION ADJUSTMENT BUTTONS
Your sewing machine will produce your preference pushing...
Instruction Manual - Page 32
...winder to left . Reverse/tacking stitch button is pushed, while buttonhole stitch is selected. Tacking stitch is not necessary to stop. It is made , a helpful message will be displayed. When a helpful message is not lowered or raised. Lower buttonhole lever when sewing buttonholes. Raise buttonhole lever when sewing stitch patterns.
Machine is moved to left when...
Instruction Manual - Page 34
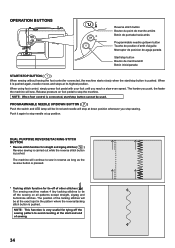
..., simply press foot pedal with your foot until you stop button is connected, start and end of other stitches ( ) The sewing machine makes 4 tiny tacking stitches to stop needle at its highest position. OPERATION BUTTONS
Reverse stitch button Bouton du point de marche arrière Botón de puntada hacia atrás
Programmable needle...
Instruction Manual - Page 36
... the amount of the setting, maximum speed may be limited depending on the lower setting, the machine will not sew faster than the speed at which pattern has been selected. NOTE: When using the foot control, if the sewing speed control is set on which the speed control is set by using the...
Instruction Manual - Page 42
...needle at its center position. Presser foot lifter F. Start the machine. First turn the handwheel toward you (counter-clockwise) until the needle is ...sewing machine. General Purpose Foot
D
Thread tension control - NOTE: To secure the stitching and avoid raveling, press the reverse stitch switch and sew a few stitches at the start and end of sewing. STRAIGHT STITCHING
A
Straight stitch...
Instruction Manual - Page 44
...Stitch Width Control.
44 Press the foot control and the machine will sew 4 stitches in reverse and then 4 stitches in forward and stop. Push the reverse switch and the machine will sew 4 stitches in forward and then 4 stitches... foot to sew to the right or left side of foot to sew in reverse and continue to foot holder. STRAIGHT STITCH WITH AUTO TIE-OFF FUNCTION
1. Helpful Hint: Slight...
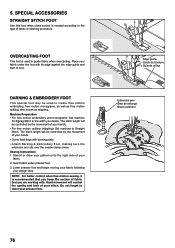
Instruction Manual - Page 54
... in heirloom sewing. ENTREDEUX STITCH
Useful for decorative stitching on slightly stretch fabrics and non-stretch fabrics such as linen, tweed, and medium to create holes in the stitch pattern. It is perfect for attaching flat elastic, for overcasting, and for sewing high stress seams.
DOUBLE OVERLOCK STITCH
The Double overlock stitch has three main uses. Helpful Hint: A slight...
Instruction Manual - Page 62
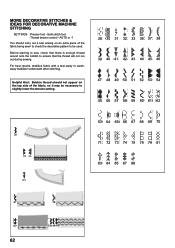
... appear on an extra piece of the fabric, so it may be used. Before starting to sew, check that the thread will not run out during sewing. MORE DECORATIVE STITCHES & IDEAS FOR DECORATIVE MACHINE STITCHING
SETTINGS :Presser foot - Helpful Hint: Bobbin thread should carry out a test sewing on the top side of the fabric being sewn to check the...
Instruction Manual - Page 70
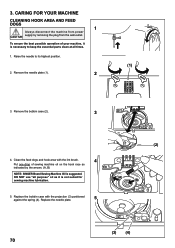
... plate.
5
(2)
(A) (B)
(3) (4)
70 Remove the needle plate (1).
(1)
2
3. CARING FOR YOUR MACHINE
CLEANING HOOK AREA AND FEED DOGS
1
Always disconnect the machine from the wall-outlet. To ensure the best possible operation of sewing machine oil on the hook race as it is not suited for sewing machine lubrication.
5. Clean the feed dogs and hook area with the projection (3) positioned...
Instruction Manual - Page 76
... the width you hoop the section of your hands. • For free motion quilting (stippling): Set machine to the type of your pattern onto the right side of fabric or stitching procedure. Sewing Instructions 1. Insert fabric under the foot with darning plate. • Attach Darning & Embroidery Foot, making sure the extension arm sits...
Instruction Manual - Page 84
Always unplug this sewing machine. "Always unplug before cleaning."
2. Replace bulb with this sewing machine from the electric outlet immediately after using and before replacing light bulb. To reduce the risk of lint, dust, and loose cloth." 5. Close attention is necessary when this sewing machine is for guidance. Return the sewing machine to the nearest authorized dealer or service ...
Similar Questions


I Get E7 Error Message On My Singer Model 7258 Sewing Machine. There Is No Refe
Error message E7 is up on my Singer Stylist model 7258 sewing machine. It is not working at all. I t...
Error message E7 is up on my Singer Stylist model 7258 sewing machine. It is not working at all. I t...
(Posted by ebellamybellamy9 5 years ago)

Beeping From Singer Sewing Machine Stylist Ii 5625
My sewing machine will beep and stop sewing after three inches of sewing. I have taken it to be repa...
My sewing machine will beep and stop sewing after three inches of sewing. I have taken it to be repa...
(Posted by arusheria 9 years ago)

I Need An Extnesion Table For My Sewing Machine Singer 7258 Stylist
(Posted by loucksd 10 years ago)
