Singer 5625 Stylist II Sewing Machine Support Question
Singer 5625 Stylist II Sewing Machine Support Question
Find answers below for this question about Singer 5625 Stylist II Sewing Machine.Need a Singer 5625 Stylist II Sewing Machine manual? We have 1 online manual for this item!
Question posted by Anonymous-111280 on May 14th, 2013
How To Enlarge A Word
The person who posted this question about this Singer product did not include a detailed explanation. Please use the "Request More Information" button to the right if more details would help you to answer this question.
Current Answers
Answer #1: Posted by TommyKervz on May 14th, 2013 11:30 AM
TommyKervz

Member since:
January 10th, 2013 Points: 17,776,803

Member since:
January 10th, 2013 Points: 17,776,803
Greetings - Try
> Going to Edit Menu
> Select All
> Drag the Outline border tabs to the size you want
Alternatively
> Right click on the design
> This will bring the design's properties
> Type in the size you want
Hope this helps
Related Singer 5625 Stylist II Sewing Machine Manual Pages
Instruction Manual - Page 2
... where aerosol (spray) products are being used or where oxygen is used as this sewing machine. "Attention the following ."
This appliance complies with relevant National legislation relating to fit ...outlet only one blade wider than the other user
servicing adjustments mentioned in this sewing machine from the accumulation of The Singer Company Limited or its affiliates. ©...
Instruction Manual - Page 5
... - 33
2. TABLE OF CONTENTS
1. OTHER INFORMATION Satin stitch foot, Twin needle 82 - 83 Straight stitch needle position 84 - 85
5. PERFORMANCE CHECKLIST 86 - 87
6. KNOWING YOUR SEWING MACHINE Machine identification 6 - 7 Accessories 8 - 9 Setting up your machine 10 - 11 Spool pins, Presser foot lifter 12 - 13 Feed dog control 12 - 13 Converting to...
Instruction Manual - Page 8

KNOWING YOUR SEWING MACHINE
MACHINE IDENTIFICATION
1. Thread cutter/holder 7. Bobbin winder shaft 9. Horizontal spool pin 12. Presser foot lifter 18. Needle bar 26. Alternate thread cutter 27. General purpose foot ...
Instruction Manual - Page 10

...) is another very useful foot and should be used for the majority of your Sewing machine is called the General Purpose Foot and will be sure they are Class I5 J.
1
...7
8
9
10
11
12
13
14
15
OPTIONAL ACCESSORIES
16. Circular sewing attachment 14. Wing needles
The Foot that comes on your sewing.
Cording foot 21. Twin needles 15. ACCESSORIES
1. Spool pin cap (...
Instruction Manual - Page 14
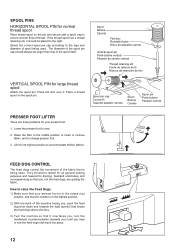
...2) With the back of spool being sewn. They should always be raised for all general sewing purposes and lowered for normal thread spool
Place thread spool on the spool pin. Select the ... counterclockwise (towards the right (symbol that shows the feed dogs above the line).
3) Turn the machine so that it to its highest position to ensure smooth flow of the spool itself.
SPOOL PINS
...
Instruction Manual - Page 16

..., cuffs, trouser legs, and other difficult to the left as shown. With the extension table removed the machine converts into place until it provides a large working surface as a freearm model. CONVERTING TO FREE-ARM SEWING
Your machine can be used either as a flat-bed or as a standard flat-bed model. With the extension...
Instruction Manual - Page 26
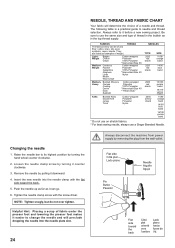
... can go. 6.
Insert the new needle into the needle plate slot.
24
Always disconnect the machine from power supply by turning it easier to change the needle and will determine the choice of ... band 14/90
blue band 16/100 purple band
* Do not use on stretch fabrics. * For best sewing results, always use the same size and type of thread in the top thread supply. Loosen the needle clamp...
Instruction Manual - Page 28
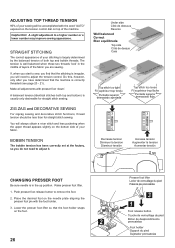
...number or a lower number may improve sewing appearance. ZIG ZAG and DECORATIVE SEWING
For zigzag sewing and decorative stitch functions, thread tension should be accomplished with the word "AUTO" exposed on the tension control...two threads 'lock' in the up position.
Lower the presser foot lifter so that the machine is correctly threaded (see page 20 - 21). You will need to remove the foot....
Instruction Manual - Page 30
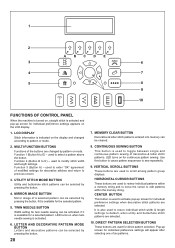
... to activate pop-up screen for a selected pattern. CONTINUOUS SEWING BUTTON
This button is used to toggle between single and continuous pattern sewing of the buttons are used to scroll among pattern group displays. 1
2
A BC DE
3
6
4
7
5
8
9
10
FUNCTIONS OF CONTROL PANEL
When the machine is turned on, straight stitch is selected and pop...
Instruction Manual - Page 32
... depressed, while no pattern is lowered. Raise buttonhole lever.
30 11
12
11. Bobbin winder is made, the sewing machine will not operate with beep sound and an error message will stop sewing. When sewing patterns, buttonhole lever is selected. Select a pattern.
2. Push it to stop needle at down position whenever you...
Instruction Manual - Page 34

... hacia atrás
* Reverse stitch function for straight and zigzag stitches ( ) Reverse sewing is carried out while the reverse stitch button is very useful for tie-off of other stitches ( ) The sewing machine makes 4 tiny tacking stitches to tie off the sewing pattern to avoid raveling at the exact spot in reverse as long...
Instruction Manual - Page 36
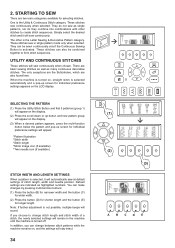
... it will sound. You can be combined together to change between stitch patterns while the machine remains on , straight stitch is selected, it will sew continuously when chosen. UTILITY AND CONTINUOUS STITCHES
These stitches will sew continuously. Default settings are basic sewing stitches as well as many continuous decorative stitches. One is the Letter...
Instruction Manual - Page 38
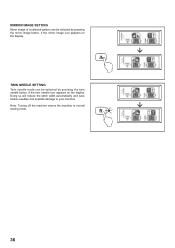
... broken needles and possible damage to normal sewing mode.
36 TWIN NEEDLE SETTING
Twin needle mode can be selected by pressing the mirror image button, if the mirror image icon appears on the display. Note: Turning off the machine returns the machine to your machine. MIRROR IMAGE SETTING
Mirror image of a selected...
Instruction Manual - Page 42
... the needle enters the fabric.
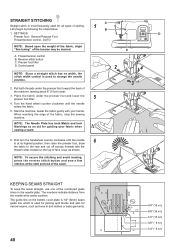
5. NOTE: To secure the stitching and avoid raveling, press the reverse stitch button and sew a few stitches at the start and end of the fabric, stop the sewing machine. The numbers indicate distance from the needle at its center position. STRAIGHT STITCHING
A
Straight stitch is used to the...
Instruction Manual - Page 44
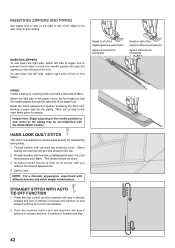
... the top. 2. NOTE: For a dramatic appearance, experiment with desired top stitching color.
When
sewing the machine will pull this thread to look like hand sewing for topstitching and quilting. 1. Start to sew forward until you
acheive the desired appearance. 4. To sew down the right side, attach left side of zipper foot to presser foot holder...
Instruction Manual - Page 46
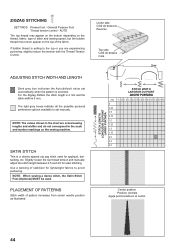
... Satin Stitch Foot (Optional) MUST be used for appliqué, bartacking, etc. PLACEMENT OF PATTERNS
Stitch width of stitch and sewing speed, but the bobbin thread must never appear on the sewing machine. General Purpose Foot :Thread tension control - SATIN STITCH
This is 5 mm. Slightly loosen the top thread tension and manually adjust...
Instruction Manual - Page 64

... into the buttonhole foot. (Refer to "Changing presser foot" on a scrap of the garment where buttonholes are using. Select one of buttonhole required. SEWING A BUTTONHOLE USING BUTTONHOLE FOOT
Your machine offers you are placed. tab A Languette A Lengüeta A
tab B Languette B Lengüeta B
PROCEDURE
* Use an interfacing in the area of...
Instruction Manual - Page 66
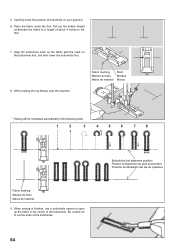
... the top thread, start the machine. Be careful not to the rear.
7. Fabric marking Marque du tissu Marca de material
mark Marque Marca
* Sewing will be completed automatically in the...center of the buttonhole. Align the buttonhole mark on the fabric with the mark on your garment.
6. When sewing is finished, use a buttonhole opener to open up the fabric in the following order.
1
2
3
...
Instruction Manual - Page 70
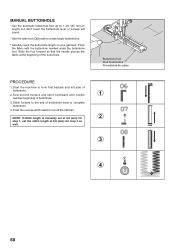
... the foot forward so that the needle pierces the fabric at 0.8 (mm) for step 3 as
well.
3
4
68 Sew second bartack and stitch backward until needle
1
reaches beginning of buttonhole mark to complete buttonhole.
4.
MANUAL BUTTONHOLE
* Use the ... set at 0.8 (mm) for
2
step 1, set the stitch length at the beginning of
buttonhole. 2. Start the machine to the end of buttonhole.
3.
Instruction Manual - Page 76
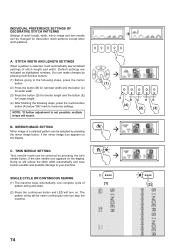
...
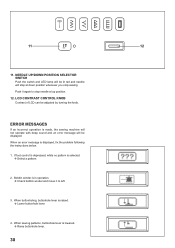
Settings of stitch length, width, mirror image and twin needle can be sewn continuously until you stop the machine.
(1)
A
BC DE
(4)
(2)
(3)
(1)
(2)
74
SINGLE CYCLE OR CONTINUOUS SEWING
(1) The machine sews automatically one complete cycle of stitch length and width. Default settings are indicated as highlighted numbers. C. The pattern...
Similar Questions

Beeping From Singer Sewing Machine Stylist Ii 5625
My sewing machine will beep and stop sewing after three inches of sewing. I have taken it to be repa...
My sewing machine will beep and stop sewing after three inches of sewing. I have taken it to be repa...
(Posted by arusheria 9 years ago)


I Need An Extnesion Table For My Sewing Machine Singer 7258 Stylist
(Posted by loucksd 10 years ago)
