Singer 5625 Stylist II Sewing Machine Support Question
Singer 5625 Stylist II Sewing Machine Support Question
Find answers below for this question about Singer 5625 Stylist II Sewing Machine.Need a Singer 5625 Stylist II Sewing Machine manual? We have 1 online manual for this item!
Question posted by Anonymous-111280 on May 14th, 2013
How Do I Enlarge A Word?
The person who posted this question about this Singer product did not include a detailed explanation. Please use the "Request More Information" button to the right if more details would help you to answer this question.
Current Answers
Related Singer 5625 Stylist II Sewing Machine Manual Pages
Instruction Manual - Page 2
... product is damaged, you should not use only." 9. If it unattended: -
This appliance complies with the appliance." 3. "IMPORTANT SAFETY INSTRUCTIONS"
"When using this sewing machine."
"This sewing machine should never be used by the manufacturer, its affiliates.
"WARNING- "Do not allow to electrical/ electronic products. "If the supply cord is intended...
Instruction Manual - Page 5
... Cleaning hook area and feed dogs 80 - 81
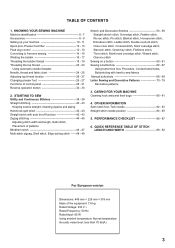
4. KNOWING YOUR SEWING MACHINE Machine identification 6 - 7 Accessories 8 - 9 Setting up your machine 10 - 11 Spool pins, Presser foot lifter 12 - 13 Feed dog control 12 - 13 Converting to -sew fabrics Manual buttonhole 68 - 69 Letter Sewing and Decorative Patterns 70 - 79 Decorative patterns
3. PERFORMANCE CHECKLIST 86 - 87
6. QUICK REFERENCE...
Instruction Manual - Page 8

...
6 Extension table (Accessory box) 8. Feed dogs 31. Face cover 6. Presser foot lifter 18. Bobbin cover plate 25. Power/light switch 15. Handle 13. KNOWING YOUR SEWING MACHINE
MACHINE IDENTIFICATION
1. Needle plate 32.
Instruction Manual - Page 10

... 11.
Quarter-Inch foot 20. Spool pin felt discs (2) 5. Spool pin cap (small) 7. Circular sewing attachment 14. Ruffler foot 17. Pintuck foot 25. Auxiliary spool pin 4. Spool pin cap (mini) 6. Screwdriver for the majority of your Sewing machine is another very useful foot and should be used for needle plate 10. When purchasing...
Instruction Manual - Page 14
... down and towards the right (symbol that shows the feed dogs above the line).
3) Turn the machine so that you hear or see the feed dogs click back into place.
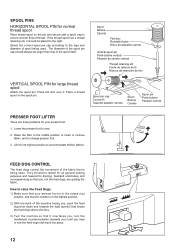
12 How to raise the...and diameter of the spool itself.
Place a thread spool on the pin and secure with a spool cap to sew.
2. Lift it to its highest position to change presser foot.
3.
Select the correct spool pin cap according to...
Instruction Manual - Page 16

... table in position, it provides a large working surface as a freearm model. CONVERTING TO FREE-ARM SEWING
Your machine can be used either as a flat-bed or as a standard flat-bed model. With the extension table removed the machine converts into place until it off to reach places.
14 To replace, slide the extension...
Instruction Manual - Page 26
... wall-outlet. Insert the new needle into the needle plate slot.
24
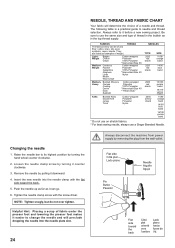
Always disconnect the machine from power supply by turning it can be of fabric under the presser foot and lowering the presser foot... band 14/90
blue band 16/100 purple band
* Do not use on stretch fabrics. * For best sewing results, always use the same size and type of weight. Flat side Côté plat Lado plano
Pin...
Instruction Manual - Page 28
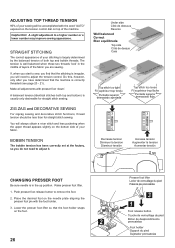
... adjust the tension control. ZIG ZAG and DECORATIVE SEWING
For zigzag sewing and decorative stitch functions, thread tension should be accomplished with the word "AUTO" exposed on the tension control dial on...only desireable for straight stitch sewing. The tension is in the middle of layers of the machine.
Lower the presser foot lifter so that the machine is correctly threaded (see page...
Instruction Manual - Page 30
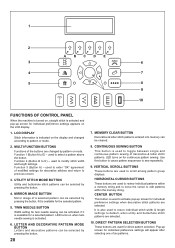
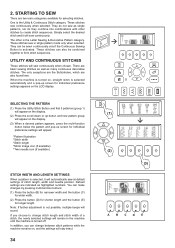
... patterns are selected. Function 2 (Button B to E) - Function 3 (Button A) - CONTINUOUS SEWING BUTTON
This button is used to pattern or mode.
2.
DIRECT PATTERN SELECTION BUTTONS
These buttons are ...
2
A BC DE
3
6
4
7
5
8
9
10
FUNCTIONS OF CONTROL PANEL
When the machine is turned on, straight stitch is selected and pop-up screen for individual preference settings appears on the...
Instruction Manual - Page 32
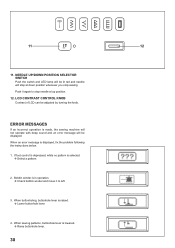
... can be displayed. Bobbin winder is made, the sewing machine will not operate with beep sound and an error message will stop sewing. Push it to stop needle at down position whenever...operation is in operation. Check bobbin winder and move it again to left.
3. When sewing patterns, buttonhole lever is raised. Lower buttonhole lever.
4. N EEDLE UP/DOWN POSITION ...
Instruction Manual - Page 34

... avoid raveling at the exact spot in reverse as long as the reverse button is pushed. The machine will be at the start and end of other stitches ( ) The sewing machine makes 4 tiny tacking stitches to sew in the pattern where the reverse/tacking stitch button is pushed.
The position of the tacking stitches...
Instruction Manual - Page 36
...button (D) for shorter length and the button (E)
for selecting stitches. These stitches sew in the machine until the machine is selected, it will appear:
*Pattern illustration *Stitch width *Stitch length *... available)
STITCH WIDTH AND LENGTH SETTINGS
When a pattern is turned off. When the machine is turned on, straight stitch is selected automatically and a pop-up screen for individual...
Instruction Manual - Page 38
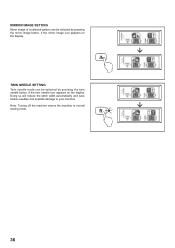
... broken needles and possible damage to normal sewing mode.
36 TWIN NEEDLE SETTING
Twin needle mode can be selected by pressing the mirror image button, if the mirror image icon appears on the display.
Note: Turning off the machine returns the machine to your machine. MIRROR IMAGE SETTING
Mirror image of a selected...
Instruction Manual - Page 42
... the edge of the tension may be desired. AUTO
NOTE: Based upon the weight of the fabric, slight "fine tuning" of the fabric, stop the sewing machine. Thread tension control B. Pull both Metric and Inch Markings as those in doll clothes or baby garments.
40
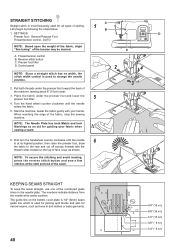
3/4" (19 mm) 5/8" (16 mm) 1/2" (13 mm) 3/8" ( 9 mm...
Instruction Manual - Page 44
... the Stitch Width Control.
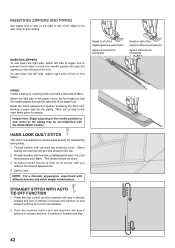
HAND-LOOK QUILT STITCH
This stitch is designed to sew forward until you
acheive the desired appearance. 4. When
sewing the machine will sew 4 stitches in reverse and then 4 stitches in reverse and continue to look like hand sewing for the piping. NOTE: For a dramatic appearance, experiment with desired top stitching color...
Instruction Manual - Page 46
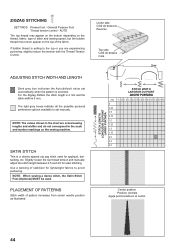
... experiencing puckering, slightly reduce the tension with the Thread Tension Control. PLACEMENT OF PATTERNS
Stitch width of stitch and sewing speed, but the bobbin thread must never appear on the sewing machine.
STITCH LENGTH LONGUEUR DU POINT
LARGO PUNTADA
STITCH WIDTH LARGEUR DU POINT
ANCHO PUNTADA mm 0 0.5 1.0 1.5 2.0 2.5 3.0 3.5 4.0 4.5 5.0 5.5 6.0 0 0.25 0.5 0.75 1.0 1.25 1.5 1.75...
Instruction Manual - Page 64

SEWING A BUTTONHOLE USING BUTTONHOLE FOOT
Your machine offers you are placed. Stabilizer or regular interfacing can be used.
* Make a practice buttonhole on page 26 - 27.)
3. Insert the button into the buttonhole foot. (...
Instruction Manual - Page 66
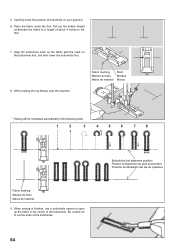
...Align the buttonhole mark on the fabric with the mark on your garment.
6. When sewing is finished, use a buttonhole opener to cut the ends of the buttonhole. Fabric marking Marque...boutonnière Posición de alineación del pie de ojaladora While holding the top thread, start the machine. Place the fabric under the foot. 5. Be careful not to open up the fabric in the following order....
Instruction Manual - Page 70
...or a beep will sound.
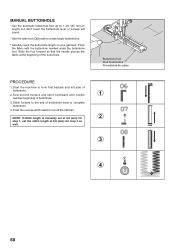
* Use the satin foot (Optional) to tie off the stitches. Sew second bartack and stitch backward until needle
1
reaches beginning of buttonhole mark to complete buttonhole.
4.
...pierces the fabric at 0.8 (mm) for step 3 as
well.
3
4
68 Start the machine to the end of buttonhole.
3.
Push the reverse stitch switch to create larger buttonholes.
* Carefully...
Instruction Manual - Page 76
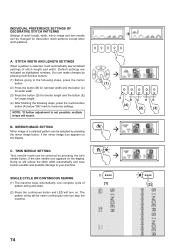
... CYCLE OR CONTINUOUS SEWING
(1) The machine sews automatically one complete cycle of pattern string and stops.
(2) Press the continuous button and LED will automatically sew at default settings of...numbers. MIRROR IMAGE SETTING
Mirror image of a selected pattern can be sewn continuously until you stop the machine.
(1)
A
BC DE
(4)
(2)
(3)
(1)
(2)
74 ...
Similar Questions

Beeping From Singer Sewing Machine Stylist Ii 5625
My sewing machine will beep and stop sewing after three inches of sewing. I have taken it to be repa...
My sewing machine will beep and stop sewing after three inches of sewing. I have taken it to be repa...
(Posted by arusheria 9 years ago)


I Need An Extnesion Table For My Sewing Machine Singer 7258 Stylist
(Posted by loucksd 10 years ago)
