Singer 5523 SCHOLASTIC Support Question
Singer 5523 SCHOLASTIC Support Question
Find answers below for this question about Singer 5523 SCHOLASTIC.Need a Singer 5523 SCHOLASTIC manual? We have 1 online manual for this item!
Question posted by Fmkangas on October 9th, 2014
Automatic Needle Threaded
I'm having a hard time threading my Singer 5523. Could you please show me step by step on how the automatic threader works?
Current Answers
Related Singer 5523 SCHOLASTIC Manual Pages
Instruction Manual - Page 2
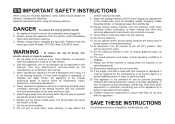
...sewing machine. Switch the sewing machine off ("O") when making any opening. 12. Do not use bent needles. 8.
SAVE THESE INSTRUCTIONS
This sewing machine... children) with foot controller is not working properly, if it to break. 7....threading needle, changing needle, threading bobbin, or changing presser foot, and the like. 10. Always use only.
It may deflect the
needle...
Instruction Manual - Page 6
......10
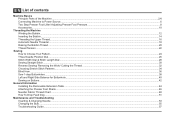
Threading the Machine Winding the Bobbin...12 Inserting the Bobbin ...14 Threading the Upper Thread...16 Automatic Needle Threader ...18 Raising the Bobbin Thread ...20 Thread Tension ...22
Sewing How to Choose Your Pattern...24 Three Needle Position Dial ...26 Stitch Width Dial & Stitch Length Dial ...28 Sewing Straight Stitch...30 Reverse Sewing/ Removing the Work/ Cutting the Thread ...32...
Instruction Manual - Page 9
... dial
6
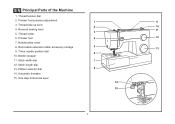
10. Automatic threader 15. Reverse sewing lever
11
3
5. Pattern selector dial
8
14. Removable extension table/ accessory storage
5
13
9. Stitch width dial
7
12. Bobbin stopper
11. One step buttonhole lever
14
15
2 Needle plate cover
8. Thread take-up lever 2
10
4. Stitch length dial
13. EN Principal Parts of the Machine
1. Presser foot pressure...
Instruction Manual - Page 11

Horizontal spool pin
17. Handwheel
20. Upper thread guide
25. Face plate
20
26. Hole for second spool pin
17
19. Buttonhole stitch balance adjustment slot
18
21. ... Handle
21
27. Power and light switch 19
22. Presser foot lifter 22
28. Bobbin winding spindle
16
18. Bobbin thread guide
24. Drop feed control
29. Foot speed control 30. EN Principal Parts of the...
Instruction Manual - Page 13
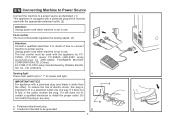
... not in doubt of electric shock, this plug is wider than the other). Unplug power cord when machine is not in the outlet, reverse the plug. Co., Ltd. (Vietnam)
Sewing light
1
Press main switch (A) to be used with a polarized plug (one way. If it still does not fit, contact a qualified electrician to...
Instruction Manual - Page 17
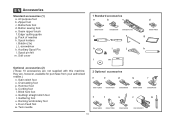
All purpose foot b. Button sewing foot e. Edge/ quilting guide g. Cording foot r. Quilting/ straight stitch foot t. Bobbin (3x) j. ... a. L-screwdriver k. Pack of needles h. Auxiliary Spool Pin l. Satin stitch foot o. Seam ripper/ brush f. Spool holders i. Gathering foot u. they are not supplied with this machine; Twin needle
2 Optional accessories
n
o
p
...
Instruction Manual - Page 19

... spool pin. (1/2)
- Cut thread. (9) 2
-
Wind thread clockwise around bobbin winder tension discs. (4)
- Snap thread into thread guide. (3)
- Push bobbin spindle to the left (10) and remove. Please Note:
When the bobbin winder spindle is in "bobbin winding"
position, the machine will not sew and the handwheel turn. Step on spindle. (5)
- To start sewing, push the bobbin winder...
Instruction Manual - Page 21
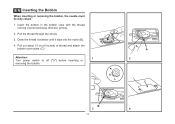
EN Inserting the Bobbin
When inserting or removing the bobbin, the needle must be fully raised.
1. Pull the thread through the slit (A).
3. Draw the thread clockwise until it slips into the notch (B).
4. Pull out about 15 cm (6 inches) of thread and attach the bobbin cover plate. (C)
Attention:
1
Turn power switch to off ("O") before inserting or...
Instruction Manual - Page 23
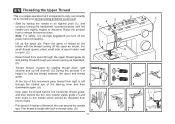
... left through pre-tension spring as by not doing so several sewing problems could result.
- Now pass the thread behind the horizontal thread guide, and then behind the thin wire needle clamp guide (7) and then down right channel and up the spool pin.
Draw thread from front to release the tension discs. Start by leading...
Instruction Manual - Page 25
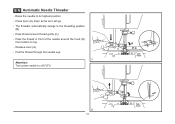
The threader automatically swings to off ("O")! Pass thread around the hook (D)
from bottom to its highest position. - A C
B D
A
2 18 Press lever (A) down as far as it will go. -
EN Automatic Needle Threader
- Pull the thread through the needle eye.
1 Attention: Turn power switch to the threading position
(B). - Pass the thread in front of the needle around thread guide ...
Instruction Manual - Page 27
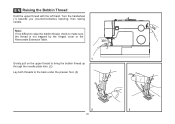
Note: If it is difficult to raise the bobbin thread, check to make sure the thread is not trapped by the hinged cover or the Removable Extension Table.
1 Gently pull on the upper thread to bring the bobbin thread up through the needle plate hole. (2) Lay both threads to the back under the presser foot. (3)
2
3
20 Turn...
Instruction Manual - Page 31

... a stretch stitch pattern, and information on how to Choose Your Pattern
The diagram on this page display the stitch patterns available on the machine. Three Needle Position Dial c.
Reverse Sewing Lever b. Stitch Width Dial d.
Stitches in gray.
Use the Stitch Width Dial (c) to adjust the stitch length as desired. Pattern Selector Dial
ABCDE...
Instruction Manual - Page 35
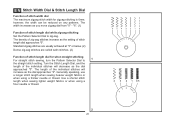
... while zig-zag stitching Set the Pattern Selector Dial to
1
the straight stitch setting. Generally speaking, use
a longer stitch length when sewing heavier weight fabrics or
when using a
finer needle or thread.
4 3 2 1 0.5
2
28 "6". (1)
Function of zig-zag stitches increase as you move zigzag dial from "0" - EN Stitch Width Dial & Stitch Length Dial
Function...
Instruction Manual - Page 37
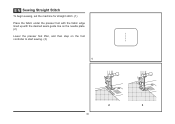
EN Sewing Straight Stitch
To begin sewing, set the machine for straight stitch. (1) Place the fabric under the presser foot with the fabric edge lined up with the desired seam guide line on the needle plate. (2) Lower the presser foot lifter, and then step on the foot controller to start sewing. (3)
1
2
3
30
Instruction Manual - Page 39
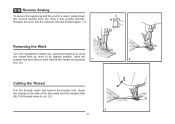
... down to its highest position, raise the
presser foot and remove work behind the needle and presser 1
2
foot. (2)
Cutting the Thread
Pull the threads under and behind the presser foot.
Pull threads down
the reverse sewing lever (A). A
Release the lever and the machine will sew forward again. (1)
Removing the Work
Turn the handwheel toward you (counterclockwise) to bring
the...
Instruction Manual - Page 43
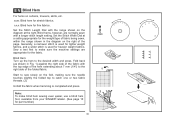
..., making sure the needle touches slightly the folded top to make blind hem sewing even easier, use a blind hem foot, available from your SINGER® retailer. (See page 10 for the fabric. M
Set the Stitch Length Dial with a longer stitch length setting. Sew a test first to catch one or two fabric threads. (2)
Unfold the fabric...
Instruction Manual - Page 45
... the marks on the
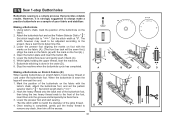
fabric. 2. Stop the machine when the buttonhole cycle has completed. Lower the presser foot and start the machine. 7. Set the stitch width at "6". Set...Once sewing is sewn the
legs will be adjusted according to always make a
M
practice buttonhole on stretch fabric, hook heavy thread or
cord under the buttonhole foot.
EN Sew 1-step Buttonholes
Buttonhole sewing is ...
Instruction Manual - Page 49
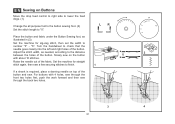
Set the machine for straight
a
2
ba b
stitch again, then sew a few securing stitches to number "3" - Turn the handwheel to check that the needle goes cleanly into the left and right holes of the button. EN Sewing on the button with 4 holes, sew through the front two holes first, push the work forward and then sew through the back...
Instruction Manual - Page 55
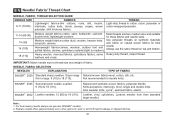
.... For best sewing results always use the same thread on natural woven fabrics for best
Heavyweight fabrics-canvas, woolens, outdoor tent and quilted fabrics, denims, upholstery material (light to 18 (110). IMPORTANT: Match needle size to 18 (110).
results. NEEDLE, FABRIC SELECTION
NEEDLES
EXPLANATION
TYPE OF FABRIC
SINGER® 2020 Standard sharp needles.
SINGER®...
Instruction Manual - Page 64
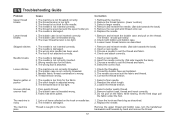
... fabric while sewing, let the feed dogs pull
the fabric under the foot.
1. Insert the needle correctly. (flat side towards the back) 5. Correct the thread tension.
1. Readjust the stitch length. 3. Do not pull on the thread. Replace the needle. Skipped stitches
Needle breaks
Loose stitches
Seams gather or pucker Uneven stitches, uneven feed
1. The machine is too...
Similar Questions

I Get E7 Error Message On My Singer Model 7258 Sewing Machine. There Is No Refe
Error message E7 is up on my Singer Stylist model 7258 sewing machine. It is not working at all. I t...
Error message E7 is up on my Singer Stylist model 7258 sewing machine. It is not working at all. I t...
(Posted by ebellamybellamy9 5 years ago)

Sewing Machine Model 5523 Page 53 In Manual Does Not Show Me How To Attach Pres
The page in your instructions I had and was reading it when it deleted
The page in your instructions I had and was reading it when it deleted
(Posted by ramseyrobert 7 years ago)

How Do I Set Up The Machine To Use The Buttonhole Fot For The Singer Scholastic
singer scholastic sewing machine model 5523
singer scholastic sewing machine model 5523
(Posted by sharitaylor91 8 years ago)

Needle Positions
My sewing machine needle adjustment is an 1/8" Off. It does not matter how many times I try to set t...
My sewing machine needle adjustment is an 1/8" Off. It does not matter how many times I try to set t...
(Posted by Jandjmason 9 years ago)

Beeping From Singer Sewing Machine Stylist Ii 5625
My sewing machine will beep and stop sewing after three inches of sewing. I have taken it to be repa...
My sewing machine will beep and stop sewing after three inches of sewing. I have taken it to be repa...
(Posted by arusheria 9 years ago)