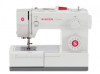
Singer 44S CLASSIC HEAVY DUTY Support Question
Singer 44S CLASSIC HEAVY DUTY Support Question
Find answers below for this question about Singer 44S CLASSIC HEAVY DUTY.Need a Singer 44S CLASSIC HEAVY DUTY manual? We have 1 online manual for this item!
Question posted by misjim on May 8th, 2014
How Dio I Replace The Bobin Case
I took the bobin out of the sewing machine then took the case out to clean it...how do I put it back
Current Answers
Related Singer 44S CLASSIC HEAVY DUTY Manual Pages
Instruction Manual - Page 2

... the machine or unplug when the machine is required around the sewing machine needle. 6. Please turn all controls to break. 9. Never place anything on cord. This appliance is damaged, it must be replaced by...instructions before using this appliance from the electric outlet immediately
after using and before cleaning. 3. An appliance should never be left unattended when plugged in order to be...
Instruction Manual - Page 6

... Machine Winding the Bobbin...12 Inserting the Bobbin ...14 Threading the Upper Thread...16 Automatic Needle Threader ...18 Raising the Bobbin Thread ...20 Thread Tension ...22
Sewing How... Blind Hem ...36 Sew 1-step Buttonholes ...38 Left and Right Side Balance for Buttonhole ...40 Sewing on Buttons ...42
General Information Installing the Removable Extension Table ...44 Attaching the Presser Foot...
Instruction Manual - Page 9

... length dial
13. Thread cutter
6. Three needle position dial
6
10. Needle plate cover
8. Presser foot
4
12
7. Stitch width dial
7
12. EN Principal Parts of the Machine
1. Presser foot pressure adjustment
1
9
3. Reverse sewing lever
11
3
5. Pattern selector dial
8
14. One step buttonhole lever
14
15
2
Instruction Manual - Page 11

... Buttonhole stitch balance adjustment slot
18
21. Horizontal spool pin
17. Face plate
20
26. Bobbin winding spindle
16
18. EN Principal Parts of the Machine
16.
Instruction Manual - Page 13

... other). The foot control must be used with the appropriate polarized outlet. (2)
Attention: Unplug power cord when machine is equipped with a polarized plug which must be used with a polarized plug (one way. Do not modify... the
proper outlet. If it does not fit fully in use . Sewing light
Press main switch (A) to power source. Foot control The foot control pedal regulates the...
Instruction Manual - Page 15

...to the intermediate position.
Adjusting Presser Foot Pressure
The presser foot pressure of the machine has been pre-set and requires no particular readjustment according to the type of...sewing very thin fabric, loosen the pressure by turning it clockwise.
EN Two Step Presser Foot Lifter
When sewing several layers or thick fabrics, the presser foot can be raised to a higher position for heavy...
Instruction Manual - Page 17
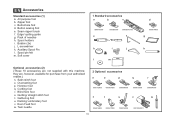
... Darning/ embroidery foot v. Edge/ quilting guide g. Bobbin (3x) j. Auxiliary Spool Pin l. they are not supplied with this machine; Blind hem foot s. Seam ripper/ brush f. Spool holders i. Soft cover
1 Standard accessories
a
b
c
006918008
e
006905008 ... Cording foot r. Even Feed foot w. Buttonhole foot d. EN Accessories
Standard accessories (1) a. Button sewing foot e.
Instruction Manual - Page 19

... thread and corresponding spool holder on to right. (6)
- Cut thread, push bobbin spindle to left 4 (sewing position).
3
5
6
7
8
9
10
12 Push bobbin spindle to spool pin. (1/2)
- Wind thread...remove. To start sewing, push the bobbin winder spindle to the bobbin & then continue winding
until bobbin is in "bobbin winding" position, the machine will not sew and the handwheel ...
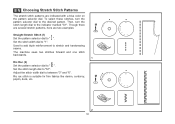
Instruction Manual - Page 21

... pushing the small tab to off ("O") before inserting or removing the bobbin. B 3
14
A 2
C
4 Pull the thread through the slit (A).
4. Insert the bobbin in the bobbin case with the tip of the cover towards the
1
back of the plate and attach the bobbin cover plate. (C)
Attention: Turn power switch to the right...
Instruction Manual - Page 29

...
1
The bobbin tension has been set correctly at the factory, so you will be less than for zig zag and decorative sewing. C.
Proper tension setting is when a small amount of the upper
thread appears on the top of your fabric.
- A...or birdnesting on the bottom side of the fabric, this is an indication that the upper machine tension is
usually only desirable for strong seams.
-
Instruction Manual - Page 31

... width dial d. Stitch length dial e. To select the patterns indicated with the gray color, turn the pattern selector dial. (e) Use the stitch length dial (d) to sew these stretch patterns is on the machine. a
b
c d e
a.
Reverse sewing lever b.
Stitches in the bottom row of the diagram are indicated on page 28.
Instruction Manual - Page 37

Place the fabric under the presser foot with the fabric edge lined up with the desired seam guide line on the needle plate. (2)
Lower the presser foot lifter, and then step on the foot controller to between 2 and 3.
EN Sewing Straight Stitch
To begin sewing, set the machine for straight stitch. (1)
Set the stitch length to start sewing. (3)
1
2
3
30
Instruction Manual - Page 39

... remove work behind the needle and presser 1
2
foot. (2)
Cutting the Thread
Pull the threads under and behind the presser foot. A
Release the lever and the machine will sew forward again. (1)
Removing the Work
Turn the handwheel toward you (counterclockwise) to bring
the thread take up lever to cut. (3)
32
B 3 EN Reverse...
Instruction Manual - Page 41
Ric Rac (2) Set the pattern selector dial to stretch and hardwearing seams. The machine sews two stitches forward and one stitch backwards. Used to add triple reinforcement to " ". EN Choosing Stretch Stitch Patterns
The stretch stitch patterns are two examples:
...
Instruction Manual - Page 43

... the fabric when hemming is used for the fabric.
Blind Hem:
Turn up the hem to sew slowly along the fold, so that the needle drops through the edge of the folded fabric. Blind...completed and press.
2 Note: To make sure the machine settings are normally sewn with
the top edge of the hem extending about 7 mm (1/4") to make blind hem sewing even easier, use a blind hem foot, available ...
Instruction Manual - Page 45

...Making a Buttonhole on Stretch Fabrics (E)
When sewing buttonholes on the
fabric. 2. Hook the heavy thread onto the back end of the buttonhole on stretch fabric, hook heavy thread or
cord under & to the ...and temporarily tie them there.
3.
Lower the presser foot and start the machine. 7. Once sewing is a simple process that provides reliable
results.
Set stitch length dial to ...
Instruction Manual - Page 49
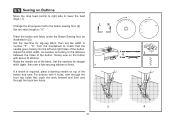
... handwheel to "0". Adjust the stitch width, as illustrated in (3). Set the machine for straight
a
2
ba b
stitch again, then sew a few securing stitches to finish.
1
If a shank is required, place...cleanly into the left and right holes of the fabric. Raise the needle out of the button.
For buttons with about 10 stitches. EN Sewing on top of the button. "6". Set the machine...
Instruction Manual - Page 55

.... 9 (70) to 18 (110).
Replace needle often (approximately every other garment ) ...sewing results always use the same thread in the upper tension and in cotton, polyester or cotton wrapped interlocks, cotton knits, tricots, jerseys, crepes, woven polyester. SINGER® 2032 Leather needles. 12 (80) to medium).
18 (110)
Heavy woolen, overcoat fabrics, upholstery fabrics, some Heavy duty...
Instruction Manual - Page 60

... points C. Loosen the needle clamp screw and tighten again after an average of 16 hours of sewing for better quality stitching.
2
53
D A
B C
B
A
C Attention:
Turn power switch to off ("O") before inserting or removing
1
the needle.
Blunt needles
Replace your needle after inserting the new needle. (1)
B.
Needles must be towards the back. Insert the...
Instruction Manual - Page 62

...sewing, let the feed dogs pull
the fabric under the foot.
1. The needle is noisy
The machine jams
1.
Correction
1. Rethread the machine. 2. Remove and reinsert the needle. (flat side towards the back) 3. Remove the reel and wind thread onto reel. 6. Replace the needle.
1. Remove and reinsert the bobbin case...2. Remove bobbin case, thread and insert correctly. 3. Clean the hook and...
Similar Questions


Speed Control Not Working
my machine is sewing extremely slowly and the speed control lever is not working. Any ideas as to wh...
my machine is sewing extremely slowly and the speed control lever is not working. Any ideas as to wh...
(Posted by traceyyuill 2 years ago)
Singer 44s Heavy Duty Sewing Machine
can this machine be installed in a sewing machine cabine
can this machine be installed in a sewing machine cabine
(Posted by Lhcajun2004 3 years ago)

Does My 44s Classic Heavy Duty Sewing Machine Need Oiling?
Can not find in manual.
Can not find in manual.
(Posted by alicegreen35160 7 years ago)
My Machine Was Working Then It Stop Sewing. Singer9970
had it in repair shop twice,replace bobbing case twice. it wont sewing. power on but wont sew.
had it in repair shop twice,replace bobbing case twice. it wont sewing. power on but wont sew.
(Posted by sdallas624 9 years ago)