Get support for Singer 4423 Heavy Duty

Singer 4423 Heavy Duty Support Question

Singer 4423 Heavy Duty Support Question

Find answers below for this question about Singer 4423 Heavy Duty.
Need a Singer 4423 Heavy Duty manual? We have 1 online manual for this item!
Question posted by knightmarian on September 15th, 2013

Shuttle No Longer Threading Bottom Stitch

bobbin case kept jumping out of shuttle so often I finally just left the screws out. Everything else works. The bobbin case no longer turns at all.

Current Answers

Answer #1: Posted by TommyKervz on September 15th, 2013 6:09 AM
This answer was accepted by the poster of the original question.
TommyKervz

Member since:
January 10th, 2013

Points: 17,776,813
1,100
points
http://www.singerco.com/support/frequently-asked-questions

The below is quoted from the link above

First, make sure the bobbin-winding spindle (located on top of your machine) has been pushed back to the left for sewing. If it is not in the correct position, the needle will not go down and pick-up your bobbin thread.

Next, make sure your needle is inserted correctly, as far as it will go, with the flat side facing back. Also, make sure your bobbin is in correctly (not backwards) and that the upper tension disks of your machine are threaded correctly. Make sure the presser foot is up when seating the thread through the upper tension.

Now, it’s time to draw up your bobbin thread.

Turn the handwheel (TOWARDS YOU ONLY, never turn the handwheel away from you) and hold the needle thread lightly. Tug on it as the needle goes down and then comes up again. You should see a small loop come up through the needle plate (this is your bobbin thread), using the tip of a narrow object like a pencil or scissors, pull the loop up and then pull both threads (top and bobbin) under the foot and toward the back of the machine.

If the above troubleshooting tips did not solve your issues, you may need to have your machine repaired for timing. If the timing is out, the needle thread is not meeting the bobbin thread in time to form a stitch.


Hope that is helpful.
Kervz at www.satechhelp.co.za

Related Singer 4423 Heavy Duty Manual Pages

Instruction Manual - Page 2

... unplug when the machine is not working properly, if it to break. 7. Do not use bent needles. 8. To disconnect, turn off ("O") when making any air openings blocked. WARNING - Always unplug sewing machine from outlet. 15. Never drop or insert any object into water. Do not unplug by the manufacturer as threading needle, changing needle, threading bobbin, or changing...
Instruction Manual - Page 6

......10 Threading the Machine Winding the Bobbin...12 Inserting the Bobbin ...14 Threading the Upper Thread...16 Automatic Needle Threader ...18 Raising the Bobbin Thread ...20 Thread Tension ...22 Sewing How to Choose Your Pattern...24 Three Needle Position Dial ...26 Stitch Width Dial & Stitch Length Dial ...28 Sewing Straight Stitch...30 Reverse Sewing/ Removing the Work/ Cutting the Thread ...32...
Instruction Manual - Page 9

...-up lever 2 10 4. Reverse sewing lever 11 3 5. Thread cutter 6. Needle plate cover 8. Bobbin stopper 11. EN Principal Parts of the Machine 1. Automatic threader 15. Removable extension table/ accessory storage 5 13 9. Presser foot 4 12 7. Three needle position dial 6 10. One step buttonhole lever 14 15 2 Thread tension dial 2. Stitch length dial 13.
Instruction Manual - Page 11

... foot lifter 22 28. Power cord 4 23 24 25 26 27 29 30 28 Foot speed control 30. Main plug socket 23. Upper thread guide 25. Handle 21 27. Bobbin winding spindle 16 18. Buttonhole stitch balance adjustment slot 18 21. Hole for second spool pin 17 19. EN Principal Parts of the...
Instruction Manual - Page 13

... a polarized plug which must be used with the appropriate polarized outlet. (2) Attention: Unplug power cord when machine is not in use . Co., Ltd. (Vietnam) Sewing light 1 Press main switch (A) to power source. Unplug power cord when machine is not in doubt of electric shock, this plug is intended to fit in a polarized outlet...
Instruction Manual - Page 15

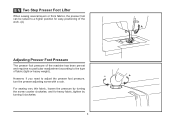
.... EN Two Step Presser Foot Lifter When sewing several layers or thick fabrics, the presser foot can be raised to a higher position for heavy fabric, tighten by turning it clockwise. 8 For sewing very thin fabric, loosen the pressure by turning the screw counter clockwise, and for easy positioning of the work. (A) A Adjusting Presser Foot Pressure The presser...
Instruction Manual - Page 17

... d. Spool holders i. Bobbin (3x) j. they are not supplied with this machine; Blind hem foot s. Darning/ embroidery foot v. EN Accessories Standard accessories (1) a. Button sewing foot e. Hemmer foot ...are , however, available for purchase from your authorized retailer.) n. Satin stitch foot o. Quilting/ straight stitch foot t. Twin needle 2 Optional accessories n o p q r 006172008...
Instruction Manual - Page 19

... spindle is in "bobbin winding" position, the machine will not sew and the handwheel turn. Thread bobbin as illustrated and place on foot control pedal. (8) - Cut thread. (9) 2 - To start sewing, push the bobbin winder spindle to right. (6) - Push bobbin spindle to the left (10) and remove. Hold thread end. (7) 1 - EN Winding the Bobbin - Snap thread into thread guide. (3) - Step...
Instruction Manual - Page 23

... is helpful to hold the thread between the spool and thread guide. - Draw thread from right to left channel. (5) During this movement pass thread from spool through the upper thread guide (3) and pulling thread through the slotted eye of thread to the rear beyond the needle eye. Start by not doing so several sewing problems could result. - Raise the...
Instruction Manual - Page 29

... you do not need to adjust it. 1 Please note: - A B - Normal thread tension for zig zag and decorative sewing. Normal thread tension for straight stitch sewing. For zig zag and decorative sewing stitch functions, thread tension should generally be between "3" and "5". Turn dial to lower number. Turn dial to higher number. D. There is when a small amount of the upper...
Instruction Manual - Page 31

... of the diagram are indicated on the machine. a b c d e a. Stitch Length Dial e. The Pattern Selector Dial may be turned in blue. Three Needle Position Dial c. Stitch Width Dial d. Use the Stitch Width Dial (c) to adjust the width of the diagram are indicated on page 34. Stitches in the top of the stitch as desired for the project. To...
Instruction Manual - Page 35

... as the dial approached "0". Generally speaking, use a longer stitch length when sewing heavier weight fabrics or when using a finer needle or thread. 2 28 4 3 2 1 0.5 Use a shorter stitch length when sewing lighter weight fabrics or when using a thicker needle or thread. Turn the Stitch Length Dial, and the length of the individual stitches will increase as the setting of the...
Instruction Manual - Page 37

EN Sewing Straight Stitch To begin sewing, set the machine for straight stitch. (1) Place the fabric under the presser foot with the fabric edge lined up with the desired seam guide line on the needle plate. (2) Lower the presser foot lifter, and then step on the foot controller to start sewing. (3) 1 2 3 30
Instruction Manual - Page 39

Sew a few reverse stitches. A Release the lever and the machine will sew forward again. (1) Removing the Work Turn the handwheel toward you (counterclockwise) to bring the thread take up lever to the side of a seam, press down to cut. (3) 32 B 3 Pull threads down the reverse sewing lever (A). EN Reverse Sewing To secure the beginning and the end of the face plate...
Instruction Manual - Page 41

... Dial. To select these stitches, turn the Stitch Length Dial to between "3" and "6". Ric Rac (2) Set the Pattern Selector Dial to the desired pattern. M 1 M 2 34 Ric Rac Stitch is suitable for firm fabrics like denim, corduroy, poplin, duck, etc. Used to add triple reinforcement to stretch and hardwearing seams. The machine sews two stitches forward and one...
Instruction Manual - Page 43

M Set the Stitch Length Dial with a longer stitch length setting. Blind Hem: Turn up the hem to make blind hem sewing even easier, use a blind hem foot, available... right side of the page. Generally, a narrower stitch is used for lighter weight fabrics, and a wider stitch is completed and press. 2 Note: To make sure the machine settings are normally sewn with the range shown on...
Instruction Manual - Page 45

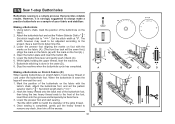
... is completed, gently pull the heavy thread to E remove any slack, then trim off the excess. 38 3 4 2 1 D Set the stitch width at "6". When the buttonhole is a simple process that provides reliable results. Stop the machine when the buttonhole cycle has completed. a b A PUSH B C Making a Buttonhole on Stretch Fabrics (E) When sewing buttonholes on the fabric with the...
Instruction Manual - Page 49

..., according to check that the needle goes cleanly into the left and right holes of the button. Adjust the stitch width, as illustrated in (3). For buttons with about 10 stitches. Set the machine for zig-zag stitch, then set the width to number "3" - EN Sewing on Buttons Move the drop feed control to right side to...
Instruction Manual - Page 55

... and double knits. Replace needle often (approximately every other garment ) and/ or at first thread breakage or skipped stitches. 48 Heavy woolen, overcoat fabrics, upholstery fabrics, some Heavy duty thread, carpet thread. EN Needle/ Fabric/ Thread Chart NEEDLE, FABRIC, THREAD SELECTION GUIDE NEEDLE SIZE 9-11 (70-80) FABRICS Lightweight fabrics-thin cottons, voile, silk...
Instruction Manual - Page 64

... needle is noisy The machine jams 1. Poor quality thread. 2. The machine is not correctly inserted. 3. Thread is too tight. 3. Remove and reinsert the bobbin case and pull on the fabric while sewing, let the feed dogs pull the fabric under the foot. 1. The thread should pull easily. 2. Check both bobbin and bobbin case. 3. Choose a needle to suit the thread and fabric. 4. Do...

Similar Questions

I Get E7 Error Message On My Singer Model 7258 Sewing Machine. There Is No Refe
Error message E7 is up on my Singer Stylist model 7258 sewing machine. It is not working at all. I t...
(Posted by ebellamybellamy9 5 years ago)
My Singer Sewing Machine 4423 Will Not Do Anything. All You Can Hear Is Motor
I hear motor the shaft spins how to change bel
(Posted by Marybeverly4576477 8 years ago)
Beeping From Singer Sewing Machine Stylist Ii 5625
My sewing machine will beep and stop sewing after three inches of sewing. I have taken it to be repa...
(Posted by arusheria 9 years ago)
Ask a New Question
Use the box below to post a new question about this Singer product .
Points & Prizes
  • You can earn points for nearly everything you do on HelpOwl.com
  • You can trade in those points for gift cards at leading retailers such as Amazon.com and Walmart
  • It's that simple!
See How it Works
Create a Free Account

Singer Manuals

Find free Singer 4423 Heavy Duty manuals and user guides available at ManualOwl.com. Try out our unique manual viewer allowing you to interact with manuals from directly within your browser!

Singer Reviews

View thousands of Singer user reviews and customer ratings available at ReviewOwl.com.

Contact Information

Complete Singer customer service contact information including steps to reach representatives, hours of operation, customer support links and more from ContactHelp.com.

Scoreboard Ratings

See detailed Singer customer service rankings, employee comments and much more from our sister site.