Singer 3232 Simple Support Question
Singer 3232 Simple Support Question
Find answers below for this question about Singer 3232 Simple.Need a Singer 3232 Simple manual? We have 1 online manual for this item!
Question posted by csaundraj on May 27th, 2015
No Stitch
I got me a Singer 3232 it didn't have a manual & I can't get it 2 sew a stitch... what do I not have set on the machine correctly...
Current Answers
Answer #1: Posted by TechSupport101 on May 27th, 2015 7:33 AM
TechSupport101

Member since:
May 24th, 2013 Points: 12,171,305

Member since:
May 24th, 2013 Points: 12,171,305
Download the manual from here https://www.helpowl.com/manuals/Singer/3232Simple/179348 for closer reference.
Related Singer 3232 Simple Manual Pages
Instruction Manual - Page 2
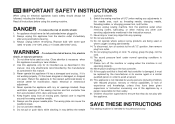
...sewing machine is being used or where oxygen is intended for household use as threading needle, changing needle, threading bobbin, or changing presser foot, and the like. 10. WARNING - Do not pull or push fabric while stitching....
Use this
manual. Keep fingers away from the electric outlet immediately
after using this appliance is required around the sewing machine needle. 6....
Instruction Manual - Page 6

... ...19 Raising the Bobbin Thread ...21
Sewing How to Choose Your Pattern ...23 Stitch Width Dial & Stitch Length Dial...25 Sewing Straight Stitch...27 Reverse Sewing/ Removing the Work/ Cutting the Thread ...29 Choosing Stretch Stitch Patterns...31 Blind Hem ...33 Sew 1-Step Buttonhole ...35 Sewing on Buttons (Model 3221)...37 Sewing on Buttons (Model 3232)...39
General Information Installing the...
Instruction Manual - Page 9
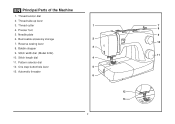
...4. Presser foot
8
5. Bobbin stopper
3
9. Stitch width dial (Model 3232)
11
10. Automatic threader 6
12 13
2 Removable accessory storage
2
7. Reverse sewing lever
10
8. Stitch length dial
4
11. Needle plate
9
6. Pattern selector dial
12. One step buttonhole lever
5
13. Thread tension dial
2. Thread take-up lever
3. EN Principal Parts of the Machine
1.
Instruction Manual - Page 11

... spool pin
14
20
17. Presser foot lifter
25. Main plug socket
16
22
20. Handle
24. Face plate
23. EN Principal Parts of the Machine
14. Foot speed control
26. Handwheel
15
18. Power cord
18
19 25
26
4 Bobbin thread guide
17
23
21. Horizontal spool pin
15. Upper...
Instruction Manual - Page 13
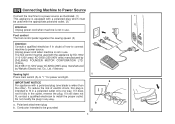
...). The foot control must be used with a polarized plug (one way. To reduce the risk of how to connect machine to power source.
Conductor intended to " l " for power and light. Co., Ltd. (Vietnam)
Sewing light
1
Press main switch (A) to be grounded
b 2
6
A 3 If it does
not fit fully in the outlet, reverse the...
Instruction Manual - Page 16
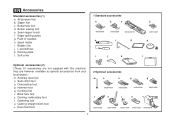
Pack of needles h. they are not supplied with this machine; Cording foot r. Button sewing foot e. L-screwdriver k. Overcasting foot p. Buttonhole foot d. Spool holder i. Satin stitch foot o. Blind hem foot s. Even-feed foot
2 Optional accessories
m
n
o
p
q
006804008
006803008
006800008
006810008
r
s
t
u
v
006812008
006016008
006917008 006916008 ...
Instruction Manual - Page 18
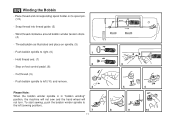
...Note: When the bobbin winder spindle is in "bobbin winding" position, the machine will not sew and the hand wheel will not turn. Wind thread clockwise around bobbin winder tension discs. (4)
- ...Cut thread. (9)
- To start sewing, push the bobbin winder spindle to right. (6)
1
- Hold thread end. (7) 2
- Step on...
Instruction Manual - Page 22
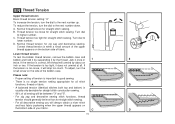
.... Thread tension too tight for straight stitch sewing.
If
the tension is correct, the thread will always obtain a nicer stitch
and less fabric puckering when the upper thread appears on the bottom side of all stitch
functions, thread or fabric. EN Thread Tension
Upper thread tension
Basic thread tension setting: "4"
To increase the tension, turn the...
Instruction Manual - Page 24
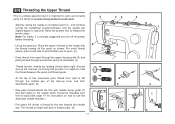
... spool and thread guide.
- Note: For safety, it is helpful to carry out correctly as by leading thread down to the needle which should be threaded from spool through the... by not doing so several sewing problems could result.
- Pull about 6-8 inches of the take-up lever and then
downwards again. (6)
2
3
4
- EN Threading the Upper Thread
This is a simple operation but it is strongly...
Instruction Manual - Page 30
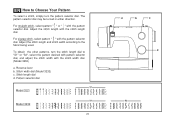
... patterns, turn the pattern selector dial. For straight stitch, select pattern " " or " " with the stitch length dial. Adjust the stitch length with the pattern selector dial. For zigzag stitch, select pattern " " with the stitch width dial. (Model 3232)
a. Stitch width dial (Model 3232) c. Reverse lever b. Adjust the stitch length and stitch width according to "S1" or "S2", select the...
Instruction Manual - Page 32
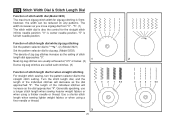
The width increases as the setting of stitch
length dial approaches "0".
1
Neat zig-zag stitches are usually achieved at "2.5" or below. (3)
Dense zig-zag stitches are called satin stitches. (3)
Function of stitch length dial for when straight stitching
For straight stitch sewing, turn the pattern selector dial to zig-zag. (Model 3232)
The density of zig-zag stitches increase as you move...
Instruction Manual - Page 34
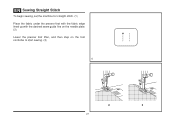
EN Sewing Straight Stitch
To begin sewing, set the machine for straight stitch. (1) Place the fabric under the presser foot with the fabric edge lined up with the desired seam guide line on the needle plate. (2) Lower the presser foot lifter, and then step on the foot controller to start sewing. (3)
1
2
3
27
Instruction Manual - Page 36
...
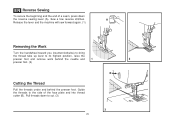
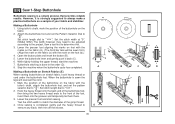
Cutting the Thread
Pull the threads under and behind the presser foot. A
Release the lever and the machine will sew forward again. (1)
Removing the Work
Turn the handwheel toward you (counterclockwise) to bring
the thread take up...cut. (3)
3
29 Pull threads down
the reverse sewing lever (A).
EN Reverse Sewing
To secure the beginning and the end of the face plate and into thread cutter...
Instruction Manual - Page 38
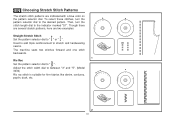
... seams. The machine sews two stitches forward and one stitch backwards.
1 Ric Rac Set the pattern selector dial to the desired pattern. EN Choosing Stretch Stitch Patterns
The stretch stitch patterns are two examples:
Straight Stretch Stitch Set the pattern selector dial to the indicator marked "S1". Adjust the stitch width dial to between "3" and "5". (Model 3232) Ric rac stitch is suitable...
Instruction Manual - Page 40

... shown on the right of the folded fabric.
Sew a test first to make blind hem sewing even easier, use a blind hem foot, available from your SINGER® retailer. (See page 9
for lighter weight fabrics, and a wider stitch is completed and press.
2
Note:
To make sure the machine settings are normally sewn with
1
the top edge of...
Instruction Manual - Page 42
... the presser foot and start the machine.
7. EN Sew 1-Step Buttonhole
Buttonhole sewing is a simple process that provides reliable results. Using tailor's chalk, mark the position of the buttonhole on the fabric with the mark on stretch fabric, hook heavy thread or cord under the buttonhole foot. Set stitch length dial to match the diameter of...
Instruction Manual - Page 44
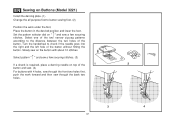
... distance between the two holes of the button without hitting the button. Set the pattern selector dial on " " and sew a few securing stitches. (3)
If a shank is required, place a darning needle on top of the
1
2
button and sew. (4)
For buttons with about 10 stitches. EN Sewing on the button with 4 holes, sew through the back two holes.
3
4
37
Instruction Manual - Page 46
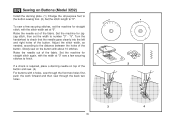
... the distance between the holes of the fabric. Set the machine for straight stitch, with 4 holes, sew through the front two holes first, push the work forward and then sew through the back two holes.
3
4
39 Raise the needle out of the button. EN Sewing on Buttons (Model 3232)
Install the darning plate. (1) Change the all purpose...
Instruction Manual - Page 52
...
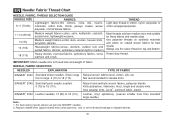
Also sweater knits, Lycra®, swimsuit fabric, elastic. For best sewing results always use the same thread on natural woven fabrics for best
...SINGER® 2045 Semi-ball point needle, scarfed. 9 (70) to 18 (110). Knits-polyesters, interlocks, tricot, single and double knits. Replace needle often (approximately every other garment ) and/ or at first thread breakage or skipped stitches...
Instruction Manual - Page 61
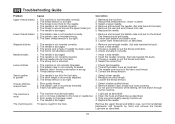
...hand and remove the thread. Readjust the stitch length. 3. Do not pull on the fabric while sewing, let it be lubricated.
1. Lubricate as described.
3. Replace the needle.
The needle is attached.
1. The wrong foot is damaged.
1. The machine is incorrectly adjusted. 3. The stitch length is not correctly threaded. 2. Poor quality thread. 2. Clean the hook...
Similar Questions

My Stitches Are Too Loose, How Do I Adjust Them? Nk
When i am sewing a straight stitch they are do loose they come right out, I have adjusted stitch siz...
When i am sewing a straight stitch they are do loose they come right out, I have adjusted stitch siz...
(Posted by reillyclan01 6 years ago)


Singer 3232
Every time I start to sew the foot does not move much and the thread gets stuck and bunches under th...
Every time I start to sew the foot does not move much and the thread gets stuck and bunches under th...
(Posted by Mwag405446616 9 years ago)

Singer 3232, The Bobbin Shuttle Came Out And I Cannot Put It Back
(Posted by antjeicl 9 years ago)

Problems With Singer 3232
I have a problem with my new singer3232 it bunches up when I do the straight stitch and makes a nois...
I have a problem with my new singer3232 it bunches up when I do the straight stitch and makes a nois...
(Posted by Becberry1 10 years ago)