Singer 3223 Simple Support Question
Singer 3223 Simple Support Question
Find answers below for this question about Singer 3223 Simple.Need a Singer 3223 Simple manual? We have 1 online manual for this item!
Question posted by dimiili on February 4th, 2013
Watt - Volt
How Many Watt And How Many Volt Is Singer 3223 Model. I Leave In Greece. I Want To Know If With An Adequate Adaptor This Machine Can Works To My Country If I Order This From America.
Current Answers
Answer #1: Posted by ARSiq on February 4th, 2013 3:32 AM
ARSiq

Member since:
January 10th, 2013 Points: 393,610

Member since:
January 10th, 2013 Points: 393,610
In your country should be voltage 220V, USA use 110. But it is possible to buy some devices from USA that's supports 220v. Ask the seller you want to buy from. Referring to user manual, there is version of this for use with 220V power.
Using adapter from 220 to 110 volt i would not recommend.
Related Singer 3223 Simple Manual Pages
Instruction Manual - Page 2

.... The sound pressure level under normal operating conditions is required around the sewing machine needle. 6. I Always unplug this appliance is being used or where oxygen is used as described in order to the off ("O") when making any air openings blocked. Always unplug sewing machine from the electrical outlet when removing covers, lubricating, or when making...
Instruction Manual - Page 6
... to Choose Your Pattern ...21 Stitch Width Dial & Stitch Length Dial...23 Sewing Straight Stitch...25 Reverse Sewing/ Removing the Work/ Cutting the Thread ...27 Choosing Stretch Stitch Patterns...29 Blind Hem ...31 Sew 4-Step Buttonhole ...33 Sewing on Buttons (Model 3223)...35 Sewing on Buttons (Model 3229)...37
General Information Installing the Removable Accessory Storage ...39 Attaching the...
Instruction Manual - Page 9
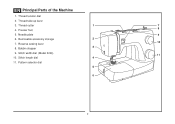
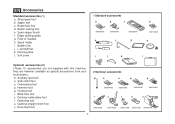
Presser foot
8
5. Stitch width dial (Model 3229)
11
10. Needle plate
9
6. Bobbin stopper
3
9. Pattern selector dial
5
6
2 Thread take-up lever
3. Thread tension dial
2. Removable accessory storage
2
7. Reverse sewing lever
10
8. Stitch length dial
4
11. Thread cutter
1
7
4. EN Principal Parts of the Machine
1.
Instruction Manual - Page 11
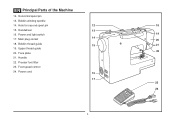
... thread guide 22
20. Power and light switch
19
17. Presser foot lifter
23. Handle
22. Horizontal spool pin
13. EN Principal Parts of the Machine
12. Bobbin winding spindle
14.
Instruction Manual - Page 13
... power and light.
Do not modify the plug in the outlet, reverse the plug. Co., Ltd. (Vietnam)
Sewing light
1
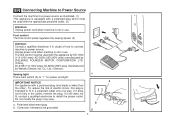
Press main switch (A) to install the proper outlet. To reduce the risk of how to connect machine to power source. a. IMPORTANT NOTICE
a
For appliance with a polarized plug (one blade is
intended to fit...
Instruction Manual - Page 16
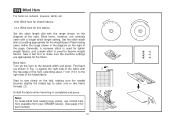
... spool pin n. Buttonhole foot d. Edge/ quilting guide g. L-screwdriver k. they are not supplied with this machine; EN Accessories
Standard accessories (1) a. Blind hem foot s. All purpose foot b. Zipper foot c. Button sewing foot e. Spool holder i. Soft cover
1 Standard accessories
a
b
c
006806008
006905008
e
f
006909008
g
d
006914008
h
i
j
k
l
Optional accessories (2) (These...
Instruction Manual - Page 18
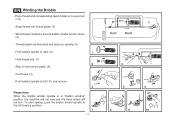
...thread into thread guide. (3)
- Hold thread end. (7) 2
- Cut thread. (9)
- To start sewing, push the bobbin winder spindle to spool pin. (1/2)
- Step on to the left (10) and remove....
4
Please Note: When the bobbin winder spindle is in "bobbin winding" position, the machine will not sew and the hand wheel will not turn. Thread bobbin as illustrated and place on spindle. (5)
-...
Instruction Manual - Page 22
... tension Basic thread tension setting: "4" To increase the tension, turn the dial to good sewing.
- To reduce the tension, turn the small screw on the bottom side of tension is no single... and "5".
- Turn
dial to higher number. Thread tension too tight for straight stitch construction
sewing.
- 90% of the bobbin case.
Lower thread tension
To test the bobbin thread tension, ...
Instruction Manual - Page 24
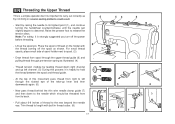
Place the spool of thread to carry out correctly as by not doing so several sewing problems could result.
- At the top of this process it is helpful to left... the spool as illustrated. (4)
- Draw thread from front to descend. EN Threading the Upper Thread
This is a simple operation but it is important to the rear beyond the needle eye. Start by leading thread down to the needle which...
Instruction Manual - Page 28
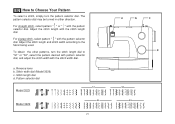
Pattern selector dial
Model 3223
3
4
2
1
Model 3229
3
4
2
1
S1 S1
21
a
b
c
d
S2 S2 Adjust the stitch length with the pattern selector dial.
For straight stitch, select pattern " " or " " with the stitch...How to Choose Your Pattern
To select a stitch, simply turn the stitch length dial to the fabric being used.
Reverse lever b. Stitch width dial (Model 3229) c. a.
Instruction Manual - Page 30

...-zag stitching
Set the pattern selector dial to " ". (2) (Model 3223)
Set the pattern selector dial to the straight stitch setting. "5". (1)
The stitch width dial is also the control for when straight stitching
For straight stitch sewing, turn the pattern selector dial to zig-zag. (Model 3229)
The density of zig-zag stitches increase as...
Instruction Manual - Page 32
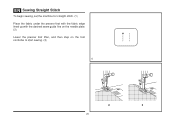
EN Sewing Straight Stitch
To begin sewing, set the machine for straight stitch. (1) Place the fabric under the presser foot with the fabric edge lined up with the desired seam guide line on the needle plate. (2) Lower the presser foot lifter, and then step on the foot controller to start sewing. (3)
1
2
3
25
Instruction Manual - Page 34
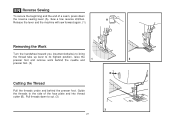
... down to its highest position, raise the presser foot and remove work behind the needle and
1
2
presser foot. (2)
B
Cutting the Thread
Pull the threads under and behind the presser foot. A
Release the lever and the machine will sew forward again. (1)
Removing the Work
Turn the handwheel toward you (counterclockwise) to bring
the thread take...
Instruction Manual - Page 36
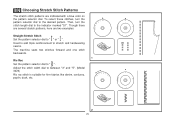
... the stitch length dial to " ". Adjust the stitch width dial to the desired pattern. Used to add triple reinforcement to stretch and hardwearing seams. The machine sews two stitches forward and one stitch backwards.
1 Ric Rac Set the pattern selector dial to the indicator marked "S1". Then, turn the pattern selector dial...
Instruction Manual - Page 38
...weight fabrics, and a wider stitch is completed and press.
2
Note: To make sure the machine settings are normally sewn with the range shown on the fold, making sure the needle touches slightly...for firm fabrics. Blind Hem:
Turn up the hem to make blind hem sewing even easier, use a blind hem foot, available from your SINGER retailer. (See page 9 for the fabric. Fold back
(as shown in...
Instruction Manual - Page 40

... to determine this. Take care not to the fabric. Set the stitch width at "5". (Model 3229) The width however may need to be sure that the buttonhole center line marked on fabric. 3. Note: Density varies according to sew too many stitches in the " " to the next step. Use seam ripper and cut...
Instruction Manual - Page 42
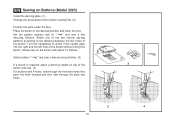
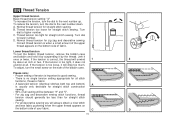
EN Sewing on Buttons (Model 3223)
Install the darning plate. (1) Change the all purpose foot to button sewing foot. (2)
Position the work forward and then sew through the front two holes first,
push the work under the foot.
Slowly sew on top of the button without hitting the button.
Turn the handwheel to the distance between the two holes...
Instruction Manual - Page 44
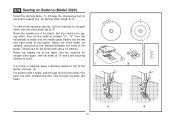
...work forward and then sew through the back two holes.
3
4
37 Set the machine for zigzag stitch, then set at "0" sew a few securing stitches, set the machine for straight stitch again, with the width at "0".
To sew...needle out of the button. Slowly sew on Buttons (Model 3229)
Install the darning plate. (1) Change the all purpose foot to the button sewing foot. (2) Set the stitch ...
Instruction Manual - Page 57
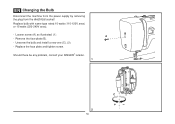
... and tighten screw. EN Changing the Bulb
Disconnect the machine from the power supply by removing the plug from the electrical socket! Loosen screw (A) as illustrated. (1) - Replace bulb with same type rated 10 watts (110-120V area) or 15 watts (220-240V area).
- B A
Should there be any problem, consult your SINGER® retailer. 1
C
2
50
Instruction Manual - Page 59
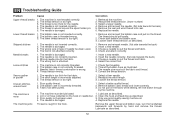
... thread. 2. Remove bobbin case, thread and insert correctly. 3. Only use good quality sewing machine oil.
4.
The machine is not inserted correctly. 2. The bobbin case is not threaded correctly. 2. The wrong.... 2. Loosen lower thread tension as described.
1. Do not pull on the fabric while sewing, let it be lubricated.
1. The needle is not correctly inserted. 3. The needle is...
Similar Questions

How To Oil The Model 3223 Of Singer Sewing Machine
I have the sewing machine singer, model 3223, I have the Manual too, BUT in the manual doesnt appear...
I have the sewing machine singer, model 3223, I have the Manual too, BUT in the manual doesnt appear...
(Posted by obejassainzanaeulalia 6 months ago)

Beeping From Singer Sewing Machine Stylist Ii 5625
My sewing machine will beep and stop sewing after three inches of sewing. I have taken it to be repa...
My sewing machine will beep and stop sewing after three inches of sewing. I have taken it to be repa...
(Posted by arusheria 9 years ago)

Where To Buy Sewing Machine Carrying Case For Model 3223
(Posted by Cqzusi 10 years ago)

258 Singer Sewing Machine
How do you lower feed dogs to be able to free-motion quilt?
How do you lower feed dogs to be able to free-motion quilt?
(Posted by vll 10 years ago)

Does This Sewing Machine Work In Australia As We Have 220 V Here Please
(Posted by jennymonte 11 years ago)